Red Hat Enterprise Linux(RHEL)について、よく使われるコマンド、コンテナ環境を用いたOpenShift Kubernetes の解説、基幹システムやPCI-DSSに必要なエッジセキュリティ、Dark Networkで用いられている技術を逆に利用したゼロトラスト (Zero Trust) システムによるVPN Systemなどの考え方をご紹介していきます。
本ページでは、OSがLinux系ですのでMark System Technoが長年培った大規模システム向けシェルプログラミングやインフラ設計・運用の考え方も紹介します。

目次
システム概要
以降の説明に使用する環境、および、システムの概要を記載します。
コマンドおよび設定の推移について、理解しやすくなると思います。
退役した機材を使用している理由から、スペック不足や無理に使用しているところ(L2SWをL3SWのように使用しているなど)がありますが、ご容赦ください。
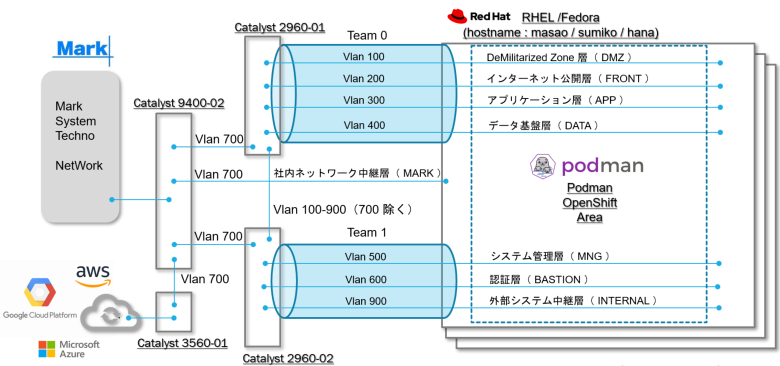
システム構成図
構築のステップ
1. OSセットアップ
2. ネットワーク設定
3. コンテナ( Podman )環境の構築
4. MARK-VPNシステム( ipsec VPN + x509v3 + AI )の構築
5. DevSecOps の実装
6. CI/CD( OpenShift ) の実装
Network Subnet/IP Address
DeMilitarized Zone 層( DMZ )
| Subnet name | vlan ID | Network Address | Default Gateway | 用途 |
| DMZ | 100 | 10.77.0.0/16 | 10.77.255.251 | DMZとしてアクセス制限を必要とするノードを収容する |
| IP Address | Node Name | Node Type | NW Type | Remarks |
| 10.77.255.100 | masao-v100 | RHEL 8 | Teaming + Tag Vlan | |
| 10.77.255.101 | sumiko-v100 | RHEL 8 | Teaming + Tag Vlan | |
| 10.77.255.102 | hana-v100 | Fedora 34 | Teaming + Tag Vlan | |
| 10.77.255.250 | BBSW-v100 | C9500 | GateWay | 社内環境と併用 |
| 10.77.255.251 | C2960-01-v100 | C2960 | LACP + Trunk | Default-Gateway |
| 10.77.255.252 | C2960-02-v100 | C2960 | LACP + Trunk | |
| 10.77.255.254 | C3560-01-v100 | C3560 | FireWall-Router |
インターネット公開層( FRONT )
| Subnet name | vlan ID | Network Address | Default Gateway | 用途 |
| FRONT | 200 | 10.78.0.0/16 | 10.78.255.251 | サービス提供ノードを収容する |
| IP Address | Node Name | Node Type | NW Type | Remarks |
| 10.78.255.100 | masao-v200 | RHEL 8 | Teaming + Tag Vlan | |
| 10.78.255.101 | sumiko-v200 | RHEL 8 | Teaming + Tag Vlan | |
| 10.78.255.102 | hana-v200 | Fedora 34 | Teaming + Tag Vlan | |
| 10.78.255.250 | BBSW-v200 | C9500 | GateWay | 社内環境と併用 |
| 10.78.255.251 | C2960-01-v200 | C2960 | LACP + Trunk | Default-Gateway |
| 10.78.255.252 | C2960-02-v200 | C2960 | LACP + Trunk | |
| 10.78.255.254 | C3560-01-v200 | C3560 | FireWall-Router |
アプリケーション層( APP )
| Subnet name | vlan ID | Network Address | Default Gateway | 用途 |
| APP | 300 | 10.79.0.0/16 | 10.79.255.251 | 各種処理、クラウド連携ノードを収容する |
| IP Address | Node Name | Node Type | NW Type | Remarks |
| 10.79.255.100 | masao-v300 | RHEL 8 | Teaming + Tag Vlan | |
| 10.79.255.101 | sumiko-v300 | RHEL 8 | Teaming + Tag Vlan | |
| 10.79.255.102 | hana-v300 | Fedora 34 | Teaming + Tag Vlan | |
| 10.79.255.250 | BBSW-v300 | C9500 | GateWay | 社内環境と併用 |
| 10.79.255.251 | C2960-01-v300 | C2960 | LACP + Trunk | Default-Gateway |
| 10.79.255.252 | C2960-02-v300 | C2960 | LACP + Trunk | |
| 10.79.255.254 | C3560-01-v300 | C3560 | FireWall-Router |
データ基盤層( DATA )
| Subnet name | vlan ID | Network Address | Default Gateway | 用途 |
| DATA | 400 | 10.80.0.0/16 | 10.80.255.251 | Data Lake基盤、AI分析基盤向けノードを収容する |
| IP Address | Node Name | Node Type | NW Type | Remarks |
| 10.80.255.100 | masao-v400 | RHEL 8 | Teaming + Tag Vlan | |
| 10.80.255.101 | sumiko-v400 | RHEL 8 | Teaming + Tag Vlan | |
| 10.80.255.102 | hana-v400 | Fedora 34 | Teaming + Tag Vlan | |
| 10.80.255.250 | BBSW-v400 | C9500 | GateWay | 社内環境と併用 |
| 10.80.255.251 | C2960-01-v400 | C2960 | LACP + Trunk | Default-Gateway |
| 10.80.255.252 | C2960-02-v400 | C2960 | LACP + Trunk | |
| 10.80.255.254 | C2960-01-v400 | C3560 | FireWall-Router |
システム管理層( MNG )
| Subnet name | vlan ID | Network Address | Default Gateway | 用途 |
| MNG | 500 | 10.81.0.0/16 | 10.81.255.252 | システム管理基盤、Data分析基盤向けノードを収容する |
| IP Address | Node Name | Node Type | NW Type | Remarks |
| 10.81.255.100 | masao-v500 | RHEL 8 | Teaming + Tag Vlan | |
| 10.81.255.101 | sumiko-v500 | RHEL 8 | Teaming + Tag Vlan | |
| 10.81.255.102 | hana-v500 | Fedora 34 | Teaming + Tag Vlan | |
| 10.81.255.250 | BBSW-v500 | C9500 | GateWay | 社内環境と併用 |
| 10.81.255.251 | C2960-01-v500 | C2960 | LACP + Trunk | |
| 10.81.255.252 | C2960-02-v500 | C2960 | LACP + Trunk | Default-Gateway |
| 10.81.255.254 | C3560-01-v500 | C3560 | FireWall-Router |
認証層( BASTION )
| Subnet name | vlan ID | Network Address | Default Gateway | 用途 |
| BASTION | 600 | 10.82.0.0/16 | 10.82.255.252 | ユーザ操作、ユーザ認証ノードを収容する |
| IP Address | Node Name | Node Type | NW Type | Remarks |
| 10.82.255.100 | masao-v600 | RHEL 8 | Teaming + Tag Vlan | |
| 10.82.255.101 | sumiko-v600 | RHEL 8 | Teaming + Tag Vlan | |
| 10.82.255.102 | hana-v600 | Fedora 34 | Teaming + Tag Vlan | |
| 10.82.255.250 | BBSW-v600 | C9500 | GateWay | 社内環境と併用 |
| 10.82.255.251 | C2960-01-v600 | C2960 | LACP + Trunk | |
| 10.82.255.252 | C2960-02-v600 | C2960 | LACP + Trunk | Default-Gateway |
| 10.82.255.254 | C3560-01-v600 | C3560 | FireWall-Router |
社内ネットワーク中継層( MARK )
| Subnet name | vlan ID | Network Address | Default Gateway | 用途 |
| MARK | 700 | 192.168.1.0/24 | 192.168.1.1 | 社内LAN連携用NATノードを収容する |
| IP Address | Node Name | Node Type | NW Type | Remarks |
| 192.168.1.1 | BBSW-v700 | C9500 | GateWay | 社内環境と併用 |
| 192.168.1.31 | masao-v700 | RHEL 8 | HOST | |
| 192.168.1.32 | hana-v700 | Fedora 34 | HOST | |
| 192.168.1.33 | sumiko-v700 | RHEL 8 | HOST | |
| 192.168.1.251 | C2960-01-v700 | C2960 | Gateway | vlan100,200,300,400 |
| 192.168.1.252 | C2960-02-v700 | C2960 | Gateway | vlan500,600,900 |
| 192.168.1.254 | C3560-01-v700 | C3560 | Gateway | vlan700 |
外部システム中継層( INTERNAL )
| Subnet name | vlan ID | Network Address | Default Gateway | 用途 |
| INTERNAL | 900 | 10.90.0.0/16 | 10.90.255.252 | 試用環境向けクラウド連携ノードを収容する |
| IP Address | Node Name | Node Type | NW Type | Remarks |
| 10.90.1.1 | w10-001-v900 | Windows 10 | Azure VPN | Azure Bastion 経由 |
| 10.90.1.2 | w10-002-v900 | Windows 10 | Azure VPN | Azure Bastion 経由 |
| 10.90.1.3 | w10-003-v900 | Windows 10 | Azure VPN | Azure Bastion 経由 |
| 10.90.1.4 | w10-004-v900 | Windows 10 | Azure VPN | Azure Bastion 経由 |
| 10.90.255.100 | masao-v900 | RHEL 8 | Teaming + Tag Vlan | |
| 10.90.255.101 | sumiko-v900 | RHEL 8 | Teaming + Tag Vlan | |
| 10.90.255.102 | hana-v900 | Fedora 34 | Teaming + Tag Vlan | |
| 10.90.255.250 | BBSW-v900 | C9500 | GateWay | 社内環境と併用 |
| 10.90.255.251 | C2960-01-v900 | C2960 | LACP + Trunk | |
| 10.90.255.252 | C2960-02-v900 | C2960 | LACP + Trunk | Default-Gateway |
| 10.90.255.254 | C3560-01-v900 | C3560 | FireWall-Router |
コマンド集
サブスクリプションの登録
Red Hat Custer Portalにアカウントを作成、登録したユーザ名とパスワードを使用します。
Red Hat Custer Portal のURLは「https://access.redhat.com/front」となります。
$ sudo su -
# subscription-manager register
実行内容は、以下のようになります。
登録中: subscription.rhsm.redhat.com:443/subscription
ユーザー名: XXXXXXXXXXXXXX
パスワード:
このシステムは、次の ID で登録されました: XXXXXX-XXXX-XXXX-XXXX-XXXXXXXXXX
登録したシステム名: XXXXXX.mark-system.com
登録内容の確認コマンドは以下となります。
# subscription-manager list
  :
  :
状態:             サブスクライブなし
状態の詳細:       Not supported by a valid subscription.
  :
  :
# subscription-manager list --available
  :
  :
  :
契約:
プール ID:                XXXXXXXXXXXXXXXXXXXXXX <---(*)
管理の提供:               いいえ
数量:                     無制限
推奨:                     1
  :
  :
  :
表示されたプール ID (*)を利用してサブスクライブします。
# subscription-manager subscribe --pool=XXXXXXXXXXXXXXXXXXXXXXXXXXXXXX以下の文字列が出力されれば、完了です。
サブスクリプションが正しく割り当てられました: Red Hat Beta Access以下のコマンドを用い、割り当て(*)を確認しておきましょう。
反映に時間がかかる場合があります。
その場合は、「Red Hat Customer Portal」から[システム]→[対象サーバ]→[サブスクリプション]を選択します。
[自動アタッチの実行]を押下しましょう。
# subscription-manager list
  :
  :
アーキテクチャー: x86_64
状態:             サブスクライブ済み <-------(*)
状態の詳細:
  :
  :
# subscription-manager list --consumed
  :
  :
アドオン:
状態の詳細:               最新のサブスクリプションです <-------(*)
サブスクリプションタイプ: Standard
  :
  :
このような場合、「サブスクリプションの登録」へ記載した以下のコマンドを用い、再度、アタッチします。
$ sudo su -
# subscription-manager attach --pool=pool_id
Red Hat パッケージの最新化 (dnf update)
以下のコマンドを用い、パッケージを最新化します。
$ sudo su -
# dnf check-update
# dnf update -y
# dnf clean all

Updating Subscription Management repositories.
17 ファイルが削除されました

パッケージを探す
# dnf search lsof

サブスクリプション管理リポジトリーを更新しています。
メタデータの期限切れの最終確認: 0:57:45 時間前の 2021年12月14日 06時03分00秒 に 実施しました。
============================= 名前 完全一致: lsof ==============================
lsof.x86_64 : A utility which lists open files on a Linux/UNIX system

ファイルやライブラリ、コマンドが含まれるパッケージを探す
# dnf provides lsof

サブスクリプション管理リポジトリーを更新しています。
メタデータの期限切れの最終確認: 0:58:55 時間前の 2021年12月14日 06時03分00秒 に 実施しました。
lsof-4.91-2.el8.x86_64 : A utility which lists open files on a Linux/UNIX system
Repo        : rhel-8-for-x86_64-baseos-rpms
一致:
提供する    : lsof = 4.91-2.el8

lsof-4.93.2-1.el8.x86_64 : A utility which lists open files on a Linux/UNIX
                         : system
Repo        : @System
一致:
提供する    : lsof = 4.93.2-1.el8

lsof-4.93.2-1.el8.x86_64 : A utility which lists open files on a Linux/UNIX
                         : system
Repo        : rhel-8-for-x86_64-baseos-rpms
一致:
提供する    : lsof = 4.93.2-1.el8
サブスクリプションの登録が未完了であったり、「Red Hat Customer Potal」と矛盾が発生している場合は以下が出力され、失敗します。
Updating Subscription Management repositories.
エラー: "/etc/yum.repos.d", "/etc/yum/repos.d", "/etc/distro.repos.d" には有効化されたリポジトリーがありません。
Red Hat パッケージマネージャー (rpm)の操作
パッケージの操作コマンドを以下に記載します。
$ sudo su -

パッケージのインストール
# rpm -ivh /tmp/XXXXXXXXX.rpm

パッケージのアンインストール
# rpm -e XXXXXXXXX

インストール済みパッケージの一覧
# rpm -qa

インストール済みパッケージのキーワード検索( 例 : team )
# rpm -qa | grep team

libteam-1.31-2.el8.x86_64
teamd-1.31-2.el8.x86_64
NetworkManager-team-1.32.10-4.el8.x86_64

インストール済みパッケージのファイル構成表示
# rpm -ql NetworkManager-team-1.32.10-4.el8.x86_64

/usr/lib/.build-id
/usr/lib/.build-id/15
/usr/lib/.build-id/15/ff7e04a50f237fc938add3e2231e2d11829f20
/usr/lib64/NetworkManager/1.32.10-4.el8/libnm-device-plugin-team.so

インストール済みパッケージの詳細情報
$ rpm -qi kernel-modules-4.18.0-305.el8.x86_64

Name        : kernel-modules
Version     : 4.18.0
Release     : 305.el8
Architecture: x86_64
Install Date: 2021年11月08日 03時42分06秒
Group       : System Environment/Kernel
Size        : 22894792
License     : GPLv2 and Redistributable, no modification permitted
Signature   : RSA/SHA256, 2021年05月02日 19時42分17秒, Key ID 199e2f91fd431d51
Source RPM  : kernel-4.18.0-305.el8.src.rpm
Build Date  : 2021年04月29日 22時13分23秒
Build Host  : x86-vm-07.build.eng.bos.redhat.com
Relocations : (not relocatable)
Packager    : Red Hat, Inc. <http://bugzilla.redhat.com/bugzilla>
Vendor      : Red Hat, Inc.
URL         : http://www.kernel.org/
Summary     : kernel modules to match the core kernel
Description :
This package provides commonly used kernel modules for the core kernel package.

ファイルの属するパッケージ名の表示
$ rpm -qf /usr/bin/lsof

lsof-4.93.2-1.el8.x86_64
時刻合わせ(chronyc)
時刻合わせコマンドを以下に記載します。
現状の同期先確認
# chronyc sources

MS Name/IP address         Stratum Poll Reach LastRx Last sample
===============================================================================
^+ omx2.classictic.com           2  10   377   636  +7464us[+7558us] +/-  164ms
^- lucy.thehomeofanime.de        2  10   377   642  +5457us[+5551us] +/-  143ms
^+ ntp1.ams1.nl.leaseweb.net     2  10   377   695  +4621us[+4715us] +/-  204ms
^* 77.68.122.252                 3  10   377   617  +5703us[+5797us] +/-  155ms

現状の時刻ズレ確認
# chronyc tracking

Reference ID    : 4D447AFC (77.68.122.252)
Stratum         : 4
Ref time (UTC)  : Tue Nov 23 13:19:15 2021
System time     : 0.000413800 seconds fast of NTP time
Last offset     : +0.000094051 seconds
RMS offset      : 0.000204610 seconds
Frequency       : 41.013 ppm slow
Residual freq   : +0.000 ppm
Skew            : 0.027 ppm
Root delay      : 0.238736287 seconds
Root dispersion : 0.017958783 seconds
Update interval : 1042.3 seconds
Leap status     : Normal

設定ファイルの編集
# cp -p /etc/chrony.conf /etc/chrony.conf.org
# vi /etc/chrony.conf
# diff /etc/chrony.conf.org /etc/chrony.conf
3c3,7
< pool 2.rhel.pool.ntp.org iburst
---
> #pool 2.rhel.pool.ntp.org iburst
> pool 0.jp.pool.ntp.org iburst
> pool 1.jp.pool.ntp.org iburst
> pool 2.jp.pool.ntp.org iburst
> pool 3.jp.pool.ntp.org iburst
23c27
< #minsources 2
---
> minsources 2
26c30
< #allow 192.168.0.0/16
---
> allow 192.168.1.0/24
29c33
< #local stratum 10
---
> local stratum 2

サービス自動起動
# systemctl enable chronyd

サービス再起動
# systemctl restart chronyd

同期確認
# chronyc sources

MS Name/IP address         Stratum Poll Reach LastRx Last sample
===============================================================================
^- 103.202.216.35                3   6     7     3  -2858us[-3311us] +/-  149ms
^- ec2-3-114-30-212.ap-nort>     2   6    17     2   +701us[ +701us] +/-   35ms
^- i172-105-204-167.poolntp>     3   6    17     4  +5644us[+5191us] +/-   14ms
^- mx.execve.net                 2   6    17     3   +139us[ +139us] +/- 5540us
^- v118-27-19-72.cxxt.stati>     2   6    17     5    +11ms[  +10ms] +/-   25ms
^- tama.paina.net                2   6    17     4    +94us[  +94us] +/-   49ms
^- time.cloudflare.com           3   6    17     5   -127ms[ -127ms] +/-  211ms
^- time.cloudflare.com           3   6    27     3  +6498us[+6498us] +/-   77ms
^+ ntp-a2.nict.go.jp             1   6    17     6   +775us[ +323us] +/- 4838us
^* ntp-b2.nict.go.jp             1   6    17     5  -1166us[-1619us] +/- 5333us
^- any.time.nl                   2   6    17     8  -1335us[-1788us] +/-   42ms
^- x.ns.gin.ntt.net              2   6    17     9  -1087us[-1540us] +/-   93ms
^- 132.226.11.60                 2   6    17     7  +7338us[+7338us] +/-   49ms
^- 126.99.178.217.static.us>     1   6    17    10  +4340us[+3887us] +/-   21ms
パケットキャプチャー(tcpdump)
パケットキャプチャーコマンドを以下に記載します。
pingなどのICMP
# tcpdump icmp

ホスト指定
# tcpdump host 192.168.1.1
# tcpdump dst host 192.168.1.1
# tcpdump src host 192.168.1.1
# tcpdump icmp and src host 192.168.1.1

ポート指定
# tcpdump port 80
# tcpdump dst port 80
# tcpdump src port 80
# tcpdump src port 80 or 443

ホストとポート指定
# tcpdump host 192.168.1.1 and src port 80 or 443
# tcpdump dst host 192.168.1.1 and src port 80 or 443
# tcpdump src host 192.168.1.1 and src port 80 or 443

ネットワークインターフェース指定
# tcpdump -i eth0 src host 192.168.1.1 and src port 80 or 443

ネットワークアドレス指定
# tcpdump net 192.168.1.0 mask 255.255.255.0
# tcpdump src net 192.168.1.0 mask 255.255.255.0 and src port 80 or 443

パケット内容の表示
# tcpdump -X dst port 80

パケット内容の表示(サイズ指定 単位:Byte)
# tcpdump -X -s 10240000 dst port 80

wiresharkなどを使用した解析用
tcpdump -n -i eth0 -s 0 -w /tmp/tcpdump_20211201_001.cap port 443
脆弱性スキャン ホスト機編( openscap / oscap )
ホスト機を用い、脆弱性スキャンを以下のとおり実施します。
$ sudo su -
# yum install -y openscap-utils bzip2
# yum install -y scap-security-guide
# wget -O - https://www.redhat.com/security/data/oval/v2/RHEL8/rhel-8.oval.xml.bz2 | bzip2 --decompress > rhel-8.oval.xmloscap
(省略)
# oscap oval eval --report oscap_res.html rhel-8.oval.xml
Definition oval:com.redhat.rhsa:def:20214903: true
Definition oval:com.redhat.rhsa:def:20214826: false
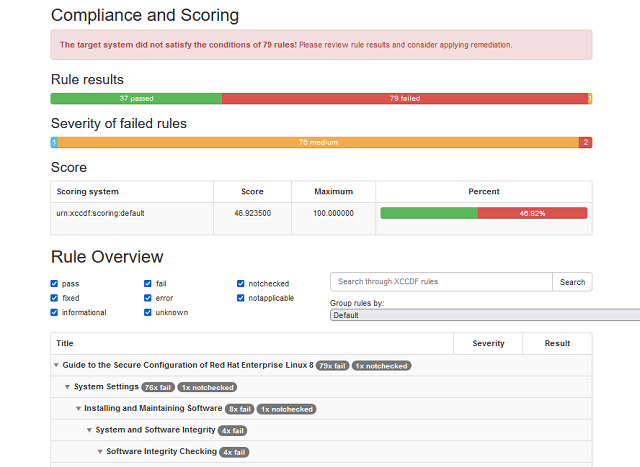
(省略)作成された「oscap_res.html」ファイルを作業PCへダウンロード、表示してみます。
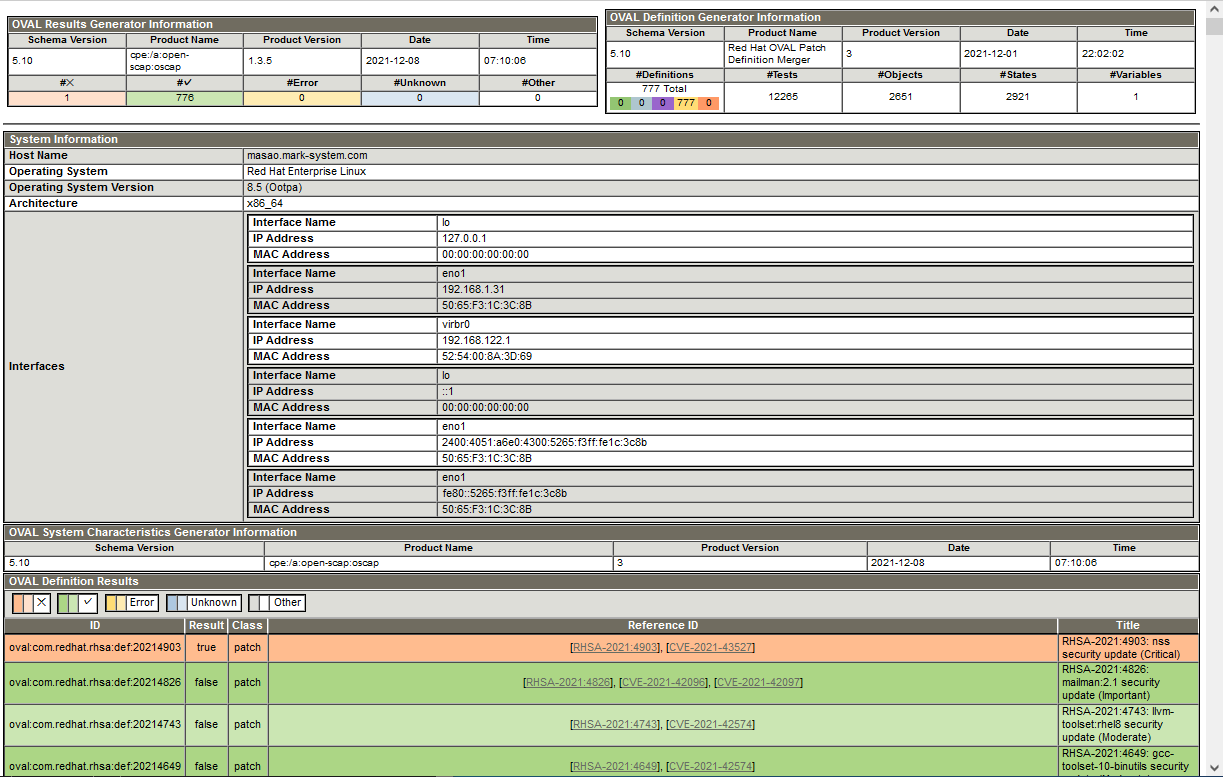
ほぼ、パーフェクトの結果となりました。
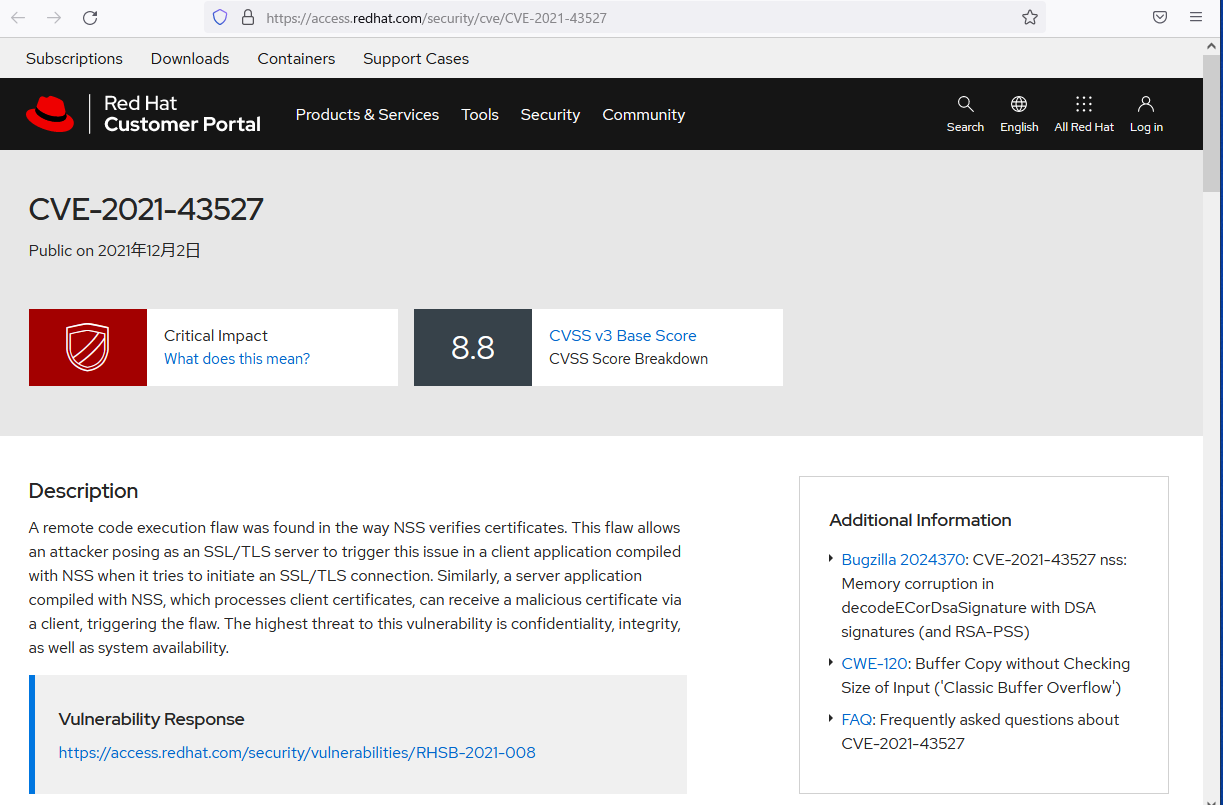
「CVE」番号は「Red Hat Customer Portal」へリンクされています。
対応方針の立案も早急に可能となります。
PCI-DSS規格を基にコンプライアンスの準拠状況を評価します。
$ sudo su -
# yum install -y openscap-utils bzip2
# yum install -y scap-security-guide
# ls -l /usr/share/xml/scap/ssg/content/
合計 200284
-rw-r--r--. 1 root root 591 9月 13 20:00 ssg-firefox-cpe-dictionary.xml
-rw-r--r--. 1 root root 3885 9月 13 20:00 ssg-firefox-cpe-oval.xml
-rw-r--r--. 1 root root 286701 9月 13 20:00 ssg-firefox-ds-1.2.xml
-rw-r--r--. 1 root root 286701 9月 13 20:00 ssg-firefox-ds.xml
-rw-r--r--. 1 root root 39214 9月 13 20:00 ssg-firefox-ocil.xml
-rw-r--r--. 1 root root 53469 9月 13 20:00 ssg-firefox-oval.xml
-rw-r--r--. 1 root root 187019 9月 13 20:00 ssg-firefox-xccdf.xml
-rw-r--r--. 1 root root 1231 9月 13 20:00 ssg-jre-cpe-dictionary.xml
-rw-r--r--. 1 root root 6349 9月 13 20:00 ssg-jre-cpe-oval.xml
-rw-r--r--. 1 root root 273498 9月 13 20:00 ssg-jre-ds-1.2.xml
-rw-r--r--. 1 root root 273498 9月 13 20:00 ssg-jre-ds.xml
-rw-r--r--. 1 root root 34732 9月 13 20:00 ssg-jre-ocil.xml
-rw-r--r--. 1 root root 44155 9月 13 20:00 ssg-jre-oval.xml
-rw-r--r--. 1 root root 186986 9月 13 20:00 ssg-jre-xccdf.xml
-rw-r--r--. 1 root root 6768 9月 13 20:03 ssg-rhel6-cpe-dictionary.xml
-rw-r--r--. 1 root root 93922 9月 13 20:03 ssg-rhel6-cpe-oval.xml
-rw-r--r--. 1 root root 22934702 9月 13 20:03 ssg-rhel6-ds-1.2.xml
-rw-r--r--. 1 root root 22935173 9月 13 20:03 ssg-rhel6-ds.xml
-rw-r--r--. 1 root root 733916 9月 13 20:03 ssg-rhel6-ocil.xml
-rw-r--r--. 1 root root 2335663 9月 13 20:03 ssg-rhel6-oval.xml
-rw-r--r--. 1 root root 7439626 9月 13 20:03 ssg-rhel6-xccdf.xml
-rw-r--r--. 1 root root 8141 9月 13 20:01 ssg-rhel7-cpe-dictionary.xml
-rw-r--r--. 1 root root 108393 9月 13 20:01 ssg-rhel7-cpe-oval.xml
-rw-r--r--. 1 root root 36688278 9月 13 20:03 ssg-rhel7-ds-1.2.xml
-rw-r--r--. 1 root root 36688749 9月 13 20:03 ssg-rhel7-ds.xml
-rw-r--r--. 1 root root 1489189 9月 13 20:01 ssg-rhel7-ocil.xml
-rw-r--r--. 1 root root 3906985 9月 13 20:01 ssg-rhel7-oval.xml
-rw-r--r--. 1 root root 11639381 9月 13 20:01 ssg-rhel7-xccdf.xml
-rw-r--r--. 1 root root 10440 9月 13 20:01 ssg-rhel8-cpe-dictionary.xml
-rw-r--r--. 1 root root 108393 9月 13 20:01 ssg-rhel8-cpe-oval.xml
-rw-r--r--. 1 root root 19262210 9月 13 20:02 ssg-rhel8-ds-1.2.xml
-rw-r--r--. 1 root root 19262536 9月 13 20:02 ssg-rhel8-ds.xml
-rw-r--r--. 1 root root 1601687 9月 13 20:01 ssg-rhel8-ocil.xml
-rw-r--r--. 1 root root 4113978 9月 13 20:01 ssg-rhel8-oval.xml
-rw-r--r--. 1 root root 11977514 9月 13 20:01 ssg-rhel8-xccdf.xml
# oscap info /usr/share/xml/scap/ssg/content/ssg-rhel8-ds-1.2.xml
Document type: Source Data Stream
Imported: 2021-09-13T20:02:54
Stream: scap_org.open-scap_datastream_from_xccdf_ssg-rhel8-xccdf-1.2.xml
Generated: (null)
Version: 1.2
Checklists:
Ref-Id: scap_org.open-scap_cref_ssg-rhel8-xccdf-1.2.xml
Status: draft
Generated: 2021-09-13
Resolved: true
Profiles:
Title: ANSSI-BP-028 (enhanced)
Id: xccdf_org.ssgproject.content_profile_anssi_bp28_enhanced
Title: ANSSI-BP-028 (high)
Id: xccdf_org.ssgproject.content_profile_anssi_bp28_high
Title: ANSSI-BP-028 (intermediary)
Id: xccdf_org.ssgproject.content_profile_anssi_bp28_intermediary
Title: ANSSI-BP-028 (minimal)
Id: xccdf_org.ssgproject.content_profile_anssi_bp28_minimal
Title: CIS Red Hat Enterprise Linux 8 Benchmark for Level 2 - Server
Id: xccdf_org.ssgproject.content_profile_cis
Title: CIS Red Hat Enterprise Linux 8 Benchmark for Level 1 - Server
Id: xccdf_org.ssgproject.content_profile_cis_server_l1
Title: CIS Red Hat Enterprise Linux 8 Benchmark for Level 1 - Workstation
Id: xccdf_org.ssgproject.content_profile_cis_workstation_l1
Title: CIS Red Hat Enterprise Linux 8 Benchmark for Level 2 - Workstation
Id: xccdf_org.ssgproject.content_profile_cis_workstation_l2
Title: Unclassified Information in Non-federal Information Systems and Organizations (NIST 800-171)
Id: xccdf_org.ssgproject.content_profile_cui
Title: Australian Cyber Security Centre (ACSC) Essential Eight
Id: xccdf_org.ssgproject.content_profile_e8
Title: Health Insurance Portability and Accountability Act (HIPAA)
Id: xccdf_org.ssgproject.content_profile_hipaa
Title: Australian Cyber Security Centre (ACSC) ISM Official
Id: xccdf_org.ssgproject.content_profile_ism_o
Title: Protection Profile for General Purpose Operating Systems
Id: xccdf_org.ssgproject.content_profile_ospp
Title: PCI-DSS v3.2.1 Control Baseline for Red Hat Enterprise Linux 8
Id: xccdf_org.ssgproject.content_profile_pci-dss
Title: DISA STIG for Red Hat Enterprise Linux 8
Id: xccdf_org.ssgproject.content_profile_stig
Title: DISA STIG with GUI for Red Hat Enterprise Linux 8
Id: xccdf_org.ssgproject.content_profile_stig_gui
Referenced check files:
ssg-rhel8-oval.xml
system: http://oval.mitre.org/XMLSchema/oval-definitions-5
ssg-rhel8-ocil.xml
system: http://scap.nist.gov/schema/ocil/2
https://www.redhat.com/security/data/oval/com.redhat.rhsa-RHEL8.xml
system: http://oval.mitre.org/XMLSchema/oval-definitions-5
Checks:
Ref-Id: scap_org.open-scap_cref_ssg-rhel8-oval.xml
Ref-Id: scap_org.open-scap_cref_ssg-rhel8-ocil.xml
Ref-Id: scap_org.open-scap_cref_ssg-rhel8-cpe-oval.xml
Dictionaries:
Ref-Id: scap_org.open-scap_cref_ssg-rhel8-cpe-dictionary.xml
# oscap xccdf eval --profile pci-dss --report pci-dss.html /usr/share/xml/scap/ssg/content/ssg-rhel8-ds-1.2.xml
(省略)
Title Specify a Remote NTP Server
Rule xccdf_org.ssgproject.content_rule_chronyd_or_ntpd_specify_remote_server
Ident CCE-80765-1
Result fail
Title Enable Smartcards in SSSD
Rule xccdf_org.ssgproject.content_rule_sssd_enable_smartcards
Ident CCE-80909-5
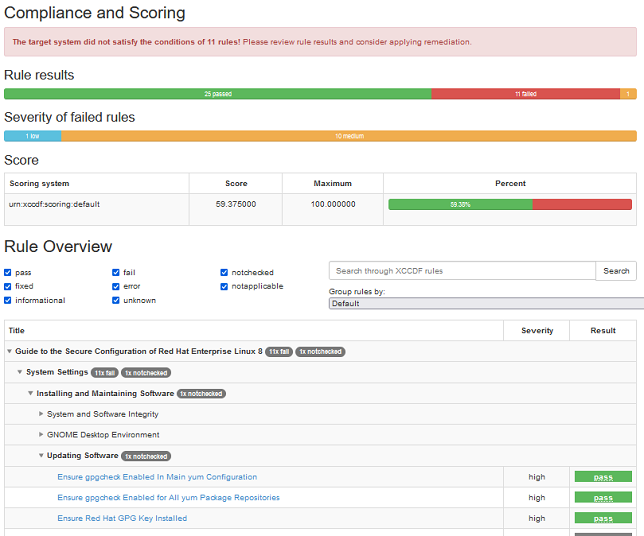
Result pass作成された「pci-dss.html」ファイルを作業PCへ転送します。
ブラウザで表示してみます。
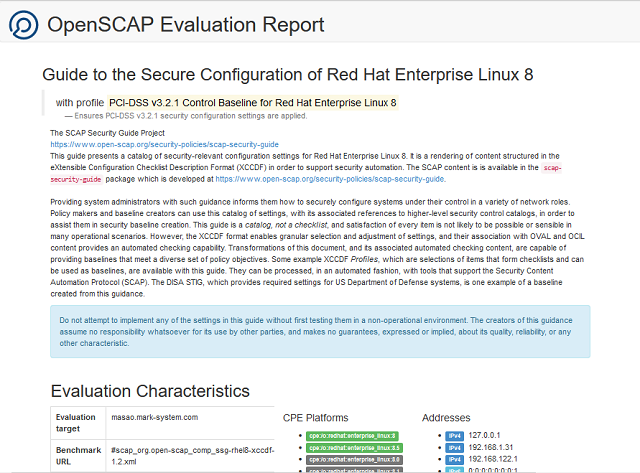
散々な結果ですが、PCI-DSS規格へ適合させていく作業は、エンジニアリングの楽しいところでもあります。
脆弱性スキャン コンテナ編( openscap / oscap-podman )
コンテナに対する脆弱性スキャンを以下のとおり実施します。
ホスト機で実施します。
ホスト機 と同様に、PCI-DSS規格を基準にスキャンを実施します。
コマンドのパラメータに「CONTAINER ID」を指定しています。
$ sudo su -
# yum install -y openscap-utils bzip2
# yum install -y scap-security-guide
# podman ps -a

CONTAINER ID  IMAGE                                COMMAND     CREATED     STATUS           PORTS       NAMES
91e2997b78a1  localhost/mark_demo/mst_main:latest  /sbin/init  2 days ago  Up 38 hours ago              mst_main

# oscap-podman 91e2997b78a1 xccdf eval --report pci-dss-podman.html --profile pci-dss /usr/share/xml/scap/ssg/content/ssg-rhel8-ds-1.2.xml

(省略)

Title   Specify a Remote NTP Server
Rule    xccdf_org.ssgproject.content_rule_chronyd_or_ntpd_specify_remote_server
Ident   CCE-80765-1
Result  notapplicable

Title   Enable Smartcards in SSSD
Rule    xccdf_org.ssgproject.content_rule_sssd_enable_smartcards
Ident   CCE-80909-5
Result  notapplicable
結果を表示してみます。
ホスト機よりもスコアは良いという結果でした。
通信ポートの開閉 ( firewall-cmd )
状況確認
firewall-cmd --list-all

ポートを開ける(サービス名指定)
firewall-cmd --zone=public --add-service=http
firewall-cmd --zone=public --add-service=http --permanent

ポートを開ける(ポート番号/プロトコル指定)
firewall-cmd --zone=public --add-port=80/tcp --permanent
firewall-cmd --zone=public --add-port=443/tcp --permanent
firewall-cmd --zone=public --add-port=18080/tcp --permanent
firewall-cmd --zone=public --add-port=18443/tcp --permanent

ポートを閉じる
firewall-cmd --zone=public --remove-port=80/tcp  --permanent
firewall-cmd --zone=public --remove-port=443/tcp  --permanent
firewall-cmd --zone=public --remove-port=18080/tcp --permanent
firewall-cmd --zone=public --remove-port=18443/tcp --permanent

変更反映
firewall-cmd --reload

状況確認
firewall-cmd --list-all
サイトの暗号セット確認 ( curl )
証明書を無視
# curl -k https://www.mark-system.com

古い暗号セット
# curl --sslv2 https://www.mark-system.com
curl: (4) OpenSSL was built without SSLv2 support

最新の暗号セット
# curl --tlsv1.3 https://www.mark-system.com
(結果省略)

プロキシ経由
# curl --tlsv1.3 https://www.mark-system.com -x http://test:password@192.168.1.1:3126
サイトのTLS証明書の有効期限日を確認 ( openssl )
# openssl s_client -connect www.mark-system.com:443 < /dev/null 2> /dev/null | openssl x509 -text | grep Not

            Not Before: Oct 31 13:54:08 2021 GMT
            Not After : Jan 29 13:54:07 2022 GMT
公開鍵と秘密鍵のペアを作成 ( ssh-keygen )
# ssh-keygen --help
(省略)

unknown option -- -  ( <--- Mmmm... )
usage: ssh-keygen [-q] [-b bits] [-t dsa | ecdsa | ed25519 | rsa] [-m format]
                  [-N new_passphrase] [-C comment] [-f output_keyfile]

# ssh-keygen -t ed25519

Generating public/private ed25519 key pair.
Enter file in which to save the key (/home/tempuser/.ssh/id_ed25519): ./id_ed25519
Enter passphrase (empty for no passphrase):(パスフレーズ入力)
Enter same passphrase again:(同一パスフレーズを入力)
Your identification has been saved in ./id_ed25519.
Your public key has been saved in ./id_ed25519.pub.
The key fingerprint is:
(省略)

# ls
id_ed25519  id_ed25519.pub
SSH時のフィンガープリントチェックを無効化
運用自動化スクリプトにおいて度々、事故を引き起こす箇所ですので、無効化します。
不正変更は、監視運用/構成管理チェックにより、キー変更、および、ホストアクセスを監視します。
編集前バックアップ
# cp -p /etc/ssh/sshd_config /etc/ssh/sshd_config.org

編集(以下の差分内容を参照)
# vi /etc/ssh/sshd_config
(省略)

差分確認 ( 基本 : パラメータは変更前、変更後 ※要「patch」コマンド 学習 )
# diff /etc/ssh/sshd_config.org /etc/ssh/sshd_config

> Host *
>    StrictHostKeyChecking no
>    UserKnownHostsFile=/dev/null
広告
デバイスの構成確認
機器、デバイスの構成を正しく理解することで、一貫性および信頼性のあるシステム構築が可能となります。
また、障害解析およびトラブルシュート時にも、感や予想ではなく、根拠のある報告ができるようになります。
本項の内容はRedhat系ディストリビューションとなる、CentOS 7 、CentOS 8 、 Fedora 20以上のOSに互換性があります。
BIOSの状況を見てみよう( dmidecode コマンド )
OS(RHEL 8)からBIOSの設定状況を参照することができます。
まずは、BIOSのバージョン情報、概要を参照します。
$ sudo su -
# dmidecode --type bios
============ 結果 =============
# dmidecode 3.2
Getting SMBIOS data from sysfs.
SMBIOS 2.7 present.

Handle 0x0000, DMI type 0, 24 bytes
BIOS Information
        Vendor: Hewlett-Packard
        Version: L01 v02.57
        Release Date: 12/11/2014
        Address: 0xF0000
        Runtime Size: 64 kB
        ROM Size: 16 MB
        Characteristics:
                PCI is supported
                PNP is supported
                BIOS is upgradeable
                BIOS shadowing is allowed
                Boot from CD is supported
                Selectable boot is supported
                EDD is supported
                Print screen service is supported (int 5h)
                8042 keyboard services are supported (int 9h)
                Serial services are supported (int 14h)
                Printer services are supported (int 17h)
                ACPI is supported
                USB legacy is supported
                BIOS boot specification is supported
                Function key-initiated network boot is supported
                Targeted content distribution is supported
                UEFI is supported
        BIOS Revision: 2.57

Handle 0x0021, DMI type 13, 22 bytes
BIOS Language Information
        Language Description Format: Long
        Installable Languages: 12
                en|US|iso8859-1
                fr|FR|iso8859-1
                es|ES|iso8859-1
                de|DE|iso8859-1
                it|IT|iso8859-1
                da|DK|iso8859-1
                fi|FI|iso8859-1
                nl|NL|iso8859-1
                no|NO|iso8859-1
                pt|PT|iso8859-1
                sv|SE|iso8859-1
                ja|JP|unicode
        Currently Installed Language: en|US|iso8859-1
次に項目の設定内容を参照してみます。
$ sudo su -
# dmidecode -t
dmidecode: option requires an argument -- 't'
Type number or keyword expected
Valid type keywords are:
  bios
  system
  baseboard
  chassis
  processor
  memory
  cache
  connector
  slot
# dmidecode -t bios
# dmidecode -t system
# dmidecode -t processor
# dmidecode -t memory
すべての項目を表示するには、パラメータを与えず、コマンドを実行します。
$ sudo su -
# dmidecode
CPUの型名、クロックスピード、コア数、スレッドを表示してみます。
$ sudo su -
# dmidecode -t processor | grep "Version:"
        Version: Intel(R) Core(TM) i7-4790 CPU @ 3.60GHz
# dmidecode -t processor | grep "Current Speed: "
        Current Speed: 3600 MHz
# dmidecode -t processor | grep "Core Enabled: "
        Core Enabled: 4
# dmidecode -t processor | grep "Thread Count: "
        Thread Count: 8
マザーボードのDIMMスロットの使用状況、メモリサイズ、メモリ規格を確認することもできます。
# dmidecode -t memory | grep "Size: "
        Size: No Module Installed
        Size: 8 GB
        Size: No Module Installed
        Size: 8 GB
# dmidecode -t memory | grep "Type: "
        Error Correction Type: None
        Type: Unknown
        Type: DDR3
        Type: Unknown
        Type: DDR3
OSが認識しているCPUを調べよう
CPUのタイプや動作モードを表示してみます。
$ cat /proc/cpuinfo
processor       : 0
vendor_id       : GenuineIntel
cpu family      : 6
model           : 60
model name      : Intel(R) Core(TM) i7-4790 CPU @ 3.60GHz
stepping        : 3
microcode       : 0x28
cpu MHz         : 3990.416
cache size      : 8192 KB
physical id     : 0
siblings        : 8
core id         : 0
cpu cores       : 4
apicid          : 0
initial apicid  : 0
fpu             : yes
fpu_exception   : yes
cpuid level     : 13
wp              : yes
flags           : fpu vme de pse tsc msr pae mce cx8 apic sep mtrr pge mca cmov pat pse36 clflush dts acpi mmx fxsr sse sse2 ss ht tm pbe syscall nx pdpe1gb rdtscp lm constant_tsc arch_perfmon pebs bts rep_good nopl xtopology nonstop_tsc cpuid aperfmperf pni pclmulqdq dtes64 monitor ds_cpl smx est tm2 ssse3 sdbg fma cx16 xtpr pdcm pcid sse4_1 sse4_2 x2apic movbe popcnt tsc_deadline_timer aes xsave avx f16c rdrand lahf_lm abm cpuid_fault epb invpcid_single pti ssbd ibrs ibpb stibp fsgsbase tsc_adjust bmi1 avx2 smep bmi2 erms invpcid xsaveopt dtherm ida arat pln pts md_clear flush_l1d
bugs            : cpu_meltdown spectre_v1 spectre_v2 spec_store_bypass l1tf mds swapgs itlb_multihit srbds
bogomips        : 7183.23
clflush size    : 64
cache_alignment : 64
address sizes   : 39 bits physical, 48 bits virtual
power management:
物理core数の表示は以下の通りとなります。
サーバ機器に搭載されている、 物理core数は4coreとなります。
$ cat /proc/cpuinfo | grep "cpu cores"
cpu cores       : 4
cpu cores       : 4
cpu cores       : 4
cpu cores       : 4
cpu cores       : 4
cpu cores       : 4
cpu cores       : 4
cpu cores       : 4
論理core(スレッド)数 の表示は以下の通りとなります。
サーバ機器のBIOSでは、ハイパースレッディングを有効化している。
また、総論理core(スレッド)数は、 8コア(スレッド)ということがわかります。
$ $ cat /proc/cpuinfo | grep "siblings"
siblings        : 8
siblings        : 8
siblings        : 8
siblings        : 8
siblings        : 8
siblings        : 8
siblings        : 8
siblings        : 8
OSが認識しているMemoryを調べよう
メモリの使用状況を表示してみます。
8GB×2=16GBのメモリを実装しています。認識されている総メモリ数 (MemTotal) は15GBぐらいとなり、空きメモリーサイズ(MemFree)は9GBぐらいということです。
cat /proc/meminfo
MemTotal:       16120008 kB
MemFree:         9608260 kB
MemAvailable:   14147512 kB
Buffers:            6428 kB
Cached:          4755688 kB
SwapCached:            0 kB
Active:          2123900 kB
Inactive:        3718464 kB
Active(anon):       3416 kB
Inactive(anon):  1195116 kB
Active(file):    2120484 kB
Inactive(file):  2523348 kB
Unevictable:       12524 kB
Mlocked:               0 kB
SwapTotal:       8224764 kB
SwapFree:        8224764 kB
Dirty:                12 kB
Writeback:             0 kB
AnonPages:       1078548 kB
Mapped:           375024 kB
Shmem:            109724 kB
KReclaimable:     231088 kB
Slab:             378488 kB
SReclaimable:     231088 kB
SUnreclaim:       147400 kB
KernelStack:       12816 kB
PageTables:        44112 kB
NFS_Unstable:          0 kB
Bounce:                0 kB
WritebackTmp:          0 kB
CommitLimit:    16284768 kB
Committed_AS:    6060400 kB
VmallocTotal:   34359738367 kB
VmallocUsed:           0 kB
VmallocChunk:          0 kB
Percpu:            14720 kB
HardwareCorrupted:     0 kB
AnonHugePages:    661504 kB
ShmemHugePages:        0 kB
ShmemPmdMapped:        0 kB
FileHugePages:         0 kB
FilePmdMapped:         0 kB
HugePages_Total:       0
HugePages_Free:        0
HugePages_Rsvd:        0
HugePages_Surp:        0
Hugepagesize:       2048 kB
Hugetlb:               0 kB
DirectMap4k:      316264 kB
DirectMap2M:    11126784 kB
DirectMap1G:     6291456 kB
OSが認識しているPCIデバイスを調べよう ( lspci コマンド )
PCIの使用状況を表示してみます。
4ポートNIC「Broadcom BCM5719 Gigabit Ethernet」が認識できていることがわかります。
$ lspci
00:00.0 Host bridge: Intel Corporation 4th Gen Core Processor DRAM Controller (rev 06)
00:01.0 PCI bridge: Intel Corporation Xeon E3-1200 v3/4th Gen Core Processor PCI Express x16 Controller (rev 06)
00:02.0 VGA compatible controller: Intel Corporation Xeon E3-1200 v3/4th Gen Core Processor Integrated Graphics Controller (rev 06)
00:03.0 Audio device: Intel Corporation Xeon E3-1200 v3/4th Gen Core Processor HD Audio Controller (rev 06)
00:14.0 USB controller: Intel Corporation 8 Series/C220 Series Chipset Family USB xHCI (rev 04)
00:16.0 Communication controller: Intel Corporation 8 Series/C220 Series Chipset Family MEI Controller #1 (rev 04)
00:16.3 Serial controller: Intel Corporation 8 Series/C220 Series Chipset Family KT Controller (rev 04)
00:19.0 Ethernet controller: Intel Corporation Ethernet Connection I217-LM (rev 04)
00:1a.0 USB controller: Intel Corporation 8 Series/C220 Series Chipset Family USB EHCI #2 (rev 04)
00:1b.0 Audio device: Intel Corporation 8 Series/C220 Series Chipset High Definition Audio Controller (rev 04)
00:1d.0 USB controller: Intel Corporation 8 Series/C220 Series Chipset Family USB EHCI #1 (rev 04)
00:1f.0 ISA bridge: Intel Corporation Q85 Express LPC Controller (rev 04)
00:1f.2 SATA controller: Intel Corporation 8 Series/C220 Series Chipset Family 6-port SATA Controller 1 [AHCI mode] (rev 04)
00:1f.3 SMBus: Intel Corporation 8 Series/C220 Series Chipset Family SMBus Controller (rev 04)
01:00.0 Ethernet controller: Broadcom Inc. and subsidiaries NetXtreme BCM5719 Gigabit Ethernet PCIe (rev 01)
01:00.1 Ethernet controller: Broadcom Inc. and subsidiaries NetXtreme BCM5719 Gigabit Ethernet PCIe (rev 01)
01:00.2 Ethernet controller: Broadcom Inc. and subsidiaries NetXtreme BCM5719 Gigabit Ethernet PCIe (rev 01)
01:00.3 Ethernet controller: Broadcom Inc. and subsidiaries NetXtreme BCM5719 Gigabit Ethernet PCIe (rev 01)
OSが認識しているUSBデバイスを調べよう( lsusb コマンド )
最初に手持ちのUSB機器を挿していない状況を表示してみます。
その次に、手持ちの[USB-HUB]と[USBメモリ]を挿した時の状況を表示します。
$ lsusb
Bus 002 Device 002: ID 8087:8000 Intel Corp.
Bus 002 Device 001: ID 1d6b:0002 Linux Foundation 2.0 root hub
Bus 001 Device 002: ID 8087:8008 Intel Corp.
Bus 001 Device 001: ID 1d6b:0002 Linux Foundation 2.0 root hub
Bus 004 Device 001: ID 1d6b:0003 Linux Foundation 3.0 root hub
Bus 003 Device 003: ID 0566:3062 Monterey International Corp.
Bus 003 Device 002: ID 045e:00cb Microsoft Corp. Basic Optical Mouse v2.0
Bus 003 Device 001: ID 1d6b:0002 Linux Foundation 2.0 root hub
$ lsusb
Bus 002 Device 002: ID 8087:8000 Intel Corp.
Bus 002 Device 001: ID 1d6b:0002 Linux Foundation 2.0 root hub
Bus 001 Device 002: ID 8087:8008 Intel Corp.
Bus 001 Device 001: ID 1d6b:0002 Linux Foundation 2.0 root hub
Bus 004 Device 001: ID 1d6b:0003 Linux Foundation 3.0 root hub
Bus 003 Device 005: ID 18a5:0302 Verbatim, Ltd Flash Drive
Bus 003 Device 004: ID 05e3:0608 Genesys Logic, Inc. Hub
Bus 003 Device 003: ID 0566:3062 Monterey International Corp.
Bus 003 Device 002: ID 045e:00cb Microsoft Corp. Basic Optical Mouse v2.0
Bus 003 Device 001: ID 1d6b:0002 Linux Foundation 2.0 root hub
以下のUSBデバイスが追加されていることが把握できます。
Bus 003 Device 005: ID 18a5:0302 Verbatim, Ltd Flash Drive
Bus 003 Device 004: ID 05e3:0608 Genesys Logic, Inc. Hub
広告
ネットワークインターフェースの設定
本項の内容はRedhat系ディストリビューションとなる、CentOS 7 、CentOS 8 、 Fedora 20以上のOSに互換性があります。
現状分析 ( ifconfig コマンド )
最初に、現状の把握を行います。
RHELのインストール時に管理用ポートとして「eno1」へ「192.168.1.0/24」のアドレスを割り当てています。
その他、拡張4ポートNICの4ポート(enp1s0f0~3)、ロールバック(lo)、デフォルト設定されるハイパーバイザ等で使用する仮想ブリッジ(virbr0)用のネットワーク用デバイスが認識できています。
$ ifconfig -a
eno1: flags=4163<UP,BROADCAST,RUNNING,MULTICAST>  mtu 1500
        inet 192.168.1.31  netmask 255.255.255.0  broadcast 192.168.1.255
        inet6 2400:4051:a6e0:4300:5265:f3ff:fe1c:3c8b  prefixlen 64  scopeid 0x0<global>
        inet6 fe80::5265:f3ff:fe1c:3c8b  prefixlen 64  scopeid 0x20<link>
        ether 50:65:f3:1c:3c:8b  txqueuelen 1000  (Ethernet)
        RX packets 469672  bytes 566283286 (540.0 MiB)
        RX errors 0  dropped 0  overruns 0  frame 0
        TX packets 147993  bytes 14504329 (13.8 MiB)
        TX errors 0  dropped 0 overruns 0  carrier 0  collisions 0
        device interrupt 20  memory 0xf7d00000-f7d20000

enp1s0f0: flags=4099<UP,BROADCAST,MULTICAST>  mtu 1500
        ether 58:c2:32:0d:7d:b0  txqueuelen 1000  (Ethernet)
        RX packets 0  bytes 0 (0.0 B)
        RX errors 0  dropped 0  overruns 0  frame 0
        TX packets 0  bytes 0 (0.0 B)
        TX errors 0  dropped 0 overruns 0  carrier 0  collisions 0
        device interrupt 16

enp1s0f1: flags=4099<UP,BROADCAST,MULTICAST>  mtu 1500
        ether 58:c2:32:0d:7d:b1  txqueuelen 1000  (Ethernet)
        RX packets 0  bytes 0 (0.0 B)
        RX errors 0  dropped 0  overruns 0  frame 0
        TX packets 0  bytes 0 (0.0 B)
        TX errors 0  dropped 0 overruns 0  carrier 0  collisions 0
        device interrupt 17

enp1s0f2: flags=4163<UP,BROADCAST,RUNNING,MULTICAST>  mtu 1500
        ether 58:c2:32:0d:7d:b2  txqueuelen 1000  (Ethernet)
        RX packets 104616  bytes 7957011 (7.5 MiB)
        RX errors 0  dropped 0  overruns 0  frame 0
        TX packets 0  bytes 0 (0.0 B)
        TX errors 0  dropped 0 overruns 0  carrier 0  collisions 0
        device interrupt 16

enp1s0f3: flags=4163<UP,BROADCAST,RUNNING,MULTICAST>  mtu 1500
        ether 58:c2:32:0d:7d:b3  txqueuelen 1000  (Ethernet)
        RX packets 104626  bytes 7958042 (7.5 MiB)
        RX errors 0  dropped 0  overruns 0  frame 0
        TX packets 0  bytes 0 (0.0 B)
        TX errors 0  dropped 0 overruns 0  carrier 0  collisions 0
        device interrupt 17

lo: flags=73<UP,LOOPBACK,RUNNING>  mtu 65536
        inet 127.0.0.1  netmask 255.0.0.0
        inet6 ::1  prefixlen 128  scopeid 0x10<host>
        loop  txqueuelen 1000  (Local Loopback)
        RX packets 48  bytes 4080 (3.9 KiB)
        RX errors 0  dropped 0  overruns 0  frame 0
        TX packets 48  bytes 4080 (3.9 KiB)
        TX errors 0  dropped 0 overruns 0  carrier 0  collisions 0

virbr0: flags=4099<UP,BROADCAST,MULTICAST>  mtu 1500
        inet 192.168.122.1  netmask 255.255.255.0  broadcast 192.168.122.255
        ether 52:54:00:8a:3d:69  txqueuelen 1000  (Ethernet)
        RX packets 0  bytes 0 (0.0 B)
        RX errors 0  dropped 0  overruns 0  frame 0
        TX packets 0  bytes 0 (0.0 B)
        TX errors 0  dropped 0 overruns 0  carrier 0  collisions 0
現状分析 ( nmcli コマンド )
各ネットワーク用デバイスの詳細パラメータを参照します。
拡張4ポートNICの「(*)」で示した[enp1s0f2]、[ enp1s0f3]は、対向機器とケーブル接続してリンクアップ中ですので、「nmcli device status」の「STATE」は、設定の有効/無効を表していることになります。
$ sudo su -
# nmcli general
STATE     CONNECTIVITY  WIFI-HW  WIFI  WWAN-HW  WWAN
接続済み  完全          有効     有効  有効     有効

# nmcli device status
DEVICE      TYPE      STATE            CONNECTION
eno1        ethernet  接続済み         eno1
virbr0      bridge    接続済み (外部)  virbr0
enp1s0f0    ethernet  切断済み         --
enp1s0f1    ethernet  切断済み         --
enp1s0f2    ethernet  切断済み         --     <----(*)
enp1s0f3    ethernet  切断済み         --     <----(*)
lo          loopback  管理無し         --
virbr0-nic  tun       管理無し         --

# nmcli connection show
NAME      UUID                                  TYPE      DEVICE
eno1      5f2adea6-ad7a-489a-9579-6c584f119bcc  ethernet  eno1
virbr0    94ec4d40-8ad2-4f5e-ad6c-06eb950a9527  bridge    virbr0
enp1s0f0  1a12fce2-e269-4b9c-8167-e46bbdf51098  ethernet  --
enp1s0f1  646addfd-283e-407c-8811-9ffa8210ab4d  ethernet  --
enp1s0f2  3d9c9f2f-a6a0-41e0-b975-7237abe8b815  ethernet  --
enp1s0f3  35a5e174-aed7-4dd8-8d8b-f6b095d1c2a5  ethernet  --

# nmcli device show
GENERAL.DEVICE:                         eno1
GENERAL.TYPE:                           ethernet
GENERAL.HWADDR:                         50:65:F3:1C:3C:8B
GENERAL.MTU:                            1500
GENERAL.STATE:                          100 (接続済み)
GENERAL.CONNECTION:                     eno1
 :
 :
(省略)

# nmcli connection show eno1
connection.id:                          eno1
connection.uuid:                        5f2adea6-ad7a-489a-9579-6c584f119bcc
connection.stable-id:                   --
connection.type:                        802-3-ethernet
connection.interface-name:              eno1
connection.autoconnect:                 はい
 :
 :
(省略)
現状分析 ( ethtool コマンド )
各ネットワーク用デバイスの詳細パラメータを参照します。
NICの設定可能なモード、現在の設定値を参照することができます。
「Link detected:」の行でリンクアップ、リンクダウンの状況を把握することができます。
以下の結果により、拡張4ポートNICの[enp1s0f0]はリンクダウン 、[eno1]、[ enp1s0f 3]はリンクアップとわかります。
$ sudo su -
# ethtool eno1

Settings for eno1:
        Supported ports: [ TP ]
        Supported link modes:   10baseT/Half 10baseT/Full
                                100baseT/Half 100baseT/Full
                                1000baseT/Full
        Supported pause frame use: No
        Supports auto-negotiation: Yes
        Supported FEC modes: Not reported
        Advertised link modes:  10baseT/Half 10baseT/Full
                                100baseT/Half 100baseT/Full
                                1000baseT/Full
        Advertised pause frame use: No
        Advertised auto-negotiation: Yes
        Advertised FEC modes: Not reported
        Speed: 100Mb/s
        Duplex: Full
        Auto-negotiation: on
        Port: Twisted Pair
        PHYAD: 1
        Transceiver: internal
        MDI-X: on (auto)
        Supports Wake-on: pumbg
        Wake-on: g
        Current message level: 0x00000007 (7)
                               drv probe link
        Link detected: yes

# ethtool enp1s0f0
Settings for enp1s0f0:
        Supported ports: [ TP ]
        Supported link modes:   10baseT/Half 10baseT/Full
                                100baseT/Half 100baseT/Full
                                1000baseT/Half 1000baseT/Full
        Supported pause frame use: No
        Supports auto-negotiation: Yes
        Supported FEC modes: Not reported
        Advertised link modes:  10baseT/Half 10baseT/Full
                                100baseT/Half 100baseT/Full
                                1000baseT/Half 1000baseT/Full
        Advertised pause frame use: No
        Advertised auto-negotiation: Yes
        Advertised FEC modes: Not reported
        Speed: Unknown!
        Duplex: Unknown! (255)
        Auto-negotiation: on
        Port: Twisted Pair
        PHYAD: 1
        Transceiver: internal
        MDI-X: Unknown
        Supports Wake-on: g
        Wake-on: d
        Current message level: 0x000000ff (255)
                               drv probe link timer ifdown ifup rx_err tx_err
        Link detected: no

# ethtool enp1s0f3
Settings for enp1s0f3:
        Supported ports: [ TP ]
        Supported link modes:   10baseT/Half 10baseT/Full
                                100baseT/Half 100baseT/Full
                                1000baseT/Half 1000baseT/Full
        Supported pause frame use: No
        Supports auto-negotiation: Yes
        Supported FEC modes: Not reported
        Advertised link modes:  10baseT/Half 10baseT/Full
                                100baseT/Half 100baseT/Full
                                1000baseT/Half 1000baseT/Full
        Advertised pause frame use: No
        Advertised auto-negotiation: Yes
        Advertised FEC modes: Not reported
        Link partner advertised link modes:  10baseT/Half 10baseT/Full
                                             100baseT/Half 100baseT/Full
        Link partner advertised pause frame use: No
        Link partner advertised auto-negotiation: Yes
        Link partner advertised FEC modes: Not reported
        Speed: 100Mb/s
        Duplex: Full
        Auto-negotiation: on
        Port: Twisted Pair
        PHYAD: 4
        Transceiver: internal
        MDI-X: off
        Supports Wake-on: g
        Wake-on: d
        Current message level: 0x000000ff (255)
                               drv probe link timer ifdown ifup rx_err tx_err
        Link detected: yes
IPアドレスの割り当て ( nmtui コマンド )
NetworkManagerのテキストユーザインタフェースを使用して、 拡張4ポートNICの[enp1s0f2]へ以下の表の内容で設定してみます。
| 項目 | 値 |
| ネットワークインターフェース | enp1s0f2 |
| IP Address | 192.168.100.22 |
| Net Mask | 255.255.255.0(24) |
| Gateway | 192.168.100.251 【注意】 便宜上、設定していますが、既にデフォルトゲートウェイ(default gateway)を設定している場合、この設定は不要です。 |
| DNS | 8.8.8.8 【注意】 便宜上、設定していますが、既にDNSサーバを設定している場合、 この設定は不要です。 |
| 検索ドメイン | 指定しない |
| IPv6 | 無効 |
| 自動的に接続する | チェック (OS起動時に有効にする) |
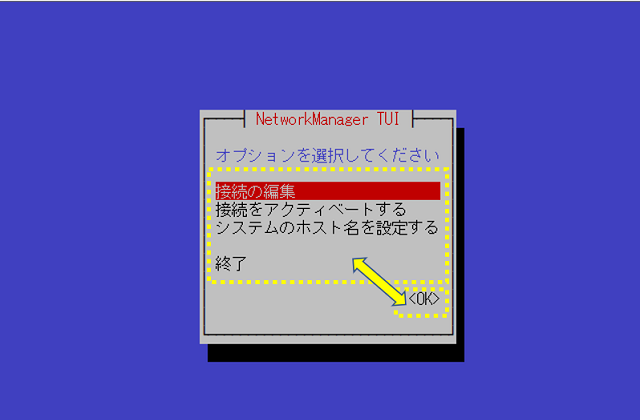
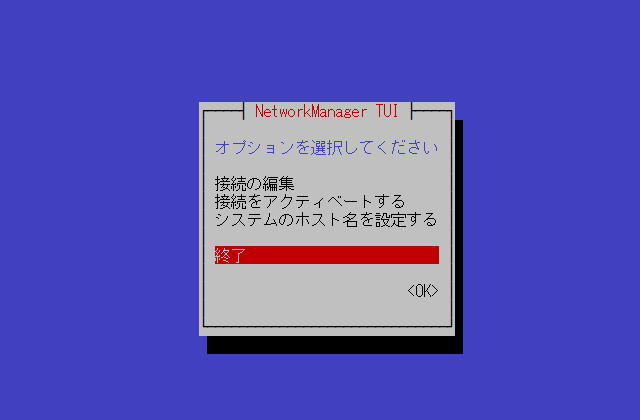
以下の「nmtui」コマンドを用い、ネットワークインターフェースを設定します。
$ sudo su -
# nmtui
簡単な操作方法を以下へ記載します。
- カーソルは[矢印]キーで移動できます。
- メニューの選択は[Enter]キーを押下します。
- 他のフィールドへカーソルを移動させるときは、[Tab]キーを押下します。
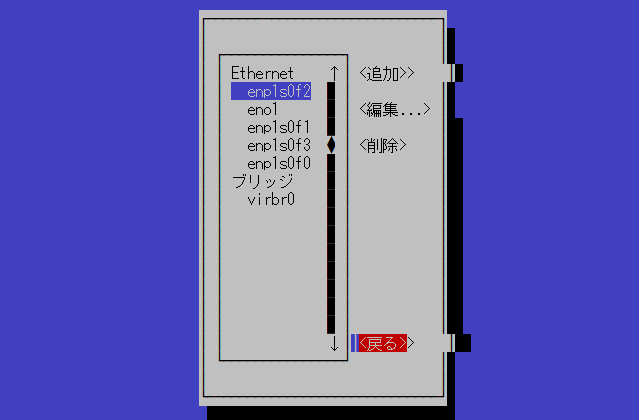
「接続の編集」を[矢印]キーで選択、[Enter]キーを押下します。
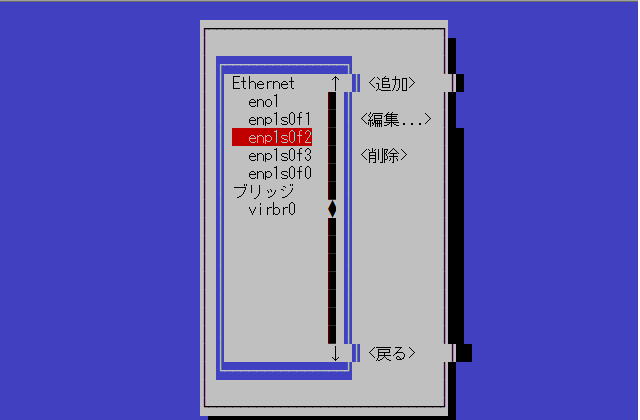
- 対象インターフェース [enp1s0f2]を[矢印]キーで選択、[Enter]キーを押下します。
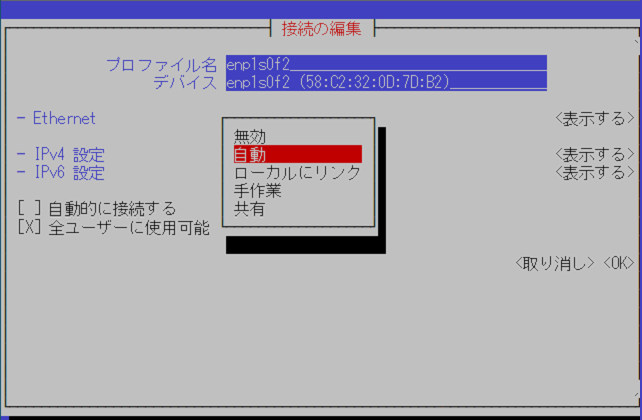
- 「IPv4 設定」行の「<自動>」を選択、[Enter]キーを押下します。
- サブメニュー画面の「手作業」を選択、[Enter]キーを押下、メニュー画面へ戻ります。
- [矢印]キーの「右」を押下し、「IPv4 設定」行の「<表示する>」を選択、[Enter]キーを押下します。
- サブメニュー画面を閉じる場合は、[Esc]キーを押下します。
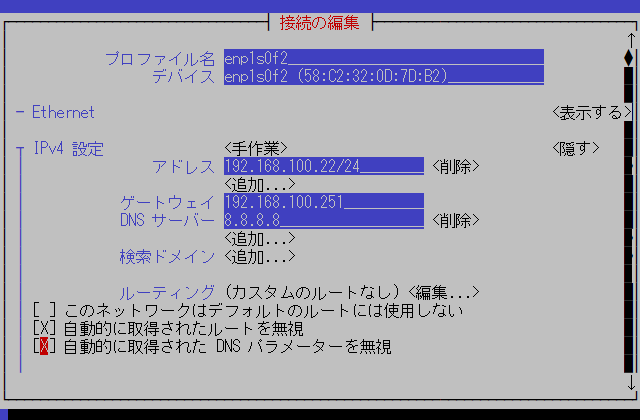
- 各項目に値を入力します。
- IPアドレスの値では、Net Maskの値も「/」を使用して記載します。( [IPアドレス]/[NetMask] )
- 各チェックボックスを[矢印]キーを使用して移動します。
- [スペース]キーを押下することで、チェックすることができます。
- チェックを外す場合も[スペース]キーを押下します。
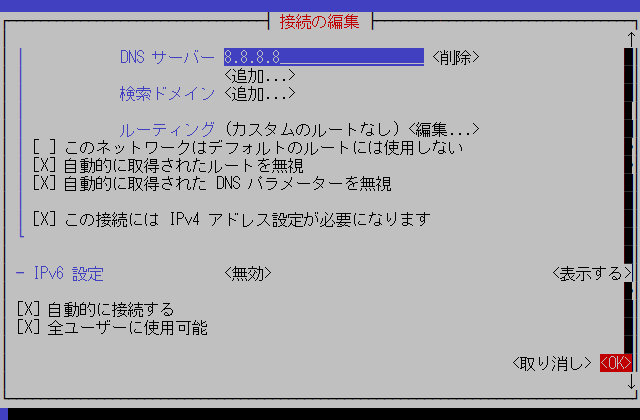
- [矢印]キーの「下」を押下し、最後まで入力します。
- 「自動的に接続する」にチェックをしない場合、OS起動時にネットワーク接続が有効にならないことに気をつけましょう。
- 最後に「<OK>」を選択、[Enter]キーを押下します。
- [Tab]キーを押下して、フィールドを移動します。「<追加>」が選択されます。
- [矢印]キーを使用して「<戻る>」を選択、[Enter]キーを押下します。
- [矢印]キーを使用して「終了」を選択、[Enter]キーを押下し、「nmtui」コマンドを終了します。
設定を確認します。
$ ifconfig -a

eno1: flags=4163<UP,BROADCAST,RUNNING,MULTICAST>  mtu 1500
        inet 192.168.1.31  netmask 255.255.255.0  broadcast 192.168.1.255
        inet6 2400:4051:a6e0:4300:5265:f3ff:fe1c:3c8b  prefixlen 64  scopeid 0x0<global>
        inet6 fe80::5265:f3ff:fe1c:3c8b  prefixlen 64  scopeid 0x20<link>
        ether 50:65:f3:1c:3c:8b  txqueuelen 1000  (Ethernet)
        RX packets 680637  bytes 823595117 (785.4 MiB)
        RX errors 0  dropped 0  overruns 0  frame 0
        TX packets 213631  bytes 20933485 (19.9 MiB)
        TX errors 0  dropped 0 overruns 0  carrier 0  collisions 0
        device interrupt 20  memory 0xf7d00000-f7d20000

enp1s0f0: flags=4099<UP,BROADCAST,MULTICAST>  mtu 1500
        ether 58:c2:32:0d:7d:b0  txqueuelen 1000  (Ethernet)
        RX packets 0  bytes 0 (0.0 B)
        RX errors 0  dropped 0  overruns 0  frame 0
        TX packets 0  bytes 0 (0.0 B)
        TX errors 0  dropped 0 overruns 0  carrier 0  collisions 0
        device interrupt 16

enp1s0f1: flags=4099<UP,BROADCAST,MULTICAST>  mtu 1500
        ether 58:c2:32:0d:7d:b1  txqueuelen 1000  (Ethernet)
        RX packets 0  bytes 0 (0.0 B)
        RX errors 0  dropped 0  overruns 0  frame 0
        TX packets 0  bytes 0 (0.0 B)
        TX errors 0  dropped 0 overruns 0  carrier 0  collisions 0
        device interrupt 17

enp1s0f2: flags=4163<UP,BROADCAST,RUNNING,MULTICAST>  mtu 1500
        inet 192.168.100.22  netmask 255.255.255.0  broadcast 192.168.100.255
        ether 58:c2:32:0d:7d:b2  txqueuelen 1000  (Ethernet)
        RX packets 159134  bytes 12103314 (11.5 MiB)
        RX errors 0  dropped 0  overruns 0  frame 0
        TX packets 11  bytes 1112 (1.0 KiB)
        TX errors 0  dropped 0 overruns 0  carrier 0  collisions 0
        device interrupt 16

enp1s0f3: flags=4163<UP,BROADCAST,RUNNING,MULTICAST>  mtu 1500
        ether 58:c2:32:0d:7d:b3  txqueuelen 1000  (Ethernet)
        RX packets 159153  bytes 12105329 (11.5 MiB)
        RX errors 0  dropped 0  overruns 0  frame 0
        TX packets 0  bytes 0 (0.0 B)
        TX errors 0  dropped 0 overruns 0  carrier 0  collisions 0
        device interrupt 17

lo: flags=73<UP,LOOPBACK,RUNNING>  mtu 65536
        inet 127.0.0.1  netmask 255.0.0.0
        inet6 ::1  prefixlen 128  scopeid 0x10<host>
        loop  txqueuelen 1000  (Local Loopback)
        RX packets 60  bytes 5100 (4.9 KiB)
        RX errors 0  dropped 0  overruns 0  frame 0
        TX packets 60  bytes 5100 (4.9 KiB)
        TX errors 0  dropped 0 overruns 0  carrier 0  collisions 0

virbr0: flags=4099<UP,BROADCAST,MULTICAST>  mtu 1500
        inet 192.168.122.1  netmask 255.255.255.0  broadcast 192.168.122.255
        ether 52:54:00:8a:3d:69  txqueuelen 1000  (Ethernet)
        RX packets 0  bytes 0 (0.0 B)
        RX errors 0  dropped 0  overruns 0  frame 0
        TX packets 0  bytes 0 (0.0 B)
        TX errors 0  dropped 0 overruns 0  carrier 0  collisions 0

virbr0-nic: flags=4098<BROADCAST,MULTICAST>  mtu 1500
        ether 52:54:00:8a:3d:69  txqueuelen 1000  (Ethernet)
        RX packets 0  bytes 0 (0.0 B)
        RX errors 0  dropped 0  overruns 0  frame 0
        TX packets 0  bytes 0 (0.0 B)
        TX errors 0  dropped 0 overruns 0  carrier 0  collisions 0
ネットワークデバイスおよびインターフェースの一覧を表示して確認します。
$ sudo su -
# nmcli device status
DEVICE      TYPE      STATE            CONNECTION
eno1        ethernet  接続済み         eno1
virbr0      bridge    接続済み (外部)  virbr0
enp1s0f2    ethernet  接続済み         enp1s0f2
enp1s0f0    ethernet  切断済み         --
enp1s0f1    ethernet  切断済み         --
enp1s0f3    ethernet  切断済み         --
lo          loopback  管理無し         --
virbr0-nic  tun       管理無し         --
追加したネットワークインターフェースの詳細情報を表示、設定どおりであることを確認します。
# nmcli connection show enp1s0f2
connection.id:                          enp1s0f2
connection.uuid:                        3d9c9f2f-a6a0-41e0-b975-7237abe8b815
connection.stable-id:                   --
connection.type:                        802-3-ethernet
connection.interface-name:              enp1s0f2
connection.autoconnect:                 はい
connection.autoconnect-priority:        0
connection.autoconnect-retries:         -1 (default)
connection.multi-connect:               0 (default)
connection.auth-retries:                -1
connection.timestamp:                   1636674971
connection.read-only:                   いいえ
connection.permissions:                 --
connection.zone:                        --
connection.master:                      --
connection.slave-type:                  --
connection.autoconnect-slaves:          -1 (default)
connection.secondaries:                 --
connection.gateway-ping-timeout:        0
connection.metered:                     不明
connection.lldp:                        default
connection.mdns:                        -1 (default)
connection.llmnr:                       -1 (default)
connection.wait-device-timeout:         -1
802-3-ethernet.port:                    --
802-3-ethernet.speed:                   0
802-3-ethernet.duplex:                  --
802-3-ethernet.auto-negotiate:          いいえ
802-3-ethernet.mac-address:             --
802-3-ethernet.cloned-mac-address:      --
802-3-ethernet.generate-mac-address-mask:--
802-3-ethernet.mac-address-blacklist:   --
802-3-ethernet.mtu:                     自動
802-3-ethernet.s390-subchannels:        --
802-3-ethernet.s390-nettype:            --
802-3-ethernet.s390-options:            --
802-3-ethernet.wake-on-lan:             default
802-3-ethernet.wake-on-lan-password:    --
ipv4.method:                            manual
ipv4.dns:                               8.8.8.8
ipv4.dns-search:                        --
ipv4.dns-options:                       --
ipv4.dns-priority:                      0
ipv4.addresses:                         192.168.100.22/24
ipv4.gateway:                           192.168.100.251
ipv4.routes:                            --
ipv4.route-metric:                      -1
ipv4.route-table:                       0 (unspec)
ipv4.routing-rules:                     --
ipv4.ignore-auto-routes:                はい
ipv4.ignore-auto-dns:                   はい
ipv4.dhcp-client-id:                    --
ipv4.dhcp-iaid:                         --
ipv4.dhcp-timeout:                      0 (default)
ipv4.dhcp-send-hostname:                はい
ipv4.dhcp-hostname:                     --
ipv4.dhcp-fqdn:                         --
ipv4.dhcp-hostname-flags:               0x0 (none)
ipv4.never-default:                     いいえ
ipv4.may-fail:                          いいえ
ipv4.required-timeout:                  -1 (default)
ipv4.dad-timeout:                       -1 (default)
ipv4.dhcp-vendor-class-identifier:      --
ipv4.dhcp-reject-servers:               --
ipv6.method:                            disabled
ipv6.dns:                               --
ipv6.dns-search:                        --
ipv6.dns-options:                       --
ipv6.dns-priority:                      0
ipv6.addresses:                         --
ipv6.gateway:                           --
ipv6.routes:                            --
ipv6.route-metric:                      -1
ipv6.route-table:                       0 (unspec)
ipv6.routing-rules:                     --
ipv6.ignore-auto-routes:                いいえ
ipv6.ignore-auto-dns:                   いいえ
ipv6.never-default:                     いいえ
ipv6.may-fail:                          はい
ipv6.required-timeout:                  -1 (default)
ipv6.ip6-privacy:                       -1 (unknown)
ipv6.addr-gen-mode:                     stable-privacy
ipv6.ra-timeout:                        0 (default)
ipv6.dhcp-duid:                         --
ipv6.dhcp-iaid:                         --
ipv6.dhcp-timeout:                      0 (default)
ipv6.dhcp-send-hostname:                はい
ipv6.dhcp-hostname:                     --
ipv6.dhcp-hostname-flags:               0x0 (none)
ipv6.token:                             --
proxy.method:                           none
proxy.browser-only:                     いいえ
proxy.pac-url:                          --
proxy.pac-script:                       --
GENERAL.NAME:                           enp1s0f2
GENERAL.UUID:                           3d9c9f2f-a6a0-41e0-b975-7237abe8b815
GENERAL.DEVICES:                        enp1s0f2
GENERAL.IP-IFACE:                       enp1s0f2
GENERAL.STATE:                          アクティベート済み
GENERAL.DEFAULT:                        いいえ
GENERAL.DEFAULT6:                       いいえ
GENERAL.SPEC-OBJECT:                    --
GENERAL.VPN:                            いいえ
GENERAL.DBUS-PATH:                      /org/freedesktop/NetworkManager/ActiveConnection/4
GENERAL.CON-PATH:                       /org/freedesktop/NetworkManager/Settings/3
GENERAL.ZONE:                           --
GENERAL.MASTER-PATH:                    --
IP4.ADDRESS[1]:                         192.168.100.22/24
IP4.GATEWAY:                            192.168.100.251
IP4.ROUTE[1]:                           dst = 192.168.100.0/24, nh = 0.0.0.0, mt = 101
IP4.ROUTE[2]:                           dst = 0.0.0.0/0, nh = 192.168.100.251, mt = 101
IP4.DNS[1]:                             8.8.8.8
IP6.GATEWAY:                            --
IPアドレスの割り当て ( nmcli コマンド )
NetworkManagerコマンド(nmcli)を使用して、 拡張4ポートNICの[enp1s0f2]へ以下の表の内容で設定してみます。
| 項目 | 値 |
| ネットワークインターフェース | enp1s0f2 |
| IP Address | 192.168.200.22 |
| Net Mask | 255.255.255.0(24) |
| Gateway | 192.168.200.251 【注意】 便宜上、設定していますが、既にデフォルトゲートウェイ(default gateway)を設定している場合、この設定は不要です。 |
| DNS | 8.8.8.8 【注意】 便宜上、設定していますが、既にDNSサーバを設定している場合、 この設定は不要です。 |
| 検索ドメイン | 指定しない |
| IPv6 | 無効 |
| 自動的に接続する | yes (OS起動時に有効にする) |
以下のように、ネットワークインターフェースを設定します。
IPアドレスの設定を何もしないまま、手動設定(ipv4.method manual)に変更することはできないことに注意が必要です。
$ sudo su -
# nmcli connection modify enp1s0f3 ipv4.method manual
エラー: 接続 'enp1s0f3' の変更に失敗しました: ipv4.addresses: 'method=manual' のこのプロパティーを空にすることはできません
# nmcli connection modify enp1s0f3 ipv4.addresses 192.168.200.22/24
# nmcli connection modify enp1s0f3 ipv4.gateway  192.168.200.251
# nmcli connection modify enp1s0f3 ipv4.dns 8.8.8.8
# nmcli connection modify enp1s0f3 ipv4.may-fail no
# nmcli connection modify enp1s0f3 ipv4.method manual
# nmcli connection modify enp1s0f3 ipv6.method disabled
# nmcli connection modify enp1s0f3 connection.autoconnect yes

設定の再読み込み、起動状態の確認

# nmcli connection reload
# nmcli connection down enp1s0f3
# nmcli connection up enp1s0f3
# nmcli connection show
# nmcli connection show enp1s0f3
「ipv4.may-fail no」のパラメータ変更は、IPv4のDHCPによるIP設定の割り当てが失敗した後に続けて、IPv6によるIP設定を実施させず、DHCP応答の待ち時間が短縮できます。
セキュリティ要件などから、動的な変更を拒否する場合は、以下の設定も実施します。
# nmcli connection modify enp1s0f3 ipv4.ignore-auto-routes yes
# nmcli connection modify enp1s0f3 ipv4.ignore-auto-dns yes


設定の再読み込み、起動状態の確認

# nmcli connection reload
# nmcli connection down enp1s0f3
# nmcli connection up enp1s0f3
# nmcli connection show
# nmcli connection show enp1s0f3
追加したネットワークインターフェースの詳細情報を表示、設定どおりであることを確認します。
# nmcli connection show enp1s0f3
connection.id:                          enp1s0f3
connection.uuid:                        35a5e174-aed7-4dd8-8d8b-f6b095d1c2a5
connection.stable-id:                   --
connection.type:                        802-3-ethernet
connection.interface-name:              enp1s0f3
connection.autoconnect:                 はい
connection.autoconnect-priority:        0
connection.autoconnect-retries:         -1 (default)
connection.multi-connect:               0 (default)
connection.auth-retries:                -1
connection.timestamp:                   1636805171
connection.read-only:                   いいえ
connection.permissions:                 --
connection.zone:                        --
connection.master:                      --
connection.slave-type:                  --
connection.autoconnect-slaves:          -1 (default)
connection.secondaries:                 --
connection.gateway-ping-timeout:        0
connection.metered:                     不明
connection.lldp:                        default
connection.mdns:                        -1 (default)
connection.llmnr:                       -1 (default)
connection.wait-device-timeout:         -1
802-3-ethernet.port:                    --
802-3-ethernet.speed:                   0
802-3-ethernet.duplex:                  --
802-3-ethernet.auto-negotiate:          いいえ
802-3-ethernet.mac-address:             --
802-3-ethernet.cloned-mac-address:      --
802-3-ethernet.generate-mac-address-mask:--
802-3-ethernet.mac-address-blacklist:   --
802-3-ethernet.mtu:                     自動
802-3-ethernet.s390-subchannels:        --
802-3-ethernet.s390-nettype:            --
802-3-ethernet.s390-options:            --
802-3-ethernet.wake-on-lan:             default
802-3-ethernet.wake-on-lan-password:    --
ipv4.method:                            manual
ipv4.dns:                               8.8.8.8
ipv4.dns-search:                        --
ipv4.dns-options:                       --
ipv4.dns-priority:                      0
ipv4.addresses:                         192.168.200.22/24
ipv4.gateway:                           192.168.200.251
ipv4.routes:                            --
ipv4.route-metric:                      -1
ipv4.route-table:                       0 (unspec)
ipv4.routing-rules:                     --
ipv4.ignore-auto-routes:                はい
ipv4.ignore-auto-dns:                   はい
ipv4.dhcp-client-id:                    --
ipv4.dhcp-iaid:                         --
ipv4.dhcp-timeout:                      0 (default)
ipv4.dhcp-send-hostname:                はい
ipv4.dhcp-hostname:                     --
ipv4.dhcp-fqdn:                         --
ipv4.dhcp-hostname-flags:               0x0 (none)
ipv4.never-default:                     いいえ
ipv4.may-fail:                          いいえ
ipv4.required-timeout:                  -1 (default)
ipv4.dad-timeout:                       -1 (default)
ipv4.dhcp-vendor-class-identifier:      --
ipv4.dhcp-reject-servers:               --
ipv6.method:                            disabled
ipv6.dns:                               --
ipv6.dns-search:                        --
ipv6.dns-options:                       --
ipv6.dns-priority:                      0
ipv6.addresses:                         --
ipv6.gateway:                           --
ipv6.routes:                            --
ipv6.route-metric:                      -1
ipv6.route-table:                       0 (unspec)
ipv6.routing-rules:                     --
ipv6.ignore-auto-routes:                いいえ
ipv6.ignore-auto-dns:                   いいえ
ipv6.never-default:                     いいえ
ipv6.may-fail:                          はい
ipv6.required-timeout:                  -1 (default)
ipv6.ip6-privacy:                       -1 (unknown)
ipv6.addr-gen-mode:                     stable-privacy
ipv6.ra-timeout:                        0 (default)
ipv6.dhcp-duid:                         --
ipv6.dhcp-iaid:                         --
ipv6.dhcp-timeout:                      0 (default)
ipv6.dhcp-send-hostname:                はい
ipv6.dhcp-hostname:                     --
ipv6.dhcp-hostname-flags:               0x0 (none)
ipv6.token:                             --
proxy.method:                           none
proxy.browser-only:                     いいえ
proxy.pac-url:                          --
proxy.pac-script:                       --
GENERAL.NAME:                           enp1s0f3
GENERAL.UUID:                           35a5e174-aed7-4dd8-8d8b-f6b095d1c2a5
GENERAL.DEVICES:                        enp1s0f3
GENERAL.IP-IFACE:                       enp1s0f3
GENERAL.STATE:                          アクティベート済み
GENERAL.DEFAULT:                        いいえ
GENERAL.DEFAULT6:                       いいえ
GENERAL.SPEC-OBJECT:                    --
GENERAL.VPN:                            いいえ
GENERAL.DBUS-PATH:                      /org/freedesktop/NetworkManager/ActiveC>
GENERAL.CON-PATH:                       /org/freedesktop/NetworkManager/Setting>
GENERAL.ZONE:                           --
GENERAL.MASTER-PATH:                    --
IP4.ADDRESS[1]:                         192.168.200.22/24
IP4.GATEWAY:                            192.168.200.251
IP4.ROUTE[1]:                           dst = 192.168.200.0/24, nh = 0.0.0.0, m>
IP4.ROUTE[2]:                           dst = 0.0.0.0/0, nh = 192.168.200.251, >
IP4.DNS[1]:                             8.8.8.8
IP6.GATEWAY:                            --
ネットワークインターフェースのパラメータ変更
例では、ネットワークインターフェース「enp1s0f3」を使っています。
パラメータ変更前の値を必ずバックアップしましょう。変更後は、必ず反映設定の再読み込み、起動状態の確認を実施しましょう。
「nmcli」コマンドによる パラメータ値のバックアップは以下のとおりです。
# nmcli connection show enp1s0f3 > /tmp/enp1s0f3.bkup.txt上記の設定において、便宜上、設定したデフォルトゲートウェイとDNSのパラメータ値を初期化してみます。
$ sudo su -
# nmcli connection modify enp1s0f3 ipv4.gateway ''
# nmcli connection modify enp1s0f3 ipv4.dns ''

設定の再読み込み、起動状態の確認

# nmcli connection reload
# nmcli connection down enp1s0f3
# nmcli connection up enp1s0f3
# nmcli connection show
# nmcli connection show enp1s0f3
パラメータ値が「disable」(無効)になっているところを「enable」(有効)にしてみます。
取りうるパラメータ値でない場合、入力可能なパラメータの種類を教えてくれます。
設定の再読み込み、起動状態の確認をお忘れなく。
$ sudo su -
# nmcli connection modify enp1s0f3 ipv6.method enable
エラー: modify ipv6.method: 'enable' は [ignore, auto, dhcp, link-local, manual, shared, disabled] にはありません. に失敗しました
# nmcli connection modify enp1s0f3 ipv6.method auto
# nmcli connection modify enp1s0f3 ipv6.method disable
もう一つ、「nmcli connection show」コマンドによるパラメータ値により表示される、「はい」、「いいえ」の箇所を変更してみます。
設定の再読み込み、起動状態の確認をお忘れなく。
$ sudo su -
# nmcli connection modify enp1s0f3 connection.autoconnect enable
エラー: modify connection.autoconnect: 'enable' は無効です。[true, yes, on] か [false, no, off] を使用してください. に失敗しました
# nmcli connection modify enp1s0f3 connection.autoconnect no
# nmcli connection modify enp1s0f3 connection.autoconnect yes
ネットワークインターフェースの初期化
上記の説明のため使用したネットワークインターフェース 「enp1s0f2」 「enp1s0f3」を初期化します。
ネットワークインターフェースの削除
# nmcli connection delete enp1s0f2
接続 'enp1s0f2' (3d9c9f2f-a6a0-41e0-b975-7237abe8b815) が正常に削除されました。

# nmcli connection delete enp1s0f3
接続 'enp1s0f3' (35a5e174-aed7-4dd8-8d8b-f6b095d1c2a5) が正常に削除されました。

削除確認
# nmcli connection show
NAME      UUID                                  TYPE      DEVICE
team1     b4500e44-02de-4766-a3bd-e1b6651ba2ca  team      team1
eno1      5f2adea6-ad7a-489a-9579-6c584f119bcc  ethernet  eno1
virbr0    94ec4d40-8ad2-4f5e-ad6c-06eb950a9527  bridge    virbr0
enp1s0f0  1a12fce2-e269-4b9c-8167-e46bbdf51098  ethernet  --
enp1s0f1  646addfd-283e-407c-8811-9ffa8210ab4d  ethernet  --

ネットワークインターフェースの追加
# nmcli connection add type ethernet ifname enp1s0f2 con-name enp1s0f2
接続 'enp1s0f2' (a48c5f90-aef9-44e2-bef5-1053a4273f2e) が正常に追加されました。

# nmcli connection add type ethernet ifname enp1s0f3 con-name enp1s0f3
接続 'enp1s0f3' (4b799987-ee76-4a9f-a0fb-e176bb02c100) が正常に追加されました。

追加確認
# nmcli connection show
NAME      UUID                                  TYPE      DEVICE
enp1s0f2  a48c5f90-aef9-44e2-bef5-1053a4273f2e  ethernet  enp1s0f2
enp1s0f3  4b799987-ee76-4a9f-a0fb-e176bb02c100  ethernet  enp1s0f3
eno1      5f2adea6-ad7a-489a-9579-6c584f119bcc  ethernet  eno1
virbr0    94ec4d40-8ad2-4f5e-ad6c-06eb950a9527  bridge    virbr0
enp1s0f0  1a12fce2-e269-4b9c-8167-e46bbdf51098  ethernet  --
enp1s0f1  646addfd-283e-407c-8811-9ffa8210ab4d  ethernet  --

反映
# nmcli connection reload

初期化確認
# nmcli connection show
NAME      UUID                                  TYPE      DEVICE
eno1      5f2adea6-ad7a-489a-9579-6c584f119bcc  ethernet  eno1
virbr0    94ec4d40-8ad2-4f5e-ad6c-06eb950a9527  bridge    virbr0
enp1s0f0  1a12fce2-e269-4b9c-8167-e46bbdf51098  ethernet  --
enp1s0f1  646addfd-283e-407c-8811-9ffa8210ab4d  ethernet  --
enp1s0f2  a48c5f90-aef9-44e2-bef5-1053a4273f2e  ethernet  --
enp1s0f3  4b799987-ee76-4a9f-a0fb-e176bb02c100  ethernet  --
広告
Teaming(LACP)
物理的なネットワークインターフェースを束ねることをリンクアグリゲーション、ボンディングなど、呼び方や技術が色々ありますが、ここでは、Teaming(チーミング)を説明します。
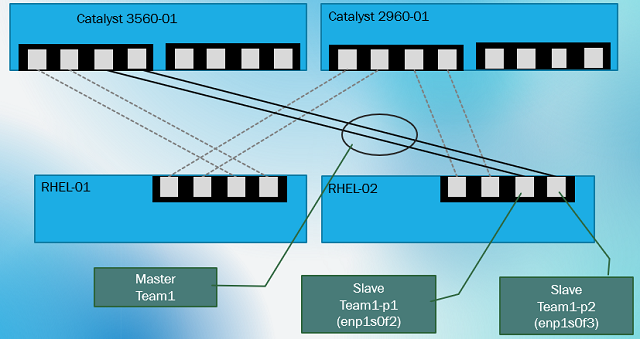
Teaming(チーミング)されたチームインターフェースを「Master」、その要素となる物理インターフェースや論理インターフェースを「Slave」と定義します。
例として、以下の図のようにTeam構成します。
本項の内容はRedhat系ディストリビューションとなる、CentOS 7 、CentOS 8 、 Fedora 20以上のOSに互換性があります。
ネットワークインターフェースの確認
上記の「nmtui」や「nmcli」を使用し、上記の解説に使った拡張4ポートNICの[enp1s0f2] 、[ enp1s0f3]を使用します。
$ nmcli device status
DEVICE      TYPE      STATE            CONNECTION
eno1        ethernet  接続済み         eno1
virbr0      bridge    接続済み (外部)  virbr0
enp1s0f2    ethernet  接続済み         enp1s0f2
enp1s0f3    ethernet  接続済み         enp1s0f3
enp1s0f0    ethernet  切断済み         --
enp1s0f1    ethernet  切断済み         --
lo          loopback  管理無し         --
virbr0-nic  tun       管理無し         --
ソフトウェアパッケージ( teamd )のインストール
以下のパッケージを「yum」コマンドを用い、追加インストールします。
| パッケージ | 説明 |
| teamd | Teamingデーモン |
| NetworkManager-team | teamd用NetworkManagerプラグイン |
コマンドの実施例を以下に示します。
$ sudo su -
# yum install -y teamd NetworkManager-team


Updating Subscription Management repositories.
メタデータの期限切れの最終確認: 2:24:28 時間前の 2021年11月15日 01時54分43秒 に 実施しました。
パッケージ teamd-1.31-2.el8.x86_64 は既にインストールされています。
パッケージ NetworkManager-team-1:1.30.0-13.el8_4.x86_64 は既にインストールされています。
依存関係が解決しました。
================================================================================
 パッケージ          Arch   バージョン      リポジトリー                  サイズ
================================================================================
アップグレード:
 NetworkManager      x86_64 1:1.32.10-4.el8 rhel-8-for-x86_64-baseos-rpms 2.6 M
 NetworkManager-adsl x86_64 1:1.32.10-4.el8 rhel-8-for-x86_64-baseos-rpms 144 k
 NetworkManager-bluetooth
                     x86_64 1:1.32.10-4.el8 rhel-8-for-x86_64-baseos-rpms 170 k
 NetworkManager-libnm
                     x86_64 1:1.32.10-4.el8 rhel-8-for-x86_64-baseos-rpms 1.8 M
 NetworkManager-team x86_64 1:1.32.10-4.el8 rhel-8-for-x86_64-baseos-rpms 149 k
 NetworkManager-tui  x86_64 1:1.32.10-4.el8 rhel-8-for-x86_64-baseos-rpms 336 k
 NetworkManager-wifi x86_64 1:1.32.10-4.el8 rhel-8-for-x86_64-baseos-rpms 190 k
 NetworkManager-wwan x86_64 1:1.32.10-4.el8 rhel-8-for-x86_64-baseos-rpms 176 k

トランザクションの概要
================================================================================
アップグレード  8 パッケージ

ダウンロードサイズの合計: 5.6 M
パッケージのダウンロード:
(1/8): NetworkManager-adsl-1.32.10-4.el8.x86_64 240 kB/s | 144 kB     00:00
(2/8): NetworkManager-wwan-1.32.10-4.el8.x86_64 291 kB/s | 176 kB     00:00
(3/8): NetworkManager-team-1.32.10-4.el8.x86_64 242 kB/s | 149 kB     00:00
(4/8): NetworkManager-1.32.10-4.el8.x86_64.rpm  5.1 MB/s | 2.6 MB     00:00
(5/8): NetworkManager-tui-1.32.10-4.el8.x86_64. 597 kB/s | 336 kB     00:00
(6/8): NetworkManager-wifi-1.32.10-4.el8.x86_64 332 kB/s | 190 kB     00:00
(7/8): NetworkManager-bluetooth-1.32.10-4.el8.x 769 kB/s | 170 kB     00:00
(8/8): NetworkManager-libnm-1.32.10-4.el8.x86_6 4.8 MB/s | 1.8 MB     00:00
--------------------------------------------------------------------------------
合計                                            3.6 MB/s | 5.6 MB     00:01
トランザクションの確認を実行中
トランザクションの確認に成功しました。
トランザクションのテストを実行中
トランザクションのテストに成功しました。
トランザクションを実行中
  準備             :                                                        1/1
  scriptletの実行中: NetworkManager-libnm-1:1.32.10-4.el8.x86_64            1/1
  アップグレード中 : NetworkManager-libnm-1:1.32.10-4.el8.x86_64           1/16
  scriptletの実行中: NetworkManager-libnm-1:1.32.10-4.el8.x86_64           1/16
  scriptletの実行中: NetworkManager-1:1.32.10-4.el8.x86_64                 2/16
  アップグレード中 : NetworkManager-1:1.32.10-4.el8.x86_64                 2/16
  scriptletの実行中: NetworkManager-1:1.32.10-4.el8.x86_64                 2/16
  アップグレード中 : NetworkManager-wwan-1:1.32.10-4.el8.x86_64            3/16
  アップグレード中 : NetworkManager-bluetooth-1:1.32.10-4.el8.x86_64       4/16
  アップグレード中 : NetworkManager-team-1:1.32.10-4.el8.x86_64            5/16
  アップグレード中 : NetworkManager-adsl-1:1.32.10-4.el8.x86_64            6/16
  アップグレード中 : NetworkManager-tui-1:1.32.10-4.el8.x86_64             7/16
  アップグレード中 : NetworkManager-wifi-1:1.32.10-4.el8.x86_64            8/16
  整理             : NetworkManager-tui-1:1.30.0-13.el8_4.x86_64           9/16
  整理             : NetworkManager-bluetooth-1:1.30.0-13.el8_4.x86_64    10/16
  整理             : NetworkManager-wwan-1:1.30.0-13.el8_4.x86_64         11/16
  整理             : NetworkManager-wifi-1:1.30.0-13.el8_4.x86_64         12/16
  整理             : NetworkManager-adsl-1:1.30.0-13.el8_4.x86_64         13/16
  整理             : NetworkManager-team-1:1.30.0-13.el8_4.x86_64         14/16
  scriptletの実行中: NetworkManager-1:1.30.0-13.el8_4.x86_64              15/16
  整理             : NetworkManager-1:1.30.0-13.el8_4.x86_64              15/16
  scriptletの実行中: NetworkManager-1:1.30.0-13.el8_4.x86_64              15/16
  整理             : NetworkManager-libnm-1:1.30.0-13.el8_4.x86_64        16/16
  scriptletの実行中: NetworkManager-libnm-1:1.30.0-13.el8_4.x86_64        16/16
  検証             : NetworkManager-wwan-1:1.32.10-4.el8.x86_64            1/16
  検証             : NetworkManager-wwan-1:1.30.0-13.el8_4.x86_64          2/16
  検証             : NetworkManager-team-1:1.32.10-4.el8.x86_64            3/16
  検証             : NetworkManager-team-1:1.30.0-13.el8_4.x86_64          4/16
  検証             : NetworkManager-adsl-1:1.32.10-4.el8.x86_64            5/16
  検証             : NetworkManager-adsl-1:1.30.0-13.el8_4.x86_64          6/16
  検証             : NetworkManager-1:1.32.10-4.el8.x86_64                 7/16
  検証             : NetworkManager-1:1.30.0-13.el8_4.x86_64               8/16
  検証             : NetworkManager-tui-1:1.32.10-4.el8.x86_64             9/16
  検証             : NetworkManager-tui-1:1.30.0-13.el8_4.x86_64          10/16
  検証             : NetworkManager-wifi-1:1.32.10-4.el8.x86_64           11/16
  検証             : NetworkManager-wifi-1:1.30.0-13.el8_4.x86_64         12/16
  検証             : NetworkManager-bluetooth-1:1.32.10-4.el8.x86_64      13/16
  検証             : NetworkManager-bluetooth-1:1.30.0-13.el8_4.x86_64    14/16
  検証             : NetworkManager-libnm-1:1.32.10-4.el8.x86_64          15/16
  検証             : NetworkManager-libnm-1:1.30.0-13.el8_4.x86_64        16/16
Installed products updated.

アップグレード済み:
  NetworkManager-1:1.32.10-4.el8.x86_64
  NetworkManager-adsl-1:1.32.10-4.el8.x86_64
  NetworkManager-bluetooth-1:1.32.10-4.el8.x86_64
  NetworkManager-libnm-1:1.32.10-4.el8.x86_64
  NetworkManager-team-1:1.32.10-4.el8.x86_64
  NetworkManager-tui-1:1.32.10-4.el8.x86_64
  NetworkManager-wifi-1:1.32.10-4.el8.x86_64
  NetworkManager-wwan-1:1.32.10-4.el8.x86_64

完了しました!
チームインターフェースの作成
Teamingの分散/冗長方式は、現時点で以下の種類があります。
対向機器が「Cisco Catalyst 3560」ですので、「LACP」リンクアグリケーションを選択します。
| team.runner 種類 | 説明 |
| broadcast | データは全ポートで送信されます |
| roundrobin | データは全ポートで順番に送信されます |
| activebackup | 1 つのポートまたはリンクが使用され、他はバックアップとして維持されます |
| loadbalance | アクティブ Tx 負荷分散と BPF ベースの Tx ポートセレクターを使用します |
| lacp | 802.3ad リンクアグリゲーション制御プロトコルを実装します |
チームインターフェースの作成/削除を説明するため、一回目を「activebackup」で作り、再作成として「LACP」により、作成します。
作成(1回目:失敗)
# nmcli connection add type team con-name team1 ifname team1 team.runner activebackup
接続 'team1' (13f33a2f-7727-4afd-a06b-d05cf7f592d0) が正常に追加されました。

パラメータ変更(1回目:失敗)
# nmcli connection modify team1 ipv4.method disabled
# nmcli connection modify team1 ipv6.method disabled

再起動(1回目:失敗)
# nmcli connection down team1
接続 'team0' が正常に非アクティブ化されました (D-Bus アクティブパス: /org/freedesktop/NetworkManager/ActiveConnection/10)
# nmcli connection up team1
接続が正常にアクティベートされました (master waiting for slaves) (D-Bus アクティブパス: /org/freedesktop/NetworkManager/ActiveConnection/11)

作成確認(1回目:失敗)
# nmcli connection show
NAME      UUID                                  TYPE      DEVICE
team1     13f33a2f-7727-4afd-a06b-d05cf7f592d0  team      team1
eno1      5f2adea6-ad7a-489a-9579-6c584f119bcc  ethernet  eno1
enp1s0f2  3d9c9f2f-a6a0-41e0-b975-7237abe8b815  ethernet  enp1s0f2
enp1s0f3  35a5e174-aed7-4dd8-8d8b-f6b095d1c2a5  ethernet  enp1s0f3
virbr0    94ec4d40-8ad2-4f5e-ad6c-06eb950a9527  bridge    virbr0
enp1s0f0  1a12fce2-e269-4b9c-8167-e46bbdf51098  ethernet  --
enp1s0f1  646addfd-283e-407c-8811-9ffa8210ab4d  ethernet  --

削除(1回目:失敗)
# nmcli connection delete team1
接続 'team1' (13f33a2f-7727-4afd-a06b-d05cf7f592d0) が正常に削除されました。

削除確認
# nmcli connection show
NAME      UUID                                  TYPE      DEVICE
eno1      5f2adea6-ad7a-489a-9579-6c584f119bcc  ethernet  eno1
enp1s0f2  3d9c9f2f-a6a0-41e0-b975-7237abe8b815  ethernet  enp1s0f2
enp1s0f3  35a5e174-aed7-4dd8-8d8b-f6b095d1c2a5  ethernet  enp1s0f3
virbr0    94ec4d40-8ad2-4f5e-ad6c-06eb950a9527  bridge    virbr0
enp1s0f0  1a12fce2-e269-4b9c-8167-e46bbdf51098  ethernet  --
enp1s0f1  646addfd-283e-407c-8811-9ffa8210ab4d  ethernet  --

再作成
# nmcli connection add type team con-name team1 ifname team1 team.runner lacp
接続 'team1' (b4500e44-02de-4766-a3bd-e1b6651ba2ca) が正常に追加されました。

パラメータ変更
# nmcli connection modify team1 ipv4.method disabled
# nmcli connection modify team1 ipv6.method disabled

再起動
# nmcli connection down team1
接続 'team0' が正常に非アクティブ化されました (D-Bus アクティブパス: /org/freedesktop/NetworkManager/ActiveConnection/10)
# nmcli connection up team1
接続が正常にアクティベートされました (master waiting for slaves) (D-Bus アクティブパス: /org/freedesktop/NetworkManager/ActiveConnection/11)


作成確認
# nmcli connection show
NAME      UUID                                  TYPE      DEVICE
team1     b4500e44-02de-4766-a3bd-e1b6651ba2ca  team      team1
eno1      5f2adea6-ad7a-489a-9579-6c584f119bcc  ethernet  eno1
enp1s0f2  3d9c9f2f-a6a0-41e0-b975-7237abe8b815  ethernet  enp1s0f2
enp1s0f3  35a5e174-aed7-4dd8-8d8b-f6b095d1c2a5  ethernet  enp1s0f3
virbr0    94ec4d40-8ad2-4f5e-ad6c-06eb950a9527  bridge    virbr0
enp1s0f0  1a12fce2-e269-4b9c-8167-e46bbdf51098  ethernet  --
enp1s0f1  646addfd-283e-407c-8811-9ffa8210ab4d  ethernet  --
リンク監視
冗長構成されたLANケーブルの監視方法を設定します。
設定した条件でリンクダウンを検知し、縮退を実施します。
リンク監視(1秒間隔)
# nmcli connection modify team1 team.link-watchers "name=ethtool delay-up=1000"

リンク監視(1秒間隔 + arp_ping)
# nmcli connection modify team1 team.link-watchers "name=ethtool delay-up=1000, name=arp_ping source-host=192.0.2.1 target-host=192.0.2.2"
スレーブの追加/削除
スレーブとはTeamingを構成するメンバー要素を表します。
ここでは、ネットワークインターフェース[enp1s0f2]、[enp1s0f3]をスレーブとして実施例を以下に示します。
スレーブが、使われている(接続)状態および設定が定義してある場合は、以下のように構成が失敗します。その場合、 ネットワークインターフェース を削除、ネットワークデバイスの「切断」を実施します。
# nmcli device status
DEVICE      TYPE      STATE            CONNECTION
eno1        ethernet  接続済み         eno1
virbr0      bridge    接続済み (外部)  virbr0
enp1s0f0    ethernet  切断済み         --
enp1s0f1    ethernet  切断済み         --
enp1s0f2    ethernet  接続済み         enp1s0f2     <----(*)
enp1s0f3    ethernet  接続済み         enp1s0f3     <----(*)
lo          loopback  管理無し         --
virbr0-nic  tun       管理無し         --

スレーブ追加(1回目:失敗)
# nmcli connection add type ethernet slave-type team con-name team1-port1 ifname enp1s0f2 master team1
接続 'team1-port1' (e67af606-fd8b-4218-b9da-00cc88267b36) が正常に追加されました。

# nmcli connection add type ethernet slave-type team con-name team1-port2 ifname enp1s0f3 master team1
接続 'team1-port2' (b3674390-b64e-49f0-aee8-63efd28db1a4) が正常に追加されました。

# nmcli connection show
NAME         UUID                                  TYPE      DEVICE
team1        b4500e44-02de-4766-a3bd-e1b6651ba2ca  team      team1
eno1         5f2adea6-ad7a-489a-9579-6c584f119bcc  ethernet  eno1
enp1s0f2     3d9c9f2f-a6a0-41e0-b975-7237abe8b815  ethernet  enp1s0f2 <----- (定義済み)
enp1s0f3     35a5e174-aed7-4dd8-8d8b-f6b095d1c2a5  ethernet  enp1s0f3 <----- (定義済み)
virbr0       94ec4d40-8ad2-4f5e-ad6c-06eb950a9527  bridge    virbr0
enp1s0f0     1a12fce2-e269-4b9c-8167-e46bbdf51098  ethernet  --
enp1s0f1     646addfd-283e-407c-8811-9ffa8210ab4d  ethernet  --
team1-port1  e67af606-fd8b-4218-b9da-00cc88267b36  ethernet  --  <----- (*)
team1-port2  b3674390-b64e-49f0-aee8-63efd28db1a4  ethernet  --  <----- (*)

スレーブの削除
# nmcli connection delete team1-port1
接続 'team1-port1' (e67af606-fd8b-4218-b9da-00cc88267b36) が正常に削除されました。

# nmcli connection delete team1-port2
接続 'team1-port2' (b3674390-b64e-49f0-aee8-63efd28db1a4) が正常に削除されました。

スレーブ削除の確認
# nmcli connection show
NAME      UUID                                  TYPE      DEVICE
team1     b4500e44-02de-4766-a3bd-e1b6651ba2ca  team      team1
eno1      5f2adea6-ad7a-489a-9579-6c584f119bcc  ethernet  eno1
enp1s0f2  3d9c9f2f-a6a0-41e0-b975-7237abe8b815  ethernet  enp1s0f2
enp1s0f3  35a5e174-aed7-4dd8-8d8b-f6b095d1c2a5  ethernet  enp1s0f3
virbr0    94ec4d40-8ad2-4f5e-ad6c-06eb950a9527  bridge    virbr0
enp1s0f0  1a12fce2-e269-4b9c-8167-e46bbdf51098  ethernet  --
enp1s0f1  646addfd-283e-407c-8811-9ffa8210ab4d  ethernet  --

ネットワークインターフェースの削除
# nmcli connection delete enp1s0f2
接続 'enp1s0f2' (3d9c9f2f-a6a0-41e0-b975-7237abe8b815) が正常に削除されました。
# nmcli connection delete enp1s0f3
接続 'enp1s0f3' (35a5e174-aed7-4dd8-8d8b-f6b095d1c2a5) が正常に削除されました。

ネットワークインターフェースの削除確認
# nmcli connection show
NAME      UUID                                  TYPE      DEVICE
team1     b4500e44-02de-4766-a3bd-e1b6651ba2ca  team      team1
eno1      5f2adea6-ad7a-489a-9579-6c584f119bcc  ethernet  eno1
virbr0    898de4ba-52d6-47ab-950d-7890f81ced5e  bridge    virbr0
enp1s0f0  1a12fce2-e269-4b9c-8167-e46bbdf51098  ethernet  --
enp1s0f1  646addfd-283e-407c-8811-9ffa8210ab4d  ethernet  --

ネットワークデバイスの「切断」確認
# nmcli device status
DEVICE      TYPE      STATE            CONNECTION
eno1        ethernet  接続済み         eno1
virbr0      bridge    接続済み (外部)  virbr0
enp1s0f0    ethernet  切断済み         --
enp1s0f1    ethernet  切断済み         --
enp1s0f2    ethernet  切断済み         --     <----(*)
enp1s0f3    ethernet  切断済み         --     <----(*)
lo          loopback  管理無し         --
virbr0-nic  tun       管理無し         --

スレーブ追加(2回目:成功)
# nmcli connection add type ethernet slave-type team con-name team1-port1 ifname enp1s0f2 master team1
接続 'team1-port1' (76c07977-5cba-4a7f-a571-73ca6629440c) が正常に追加されました。

# nmcli connection add type ethernet slave-type team con-name team1-port2 ifname enp1s0f3 master team1
接続 'team1-port2' (871c741c-8d9e-4d9d-8777-b096459e2da8) が正常に追加されました。

再読み込み
# nmcli connection reload

構成の確認
# nmcli connection show
NAME         UUID                                  TYPE      DEVICE
team1        b4500e44-02de-4766-a3bd-e1b6651ba2ca  team      team1
eno1         5f2adea6-ad7a-489a-9579-6c584f119bcc  ethernet  eno1
virbr0       898de4ba-52d6-47ab-950d-7890f81ced5e  bridge    virbr0
team1-port1  76c07977-5cba-4a7f-a571-73ca6629440c  ethernet  enp1s0f2 <----(*)
team1-port2  871c741c-8d9e-4d9d-8777-b096459e2da8  ethernet  enp1s0f3 <----(*)
enp1s0f0     1a12fce2-e269-4b9c-8167-e46bbdf51098  ethernet  --
enp1s0f1     646addfd-283e-407c-8811-9ffa8210ab4d  ethernet  --
Teamingの状態確認
# ps -ef | grep teamd
root        1530    1216  0 11月16 ?      00:00:00 /usr/bin/teamd -o -n -U -D -N -t team1 -c { "runner": { "name": "lacp" }, "link_watch": { "name": "ethtool", "delay_up": 1000 } }

# teamdctl team1 state view
setup:
  runner: lacp
ports:
  enp1s0f2
    link watches:
      link summary: up
      instance[link_watch_0]:
        name: ethtool
        link: up
        down count: 0
    runner:
      aggregator ID: 5, Selected
      selected: yes
      state: current
  enp1s0f3
    link watches:
      link summary: up
      instance[link_watch_0]:
        name: ethtool
        link: up
        down count: 0
    runner:
      aggregator ID: 5, Selected
      selected: yes
      state: current
runner:
  active: yes
  fast rate: no

# ip link
1: lo: <LOOPBACK,UP,LOWER_UP> mtu 65536 qdisc noqueue state UNKNOWN mode DEFAULT group default qlen 1000
    link/loopback 00:00:00:00:00:00 brd 00:00:00:00:00:00
2: enp1s0f0: <NO-CARRIER,BROADCAST,MULTICAST,UP> mtu 1500 qdisc mq state DOWN mode DEFAULT group default qlen 1000
    link/ether 58:c2:32:0d:7d:b0 brd ff:ff:ff:ff:ff:ff
3: enp1s0f1: <NO-CARRIER,BROADCAST,MULTICAST,UP> mtu 1500 qdisc mq state DOWN mode DEFAULT group default qlen 1000
    link/ether 58:c2:32:0d:7d:b1 brd ff:ff:ff:ff:ff:ff
4: enp1s0f2: <BROADCAST,MULTICAST,UP,LOWER_UP> mtu 1500 qdisc mq master team1 state UP mode DEFAULT group default qlen 1000
    link/ether 58:c2:32:0d:7d:b2 brd ff:ff:ff:ff:ff:ff
5: enp1s0f3: <BROADCAST,MULTICAST,UP,LOWER_UP> mtu 1500 qdisc mq master team1 state UP mode DEFAULT group default qlen 1000
    link/ether 58:c2:32:0d:7d:b2 brd ff:ff:ff:ff:ff:ff permaddr 58:c2:32:0d:7d:b3
6: eno1: <BROADCAST,MULTICAST,UP,LOWER_UP> mtu 1500 qdisc fq_codel state UP mode DEFAULT group default qlen 1000
    link/ether 50:65:f3:1c:3c:8b brd ff:ff:ff:ff:ff:ff
7: team1: <BROADCAST,MULTICAST,UP,LOWER_UP> mtu 1500 qdisc noqueue state UP mode DEFAULT group default qlen 1000
    link/ether 58:c2:32:0d:7d:b2 brd ff:ff:ff:ff:ff:ff
8: virbr0: <NO-CARRIER,BROADCAST,MULTICAST,UP> mtu 1500 qdisc noqueue state DOWN mode DEFAULT group default qlen 1000
    link/ether 52:54:00:8a:3d:69 brd ff:ff:ff:ff:ff:ff
9: virbr0-nic: <BROADCAST,MULTICAST> mtu 1500 qdisc fq_codel master virbr0 state DOWN mode DEFAULT group default qlen 1000
    link/ether 52:54:00:8a:3d:69 brd ff:ff:ff:ff:ff:ff

# nmcli connection show team1
# nmcli connection show team1-port1
# nmcli connection show team1-port2
チームインターフェースの起動確認
# nmcli connection down team1
接続 'team1' が正常に非アクティブ化されました (D-Bus アクティブパス: /org/freedesktop/NetworkManager/ActiveConnection/7)

# nmcli connection up team1
接続が正常にアクティベートされました (master waiting for slaves) (D-Bus アクティブパス: /org/freedesktop/NetworkManager/ActiveConnection/7)
チームインターフェースの自動起動
ネットワークインターフェースの自動起動
# nmcli connection modify team1 connection.autoconnect yes
# nmcli connection modify team1-port1 connection.autoconnect yes
# nmcli connection modify team1-port2 connection.autoconnect yes

自動起動の確認
# nmcli con show team1 | grep "connection.autoconnect:"
connection.autoconnect:                 はい
# nmcli con show team1-port1 | grep "connection.autoconnect:"
connection.autoconnect:                 はい
# nmcli con show team1-port2 | grep "connection.autoconnect:"
connection.autoconnect:                 はい
広告
vlanインターフェース(Teaming + Tag VLAN)
上記で作成したチームインターフェース(team1)に複数VLAN(Vlan100、 Vlan200)を通す設定をします。1本のLANケーブル接続に複数VLANを通す場合も手順は同様となり、 チームインターフェース を物理インターフェース(eno1など)に読み替えてください。
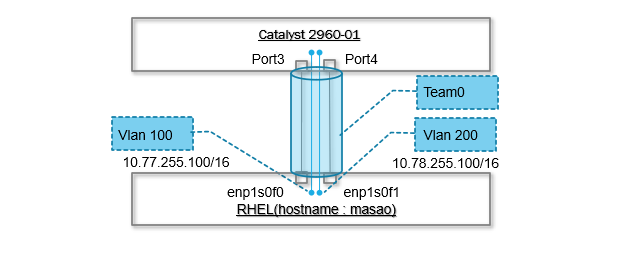
vlanインターフェース作成
作成/削除のため、最初に「team1」デバイスにvlan100、200のvlanインターフェースを作成し、削除、設計通りに「team0」へ作成します。
デバイスとインターフェース(CONNECTION)の現状確認
# nmcli dev
DEVICE      TYPE      STATE            CONNECTION
eno1        ethernet  接続済み         eno1
virbr0      bridge    接続済み (外部)  virbr0
enp1s0f0    ethernet  接続済み         team0-port1
enp1s0f1    ethernet  接続済み         team0-port2
enp1s0f2    ethernet  接続済み         team1-port1
enp1s0f3    ethernet  接続済み         team1-port2
team0       team      接続済み         team0
team1       team      接続済み         team1
lo          loopback  管理無し         --
virbr0-nic  tun       管理無し         --

vlanインターフェース作成(vlan100) 失敗
# nmcli connection add type vlan con-name vlan100 dev team1 id 100
接続 'vlan100' (e6ccd6c2-c7da-4a5d-9fe2-adb67dd76b62) が正常に追加されました。

vlanインターフェース作成(vlan200) 失敗
# nmcli connection add type vlan con-name vlan200 dev team1 id 200
接続 'vlan200' (bd5b3242-a487-46ba-9893-a987ed27402b) が正常に追加されました。

作成確認 失敗
# nmcli connection show
NAME         UUID                                  TYPE      DEVICE
team0        ca2dd95b-5f74-4ca4-bd7e-c6ca7d59bcaa  team      team0
eno1         5f2adea6-ad7a-489a-9579-6c584f119bcc  ethernet  eno1
virbr0       ddb5a956-a7eb-453a-8417-bb67c8b779ce  bridge    virbr0
team0-port1  cd810242-32d5-4939-9723-cc4d4de4b71a  ethernet  enp1s0f0
team0-port2  ae998e51-3b07-44ea-b653-c0e42890eff0  ethernet  enp1s0f1
team1        b4500e44-02de-4766-a3bd-e1b6651ba2ca  team      team1
team1-port1  76c07977-5cba-4a7f-a571-73ca6629440c  ethernet  enp1s0f2
team1-port2  871c741c-8d9e-4d9d-8777-b096459e2da8  ethernet  enp1s0f3
vlan100      e6ccd6c2-c7da-4a5d-9fe2-adb67dd76b62  vlan      --  <-----(*)
vlan200      bd5b3242-a487-46ba-9893-a987ed27402b  vlan      --  <-----(*)

vlanインターフェースの削除
# nmcli connection delete vlan100
接続 'vlan100' (e6ccd6c2-c7da-4a5d-9fe2-adb67dd76b62) が正常に削除されました。
# nmcli connection delete vlan200
接続 'vlan200' (bd5b3242-a487-46ba-9893-a987ed27402b) が正常に削除されました。

削除確認
# nmcli connection show
NAME         UUID                                  TYPE      DEVICE
team0        ca2dd95b-5f74-4ca4-bd7e-c6ca7d59bcaa  team      team0
eno1         5f2adea6-ad7a-489a-9579-6c584f119bcc  ethernet  eno1
virbr0       ddb5a956-a7eb-453a-8417-bb67c8b779ce  bridge    virbr0
team0-port1  cd810242-32d5-4939-9723-cc4d4de4b71a  ethernet  enp1s0f0
team0-port2  ae998e51-3b07-44ea-b653-c0e42890eff0  ethernet  enp1s0f1
team1        b4500e44-02de-4766-a3bd-e1b6651ba2ca  team      team1
team1-port1  76c07977-5cba-4a7f-a571-73ca6629440c  ethernet  enp1s0f2
team1-port2  871c741c-8d9e-4d9d-8777-b096459e2da8  ethernet  enp1s0f3

vlanインターフェース再作成(vlan100)
# nmcli connection add type vlan con-name vlan100 dev team0 id 100
接続 'vlan100' (a2757730-2adb-4222-8455-a28f8d22e91f) が正常に追加されました。

vlanインターフェース再作成(vlan200)
# nmcli connection add type vlan con-name vlan200 dev team0 id 200
接続 'vlan200' (cc92de51-54c0-4b9d-aa93-43a3945b3b6f) が正常に追加されました。

再作成確認
# nmcli connection show
NAME         UUID                                  TYPE      DEVICE
team0        ca2dd95b-5f74-4ca4-bd7e-c6ca7d59bcaa  team      team0
eno1         5f2adea6-ad7a-489a-9579-6c584f119bcc  ethernet  eno1
virbr0       ddb5a956-a7eb-453a-8417-bb67c8b779ce  bridge    virbr0
team0-port1  cd810242-32d5-4939-9723-cc4d4de4b71a  ethernet  enp1s0f0
team0-port2  ae998e51-3b07-44ea-b653-c0e42890eff0  ethernet  enp1s0f1
team1        b4500e44-02de-4766-a3bd-e1b6651ba2ca  team      team1
team1-port1  76c07977-5cba-4a7f-a571-73ca6629440c  ethernet  enp1s0f2
team1-port2  871c741c-8d9e-4d9d-8777-b096459e2da8  ethernet  enp1s0f3
vlan100      a2757730-2adb-4222-8455-a28f8d22e91f  vlan      --
vlan200      cc92de51-54c0-4b9d-aa93-43a3945b3b6f  vlan      --

再読み込み
# nmcli connection reload
vlanインターフェース(デバイス)設定
vlanインターフェース作成(vlan100)
# nmcli connection modify vlan100 ipv4.addresses 10.77.255.100/16
# nmcli connection modify vlan100 ipv4.may-fail no
# nmcli connection modify vlan100 ipv4.method manual
# nmcli connection modify vlan100 ipv6.method disabled
# nmcli connection modify vlan100 connection.autoconnect yes
# nmcli connection up vlan100

vlanインターフェース作成(vlan200)
# nmcli connection modify vlan200 ipv4.addresses 10.78.255.100/16
# nmcli connection modify vlan200 ipv4.may-fail no
# nmcli connection modify vlan200 ipv4.method manual
# nmcli connection modify vlan200 ipv6.method disabled
# nmcli connection modify vlan200 connection.autoconnect yes
# nmcli connection up vlan200

確認
# nmcli connection show
NAME         UUID                                  TYPE      DEVICE
team1        b4500e44-02de-4766-a3bd-e1b6651ba2ca  team      team1
eno1         5f2adea6-ad7a-489a-9579-6c584f119bcc  ethernet  eno1
vlan100      e6ccd6c2-c7da-4a5d-9fe2-adb67dd76b62  vlan      team1.100 <-----(*)
vlan200      bd5b3242-a487-46ba-9893-a987ed27402b  vlan      team1.200 <-----(*)
virbr0       2b7ac30e-f764-467f-8e17-efa6675edaaa  bridge    virbr0
team1-port1  76c07977-5cba-4a7f-a571-73ca6629440c  ethernet  enp1s0f2
team1-port2  871c741c-8d9e-4d9d-8777-b096459e2da8  ethernet  enp1s0f3
enp1s0f0     1a12fce2-e269-4b9c-8167-e46bbdf51098  ethernet  --
enp1s0f1     646addfd-283e-407c-8811-9ffa8210ab4d  ethernet  --

反映
# nmcli connection reload
vlanインターフェースを削除する場合は、以下のコマンドとなります。
vlanインターフェース削除(vlan100)
# nmcli connection delete vlan100
vlanインターフェースの起動確認
# nmcli connection down vlan100
接続 'vlan100' が正常に非アクティブ化されました (D-Bus アクティブパス: /org/freedesktop/NetworkManager/ActiveConnection/5)

# nmcli connection up vlan100
接続が正常にアクティベートされました (D-Bus アクティブパス: /org/freedesktop/NetworkManager/ActiveConnection/9)
vlanインターフェースの自動起動
ネットワークインターフェースの自動起動
# nmcli connection modify vlan100 connection.autoconnect yes
# nmcli connection modify vlan200 connection.autoconnect yes

自動起動の確認
# nmcli con show vlan100 | grep "connection.autoconnect:"
connection.autoconnect:                 はい
# nmcli con show vlan200 | grep "connection.autoconnect:"
connection.autoconnect:                 はい
ネットワーク疎通確認/冗長化試験
コマンド「ping」による疎通試験結果と観点を以下に記載します。
既に対向サーバでサービス(httpsなど)が起動しているのであれば、サービス接続試験も実施します。
shellを用い、できる限り全パターンを網羅する試験を実施します。
大丈夫だと思っている箇所に構築バグおよび構築ミスは潜んでいます。
16進数"5A5A5A5A5A5A"(1010101010101)パターンによる単なる疎通確認
# ping -c 3 -p 5A5A5A5A5A5A 10.77.255.102
PATTERN: 0x5a5a5a5a5a5a
PING 10.77.255.102 (10.77.255.102) 56(84) bytes of data.
64 bytes from 10.77.255.102: icmp_seq=1 ttl=64 time=0.197 ms
64 bytes from 10.77.255.102: icmp_seq=2 ttl=64 time=0.225 ms
64 bytes from 10.77.255.102: icmp_seq=3 ttl=64 time=0.194 ms

--- 10.77.255.102 ping statistics ---
3 packets transmitted, 3 received, 0% packet loss, time 2077ms
rtt min/avg/max/mdev = 0.194/0.205/0.225/0.018 ms

MTU 限界値
# ping -c 3 -s 1472 -M do 10.90.255.102
PING 10.90.255.102 (10.90.255.102) 1472(1500) bytes of data.
1480 bytes from 10.90.255.102: icmp_seq=1 ttl=64 time=0.788 ms
1480 bytes from 10.90.255.102: icmp_seq=2 ttl=64 time=0.732 ms
1480 bytes from 10.90.255.102: icmp_seq=1 ttl=64 time=0.788 ms

--- 10.90.255.102 ping statistics ---
3 packets transmitted, 3 received, 0% packet loss, time 1038ms
rtt min/avg/max/mdev = 0.732/0.760/0.788/0.028 ms

MTU 限界値越え
# ping -c 3 -s 1473 -M do 10.90.255.102
PING 10.90.255.102 (10.90.255.102) 1473(1501) bytes of data.
ping: local error: Message too long, mtu=1500
ping: local error: Message too long, mtu=1500
ping: local error: Message too long, mtu=1500

--- 10.90.255.102 ping statistics ---
3 packets transmitted, 0 received, +3 errors, 100% packet loss, time 2068ms

# ping -c 3 -s 50000 10.90.255.102
PING 10.90.255.102 (10.90.255.102) 50000(50028) bytes of data.
50008 bytes from 10.90.255.102: icmp_seq=1 ttl=64 time=9.02 ms
50008 bytes from 10.90.255.102: icmp_seq=2 ttl=64 time=9.04 ms
50008 bytes from 10.90.255.102: icmp_seq=3 ttl=64 time=9.07 ms

--- 10.90.255.102 ping statistics ---
3 packets transmitted, 3 received, 0% packet loss, time 2003ms
rtt min/avg/max/mdev = 9.024/9.046/9.074/0.111 ms

冗長化(チーミング)動作確認
# ping -s 50000 10.77.255.102
PING 10.77.255.102 (10.77.255.102) 50000(50028) bytes of data.
50008 bytes from 10.77.255.102: icmp_seq=1 ttl=64 time=1.16 ms
50008 bytes from 10.77.255.102: icmp_seq=11 ttl=64 time=1.20 ms
 :
(省略)
 :
50008 bytes from 10.77.255.102: icmp_seq=17 ttl=64 time=1.16 ms
50008 bytes from 10.77.255.102: icmp_seq=18 ttl=64 time=1.51 ms <-- LANケーブルA 抜線
50008 bytes from 10.77.255.102: icmp_seq=19 ttl=64 time=1.20 ms
50008 bytes from 10.77.255.102: icmp_seq=20 ttl=64 time=1.31 ms
From 10.77.255.100 icmp_seq=50 Destination Host Unreachable  <-- LANケーブルA、B 抜線
From 10.77.255.100 icmp_seq=51 Destination Host Unreachable
From 10.77.255.100 icmp_seq=53 Destination Host Unreachable
From 10.77.255.100 icmp_seq=54 Destination Host Unreachable
50008 bytes from 10.77.255.102: icmp_seq=56 ttl=64 time=1027 ms
50008 bytes from 10.77.255.102: icmp_seq=57 ttl=64 time=3.72 ms
50008 bytes from 10.77.255.102: icmp_seq=58 ttl=64 time=1.25 ms
50008 bytes from 10.77.255.102: icmp_seq=59 ttl=64 time=1.16 ms
50008 bytes from 10.77.255.102: icmp_seq=60 ttl=64 time=1.30 ms <-- LANケーブルB 抜線
 :
(省略)
 :
--- 10.77.255.102 ping statistics ---
60 packets transmitted, 25 received, +4 errors, 58.3333% packet loss, time 59883ms
rtt min/avg/max/mdev = 1.155/42.374/1027.319/201.051 ms, pipe 3

# traceroute www.google.com
帯域幅確認
以下の実施例は、サーバ「masao」から「hana」へ接続したときの帯域幅を確認しています。
両サーバへ「iperf3」をインストールし、必要なポートを開放します。
テスト後、ポートを閉塞します。
接続元サーバ、接続先サーバへ「iperf3」をインストール
# yum install iperf3

接続元サーバ、接続先サーバともに、ポート開放
# firewall-cmd --add-port=5201/tcp --permanent
success

変更を再読み込み
# firewall-cmd --reload
success

テスト後、ポート閉塞
# firewall-cmd --remove-port=5201/tcp --permanent
success

再読み込み
# firewall-cmd --reload
success

ポートの開放状況を確認
# firewall-cmd --list-all

public (active)
  target: default
  icmp-block-inversion: no
  interfaces: eno1 enp1s0f0 enp1s0f1 enp1s0f2 enp1s0f3 team0 team0.100 team0.200 team0.300 team0.400 team1 team1.500 team1.600 team1.900
  sources:
  services: cockpit dhcpv6-client ssh
  ports:
  protocols:
  forward: no
  masquerade: no
  forward-ports:
  source-ports:
  icmp-blocks:
  rich rules:
2台のサーバ(masao、hana)間で計測します。
「ターミナル」画面をそれぞれのサーバで開き、同じコマンドを実行します。
対向サーバ(hana)側
# iperf3 -s

クライアント(masao)側
# iperf3 -c 10.90.255.102 ( hana / vlan 900 / 100MBbps×2 )

# iperf3 -c 10.77.255.102 ( hana / vlan 100 / 1GBbps×2 )
hana / vlan 900 / 100MBbps×2
LANケーブル2本のチーミングだからと言って、200Mbpsの速度が出ることはありません。
多重度の帯域試験では、合計で200Mbpsに近づきます。
# iperf3 -c 10.90.255.102
Connecting to host 10.90.255.102, port 5201
[  5] local 10.90.255.100 port 37710 connected to 10.90.255.102 port 5201
[ ID] Interval           Transfer     Bitrate         Retr  Cwnd
[  5]   0.00-1.00   sec  11.8 MBytes  99.1 Mbits/sec    0    136 KBytes
[  5]   1.00-2.00   sec  11.2 MBytes  93.8 Mbits/sec    0    143 KBytes
[  5]   2.00-3.00   sec  11.2 MBytes  93.8 Mbits/sec    0    143 KBytes
[  5]   3.00-4.00   sec  11.2 MBytes  93.8 Mbits/sec    0    143 KBytes
[  5]   4.00-5.00   sec  11.2 MBytes  93.8 Mbits/sec    0    143 KBytes
[  5]   5.00-6.00   sec  11.2 MBytes  93.8 Mbits/sec    0    143 KBytes
[  5]   6.00-7.00   sec  11.2 MBytes  93.8 Mbits/sec    0    143 KBytes
[  5]   7.00-8.00   sec  11.2 MBytes  93.8 Mbits/sec    0    143 KBytes
[  5]   8.00-9.00   sec  11.5 MBytes  96.4 Mbits/sec    0    156 KBytes
[  5]   9.00-10.00  sec  11.2 MBytes  93.8 Mbits/sec    0    156 KBytes
- - - - - - - - - - - - - - - - - - - - - - - - -
[ ID] Interval           Transfer     Bitrate         Retr
[  5]   0.00-10.00  sec   113 MBytes  94.6 Mbits/sec    0             sender
[  5]   0.00-10.05  sec   112 MBytes  93.5 Mbits/sec                  receiver

iperf Done.
hana / vlan 100 / 1GBbps×2
流石に100Mbpsの10倍の帯域が計測できました。
ちなみに、弊社の10GBpsネットワークでは、さらにこの10倍の帯域が出せます。(自慢)
# iperf3 -c 10.77.255.102
Connecting to host 10.77.255.102, port 5201
[  5] local 10.77.255.100 port 54270 connected to 10.77.255.102 port 5201
[ ID] Interval           Transfer     Bitrate         Retr  Cwnd
[  5]   0.00-1.00   sec   114 MBytes   958 Mbits/sec    0    414 KBytes
[  5]   1.00-2.00   sec   112 MBytes   936 Mbits/sec    0    458 KBytes
[  5]   2.00-3.00   sec   113 MBytes   945 Mbits/sec    0    479 KBytes
[  5]   3.00-4.00   sec   111 MBytes   935 Mbits/sec    0    479 KBytes
[  5]   4.00-5.00   sec   112 MBytes   943 Mbits/sec    0    479 KBytes
[  5]   5.00-6.00   sec   112 MBytes   938 Mbits/sec    0    529 KBytes
[  5]   6.00-7.00   sec   112 MBytes   939 Mbits/sec    0    529 KBytes
[  5]   7.00-8.00   sec   112 MBytes   937 Mbits/sec    0    556 KBytes
[  5]   8.00-9.00   sec   112 MBytes   938 Mbits/sec    0    556 KBytes
[  5]   9.00-10.00  sec   112 MBytes   938 Mbits/sec    0    556 KBytes
- - - - - - - - - - - - - - - - - - - - - - - - -
[ ID] Interval           Transfer     Bitrate         Retr
[  5]   0.00-10.00  sec  1.10 GBytes   941 Mbits/sec    0             sender
[  5]   0.00-10.04  sec  1.09 GBytes   935 Mbits/sec                  receiver

iperf Done.
広告
コンテナ( Podman )
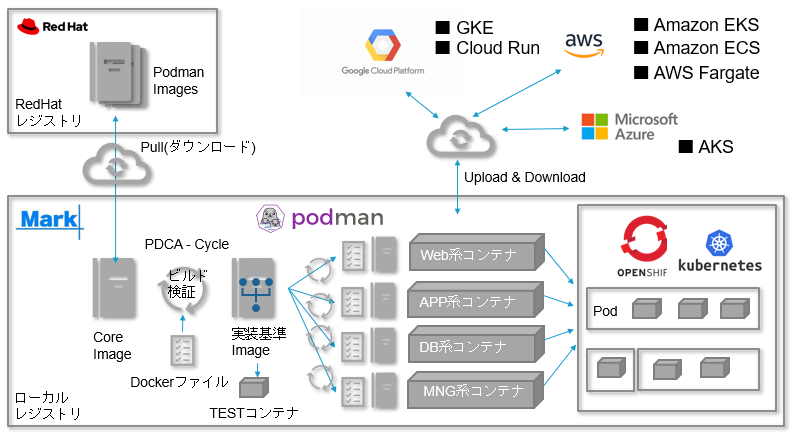
システムエンジニアの保有スキルや導入コスト、ランニングコストを考慮すると、必然的にコンテナエンジンを中心としたシステムインフラが主流になり、今後も加速していきます。
その理由をいくつかご紹介します。
■ サーバ集約の加速
物理マシンを中心としたモノリスシステムから、VMWareESXiなどの仮想サーバ(VM)技術の普及により、サーバ台数の集約が進みました。
しかし、新規事業の立ち上げ、および、サービスの多様性を求められ、ノード分割を迫られた結果、結局は物理的なホスト機が増え続けています。
また、管理系ホストも、新たなセキュリティ面の脅威から監視機能をはじめとした観点が増え続け、管理部門のノードも続けています。
これは、機能の追加に関するシステム刷新は現行サービスやサーバ機能へ影響を与えないことから、容易に実現できるという理由からです。
悪習から今までのサービス、サーバ機能を停止することは行わないため、マイクロサービス化により、1コア、4GBを割り当てたVMが多く、EOLを経過したOSが存在する結果に陥っています。
コンテナエンジンでは、コンテナをホスト機から見た場合、1プロセスとして機能する訳ですから、ホストリソースが許す限り無数の小さなコンテナを実装することが可能となります。
したがって、VM間のオーバーヘッドも考慮することなく、仮想化技術よりもサーバ台数を集約することが可能となるのです。
粗末なPCマシン3台を用い、数百コンテナを動すことが可能となります。
■ システム管理の簡素化
数々のコンテナを紹介する書籍、Webページを参照すると、コンテナエンジンが新たな(DevOpsやCI/CDなどの)概念のためのインフラであるかのように記載されています。
ベテランのインフラエンジニアが、このような情報を見ると目を背けたくなるものです。(経験談)
しかし、知れば知るほど、仮想化技術よりも扱いやすく、新たな技術習得には驚くほど、時間が少なくて済ます。
なぜなら、loadbalancer、ssh、firewall、systemctlも実装可能ですので、1コンテナを1VMのように扱うことができるからです。
SREの観点が必要となりますが、気軽にコンテナをアップデートすることが出来ることから、今までの経験を基にした構築、運用を厳格な規律化/形式化することが容易となります。
これは運用自動化の加速へ繋がり、結果的にDevOpsやCI/CDを実現します。
また、VMを集中管理するソフトウェア(VMWare vCenterなど)がkubernetesやPodに置き換わっているだけであり、オーケストレーションの新たな概念を必要としません。
VMと違い、あっちこっちへログインすることなく、ホスト機からコンテナへコマンドを実行させられることから、システム管理の自動化も簡単に実現できます。(もちろん、ログインすることも可能です。)
以上のことから、kubernetesを利用せず、今までの経験で養った「Ansible」、「Jenkins」、「Gitlab」を使い、システム管理、保守、引継ぎを実現しているプロジェクトも多く存在します。
■ クラウドサービス(AWS/GCP/AZURE)とオンプレ環境間のコンテナ利用
オンプレミス環境を用い作成したコンテナは、クラウドサービス(AWS/GCP/AZURE)の各種サービスへ移行が可能となり、同じように動作させることが可能です。
逆に、クラウドサービスを用い作成したコンテナをオンプレミス環境へ移行し、動かせます。
以上の利点は、拠点を必要としないCI/CDの実現など無数にあります。
アプリ系エンジニアとインフラ系エンジニアがいがみ合うことなく、ハーモニーを奏でることが容易になります。
当ページでは、以上のことを実現するための基礎知識や基礎技術を紹介しています。
ソフトウェアパッケージ( Podman )のインストール
インストール後、使用可能となるコンテナ制御コマンドと用途を以下の表へ記載します。
| コンテナ制御コマンド | 用途 |
| podman | コンテナ、および、podを管理します。 run : コンテナイメージからコンテナを実装します。 stop : コンテナを停止します。 start : コンテナを開始します。 ps : コンテナを状態を表示します。 attach (-a) : フォアグラウンドモードでコンテナーを実行します。 detach(-d) : コンテナーをバックグラウンドで実行し、新しいコンテナー ID を出力します。 exec : コンテナと対話、および、ログインするときに使用します。 |
| buildah | コンテナイメージの構築、プッシュ、および、署名に使用します。 |
| skopeo | コンテナイメージのコピー(バックアップ)、検証、削除、および、署名に使用します。 |
| runc | podman、および、buildah へコンテナの実行機能と構築機能を提供します。 |
| crun | ルートレスコンテナの汎用性、制御、および、セキュリティーを向上させるためのランタイムです。 |
「container-tools」のインストール
# yum module install -y container-tools

サブスクリプション管理リポジトリーを更新しています。
メタデータの期限切れの最終確認: 0:13:53 時間前の 2021年11月27日 17時48分01秒 に 実施しました。
依存関係が解決しました。
================================================================================
 パッケージ     Arch   バージョン        リポジトリー                     サイズ
================================================================================
group/moduleパッケージをインストール:
 crun           x86_64 1.0-1.module+el8.5.0+12582+56d94c81
                                         rhel-8-for-x86_64-appstream-rpms 193 k
 python3-podman noarch 3.2.0-2.module+el8.5.0+12582+56d94c81
                                         rhel-8-for-x86_64-appstream-rpms 148 k
 skopeo         x86_64 1:1.4.2-0.1.module+el8.5.0+12582+56d94c81
                                         rhel-8-for-x86_64-appstream-rpms 6.7 M
 toolbox        x86_64 0.0.99.3-0.4.module+el8.5.0+12682+a4eeb084
                                         rhel-8-for-x86_64-appstream-rpms 2.3 M
 udica          noarch 0.2.5-2.module+el8.5.0+12582+56d94c81
                                         rhel-8-for-x86_64-appstream-rpms  51 k
依存関係のインストール:
 python3-pytoml noarch 0.1.14-5.git7dea353.el8
                                         rhel-8-for-x86_64-appstream-rpms  25 k
モジュールプロファイルのインストール中:
 container-tools/common


トランザクションの概要
================================================================================
インストール  6 パッケージ

ダウンロードサイズの合計: 9.4 M
インストール後のサイズ: 34 M
パッケージのダウンロード:
(1/6): python3-pytoml-0.1.14-5.git7dea353.el8.n  58 kB/s |  25 kB     00:00
(2/6): toolbox-0.0.99.3-0.4.module+el8.5.0+1268 2.6 MB/s | 2.3 MB     00:00
(3/6): udica-0.2.5-2.module+el8.5.0+12582+56d94  88 kB/s |  51 kB     00:00
(4/6): crun-1.0-1.module+el8.5.0+12582+56d94c81 762 kB/s | 193 kB     00:00
(5/6): python3-podman-3.2.0-2.module+el8.5.0+12 492 kB/s | 148 kB     00:00
(6/6): skopeo-1.4.2-0.1.module+el8.5.0+12582+56 4.4 MB/s | 6.7 MB     00:01
--------------------------------------------------------------------------------
合計                                            6.2 MB/s | 9.4 MB     00:01
トランザクションの確認を実行中
トランザクションの確認に成功しました。
トランザクションのテストを実行中
トランザクションのテストに成功しました。
トランザクションを実行中
  準備             :                                                        1/1
  インストール中   : python3-pytoml-0.1.14-5.git7dea353.el8.noarch          1/6
  インストール中   : python3-podman-3.2.0-2.module+el8.5.0+12582+56d94c81   2/6
  インストール中   : crun-1.0-1.module+el8.5.0+12582+56d94c81.x86_64        3/6
  インストール中   : udica-0.2.5-2.module+el8.5.0+12582+56d94c81.noarch     4/6
  インストール中   : toolbox-0.0.99.3-0.4.module+el8.5.0+12682+a4eeb084.x   5/6
  インストール中   : skopeo-1:1.4.2-0.1.module+el8.5.0+12582+56d94c81.x86   6/6
  scriptletの実行中: skopeo-1:1.4.2-0.1.module+el8.5.0+12582+56d94c81.x86   6/6
  検証             : python3-pytoml-0.1.14-5.git7dea353.el8.noarch          1/6
  検証             : skopeo-1:1.4.2-0.1.module+el8.5.0+12582+56d94c81.x86   2/6
  検証             : toolbox-0.0.99.3-0.4.module+el8.5.0+12682+a4eeb084.x   3/6
  検証             : udica-0.2.5-2.module+el8.5.0+12582+56d94c81.noarch     4/6
  検証             : crun-1.0-1.module+el8.5.0+12582+56d94c81.x86_64        5/6
  検証             : python3-podman-3.2.0-2.module+el8.5.0+12582+56d94c81   6/6
インストール済みの製品が更新されています。

インストール済み:
  crun-1.0-1.module+el8.5.0+12582+56d94c81.x86_64
  python3-podman-3.2.0-2.module+el8.5.0+12582+56d94c81.noarch
  python3-pytoml-0.1.14-5.git7dea353.el8.noarch
  skopeo-1:1.4.2-0.1.module+el8.5.0+12582+56d94c81.x86_64
  toolbox-0.0.99.3-0.4.module+el8.5.0+12682+a4eeb084.x86_64
  udica-0.2.5-2.module+el8.5.0+12582+56d94c81.noarch

完了しました!
「podman-docker」のインストール
$ sudo su -
# yum install -y podman-docker

サブスクリプション管理リポジトリーを更新しています。
メタデータの期限切れの最終確認: 0:15:17 時間前の 2021年11月27日 17時48分01秒 に 実施しました。
依存関係が解決しました。
================================================================================
 パッケージ    Arch   バージョン         リポジトリー                     サイズ
================================================================================
インストール:
 podman-docker noarch 3.3.1-9.module+el8.5.0+12697+018f24d7
                                         rhel-8-for-x86_64-appstream-rpms  56 k

トランザクションの概要
================================================================================
インストール  1 パッケージ

ダウンロードサイズの合計: 56 k
インストール後のサイズ: 230
パッケージのダウンロード:
podman-docker-3.3.1-9.module+el8.5.0+12697+018f 153 kB/s |  56 kB     00:00
--------------------------------------------------------------------------------
合計                                            152 kB/s |  56 kB     00:00
トランザクションの確認を実行中
トランザクションの確認に成功しました。
トランザクションのテストを実行中
トランザクションのテストに成功しました。
トランザクションを実行中
  準備             :                                                        1/1
  インストール中   : podman-docker-3.3.1-9.module+el8.5.0+12697+018f24d7.   1/1
  scriptletの実行中: podman-docker-3.3.1-9.module+el8.5.0+12697+018f24d7.   1/1
  検証             : podman-docker-3.3.1-9.module+el8.5.0+12697+018f24d7.   1/1
インストール済みの製品が更新されています。

インストール済み:
  podman-docker-3.3.1-9.module+el8.5.0+12697+018f24d7.noarch

完了しました!
コンテナ収容ネットワークの設定
上記の「Teaming」や「Tag VLAN」の評価や説明のため、コンテナにより使用するネットワークポートへ、ホスト機から通常どおり使用できるよう、設定をしていました。
評価が終わったため、以下のようなコンテナ収容ネットワークへ作り変えていきます。
コンテナ収容ネットワーク以外のネットワークや機器に対しても、通信経路の整備を行います。
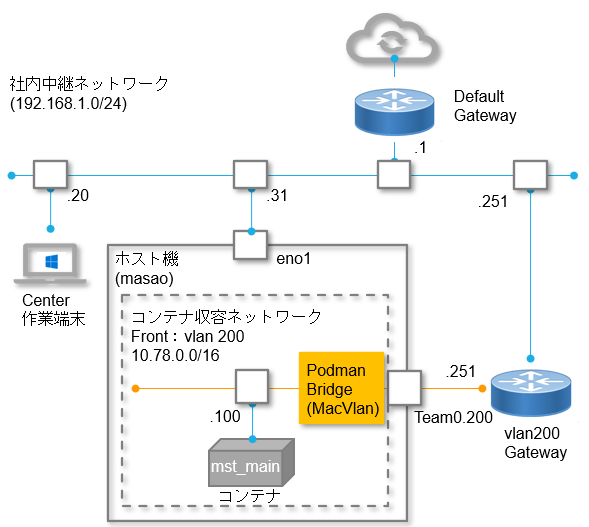
ネットワークインタフェース初期化
無用なホストルーティングを避ける(ホスト、コンテナ間でpingなどのネットワーク疎通が通らない状況を避ける)ため、ホストへ設定したVLANインターフェースを削除します。
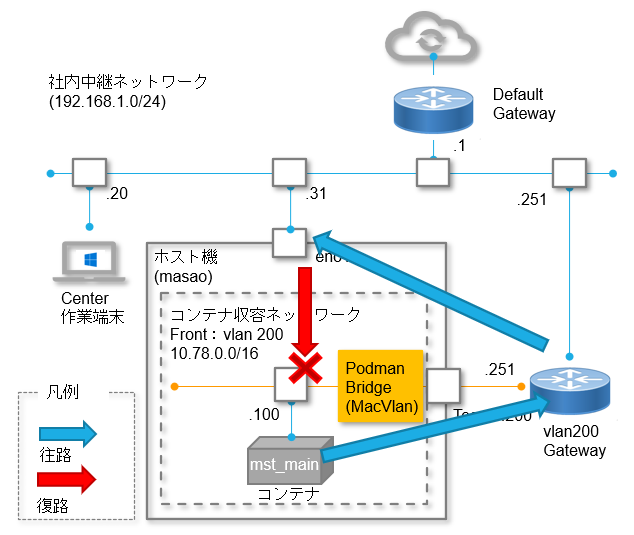
IPv4、IPv6を無効化した状態のVLANインターフェースを再作成します。
再作成したインターフェースを仮想ネットワーク( macvlan )により使用します。
VLANインターフェース削除
# nmcli connection delete vlan100
# nmcli connection delete vlan200
# nmcli connection delete vlan300
# nmcli connection delete vlan400
# nmcli connection delete vlan500
# nmcli connection delete vlan600
# nmcli connection delete vlan900

削除確認
# nmcli dev
DEVICE      TYPE      STATE            CONNECTION
eno1        ethernet  接続済み         eno1
virbr0      bridge    接続済み (外部)  virbr0
enp1s0f0    ethernet  接続済み         team0-port1
enp1s0f1    ethernet  接続済み         team0-port2
enp1s0f2    ethernet  接続済み         team1-port1
enp1s0f3    ethernet  接続済み         team1-port2
team0       team      接続済み         team0
team1       team      接続済み         team1
lo          loopback  管理無し         --
virbr0-nic  tun       管理無し         --

ネットワークインターフェース、デバイス追加
# nmcli connection add type vlan con-name vlan100 dev team0 id 100
# nmcli connection add type vlan con-name vlan200 dev team0 id 200
# nmcli connection add type vlan con-name vlan300 dev team0 id 300
# nmcli connection add type vlan con-name vlan400 dev team0 id 400
# nmcli connection add type vlan con-name vlan500 dev team1 id 500
# nmcli connection add type vlan con-name vlan600 dev team1 id 600
# nmcli connection add type vlan con-name vlan900 dev team1 id 900

デバイス追加確認
# nmcli dev
DEVICE      TYPE      STATE                     CONNECTION
eno1        ethernet  接続済み                  eno1
virbr0      bridge    接続済み (外部)           virbr0
enp1s0f0    ethernet  接続済み                  team0-port1
enp1s0f1    ethernet  接続済み                  team0-port2
enp1s0f2    ethernet  接続済み                  team1-port1
enp1s0f3    ethernet  接続済み                  team1-port2
team0       team      接続済み                  team0
team1       team      接続済み                  team1
team0.100   vlan      接続中 (IP 設定を取得中)  vlan100
team0.200   vlan      接続中 (IP 設定を取得中)  vlan200
team0.300   vlan      接続中 (IP 設定を取得中)  vlan300
team0.400   vlan      接続中 (IP 設定を取得中)  vlan400
team1.500   vlan      接続中 (IP 設定を取得中)  vlan500
team1.600   vlan      接続中 (IP 設定を取得中)  vlan600
team1.900   vlan      接続中 (IP 設定を取得中)  vlan900
lo          loopback  管理無し                  --
virbr0-nic  tun       管理無し                  --

空のIPアドレス設定、自動起動

# nmcli connection modify vlan100 ipv4.method disabled
# nmcli connection modify vlan100 ipv6.method disabled
# nmcli connection modify vlan100 connection.autoconnect yes
# nmcli connection up vlan100


# nmcli connection modify vlan200 ipv4.method disabled
# nmcli connection modify vlan200 ipv6.method disabled
# nmcli connection modify vlan200 connection.autoconnect yes
# nmcli connection up vlan200


# nmcli connection modify vlan300 ipv4.method disabled
# nmcli connection modify vlan300 ipv6.method disabled
# nmcli connection modify vlan300 connection.autoconnect yes
# nmcli connection up vlan300


# nmcli connection modify vlan400 ipv4.method disabled
# nmcli connection modify vlan400 ipv6.method disabled
# nmcli connection modify vlan400 connection.autoconnect yes
# nmcli connection up vlan400


# nmcli connection modify vlan500 ipv4.method disabled
# nmcli connection modify vlan500 ipv6.method disabled
# nmcli connection modify vlan500 connection.autoconnect yes
# nmcli connection up vlan500


# nmcli connection modify vlan600 ipv4.method disabled
# nmcli connection modify vlan600 ipv6.method disabled
# nmcli connection modify vlan600 connection.autoconnect yes
# nmcli connection up vlan600


# nmcli connection modify vlan900 ipv4.method disabled
# nmcli connection modify vlan900 ipv6.method disabled
# nmcli connection modify vlan900 connection.autoconnect yes
# nmcli connection up vlan900

接続確認
# nmcli dev
DEVICE      TYPE      STATE            CONNECTION
eno1        ethernet  接続済み         eno1
virbr0      bridge    接続済み (外部)  virbr0
enp1s0f0    ethernet  接続済み         team0-port1
enp1s0f1    ethernet  接続済み         team0-port2
enp1s0f2    ethernet  接続済み         team1-port1
enp1s0f3    ethernet  接続済み         team1-port2
team0       team      接続済み         team0
team1       team      接続済み         team1
team0.100   vlan      接続済み         vlan100
team0.200   vlan      接続済み         vlan200
team0.300   vlan      接続済み         vlan300
team0.400   vlan      接続済み         vlan400
team1.500   vlan      接続済み         vlan500
team1.600   vlan      接続済み         vlan600
team1.900   vlan      接続済み         vlan900
lo          loopback  管理無し         --
virbr0-nic  tun       管理無し         --
仮想ネットワーク( macvlan )の作成
物理的なネットワークとNameSpace内のコンテナ用仮想ネットワークを仮想的に接続するために、仮想ブリッジを作成します。
仮想ブリッジ内は物理的なネットワークと同じネットワークアドレスになります。
現状確認
# podman network ls

NETWORK ID    NAME        VERSION     PLUGINS
2f259bab93aa  podman      0.4.0       bridge,portmap,firewall,tuning

ネットワークデバイスの事前確認
# nmcli dev

DEVICE      TYPE      STATE            CONNECTION
eno1        ethernet  接続済み         eno1
virbr0      bridge    接続済み (外部)  virbr0
team0.100   vlan      接続済み         vlan100
team0.200   vlan      接続済み         vlan200
team0.300   vlan      接続済み         vlan300
team0.400   vlan      接続済み         vlan400
team1.500   vlan      接続済み         vlan500
team1.600   vlan      接続済み         vlan600
team1.900   vlan      接続済み         vlan900
enp1s0f0    ethernet  接続済み         team0-port1
enp1s0f1    ethernet  接続済み         team0-port2
enp1s0f2    ethernet  接続済み         team1-port1
enp1s0f3    ethernet  接続済み         team1-port2
team0       team      接続済み         team0
team1       team      接続済み         team1
lo          loopback  管理無し         --
virbr0-nic  tun       管理無し         --

作成
# podman network create -d macvlan --subnet=10.77.0.0/16 --gateway=10.77.255.251 -o parent=team0.100 macvlan.100
/etc/cni/net.d/macvlan.100.conflist

# podman network create -d macvlan --subnet=10.78.0.0/16 --gateway=10.78.255.251 -o parent=team0.200 macvlan.200
/etc/cni/net.d/macvlan.200.conflist

# podman network create -d macvlan --subnet=10.79.0.0/16 --gateway=10.79.255.251 -o parent=team0.300 macvlan.300
/etc/cni/net.d/macvlan.300.conflist

# podman network create -d macvlan --subnet=10.80.0.0/16 --gateway=10.80.255.251 -o parent=team0.400 macvlan.400
/etc/cni/net.d/macvlan.400.conflist

# podman network create -d macvlan --subnet=10.81.0.0/16 --gateway=10.81.255.252 -o parent=team1.500 macvlan.500
/etc/cni/net.d/macvlan.500.conflist

# podman network create -d macvlan --subnet=10.82.0.0/16 --gateway=10.82.255.252 -o parent=team1.600 macvlan.600
/etc/cni/net.d/macvlan.600.conflist

# podman network create -d macvlan --subnet=10.90.0.0/16 --gateway=10.90.255.252 -o parent=team1.900 macvlan.900
/etc/cni/net.d/macvlan.900.conflist

作成確認
# podman network ls
NETWORK ID    NAME         VERSION     PLUGINS
2f259bab93aa  podman       0.4.0       bridge,portmap,firewall,tuning
12468afd8575  macvlan.100  0.4.0       macvlan
2503dccf3bf1  macvlan.200  0.4.0       macvlan
7673b51b18ca  macvlan.300  0.4.0       macvlan
12e374f1fa82  macvlan.400  0.4.0       macvlan
ec5006f37db3  macvlan.500  0.4.0       macvlan
5787b4137a85  macvlan.600  0.4.0       macvlan
d9ee26bba945  macvlan.900  0.4.0       macvlan

削除(非接続化)
# podman network rm macvlan.900
macvlan.900

削除(使用済みフォルダの削除)
# /bin/rm -r /var/lib/cni/networks/macvlan.900

削除確認
# podman network ls
NETWORK ID    NAME         VERSION     PLUGINS
2f259bab93aa  podman       0.4.0       bridge,portmap,firewall,tuning
12468afd8575  macvlan.100  0.4.0       macvlan
2503dccf3bf1  macvlan.200  0.4.0       macvlan
7673b51b18ca  macvlan.300  0.4.0       macvlan
12e374f1fa82  macvlan.400  0.4.0       macvlan
ec5006f37db3  macvlan.500  0.4.0       macvlan
5787b4137a85  macvlan.600  0.4.0       macvlan

再作成
# podman network create -d macvlan --subnet=10.90.0.0/16 --gateway=10.90.255.254 -o parent=team1.900 macvlan.900
/etc/cni/net.d/macvlan.900.conflist

再作成の確認
# podman network ls
NETWORK ID    NAME         VERSION     PLUGINS
2f259bab93aa  podman       0.4.0       bridge,portmap,firewall,tuning
12468afd8575  macvlan.100  0.4.0       macvlan
2503dccf3bf1  macvlan.200  0.4.0       macvlan
7673b51b18ca  macvlan.300  0.4.0       macvlan
12e374f1fa82  macvlan.400  0.4.0       macvlan
ec5006f37db3  macvlan.500  0.4.0       macvlan
5787b4137a85  macvlan.600  0.4.0       macvlan
d9ee26bba945  macvlan.900  0.4.0       macvlan

定義ファイル表示
# podman network inspect macvlan.100
[
    {
        "cniVersion": "0.4.0",
        "name": "macvlan.100",
        "plugins": [
            {
                "ipam": {
                    "ranges": [
                        [
                            {
                                "gateway": "10.77.255.251",
                                "subnet": "10.77.0.0/16"
                            }
                        ]
                    ],
                    "routes": [
                        {
                            "dst": "0.0.0.0/0"
                        }
                    ],
                    "type": "host-local"
                },
                "master": "team0.100",
                "type": "macvlan"
            }
        ]
    }
]

仮想ネットワークの存在確認
 存在している場合
# podman network exists macvlan.900
# echo $?
0

 未定義の場合
# podman network exists macvlan.999
# echo $?
1
仮想ネットワークを再作成する場合、対象となるネットワーク上のコンテナをすべて削除する必要があります。
仮想ネットワークの再作成後、コンテナを再作成すると、以下のようなエラーを出力することがあります。
そのような場合、以下の定義ファイルも削除します。
# podman run -it -d --privileged --tz=Asia/Tokyo --hostname=mst_main --name=mst_main --security-opt label=disable --net=macvlan.200 --ip=10.78.0.100 localhost/mark_demo/mst_main /sbin/init

ERRO[0000] error loading cached network config: network "macvlan.200" not found in CNI cache
WARN[0000] falling back to loading from existing plugins on disk
Error: error configuring network namespace for container 7d2b9386110f9877e54b1e6422a90456043f8d31e574930e3b6004d557c37b31: error adding pod mst_main_mst_main to CNI network "macvlan.200": failed to allocate for range 0: requested IP address 10.78.0.100 is not available in range set 10.78.0.1-10.78.255.254

# cd /var/lib/cni/networks/
# ls
macvlan.200  podman

# /bin/rm -r macvlan.200
# ls
podman
作業用Windows端末へスタティックルート追加
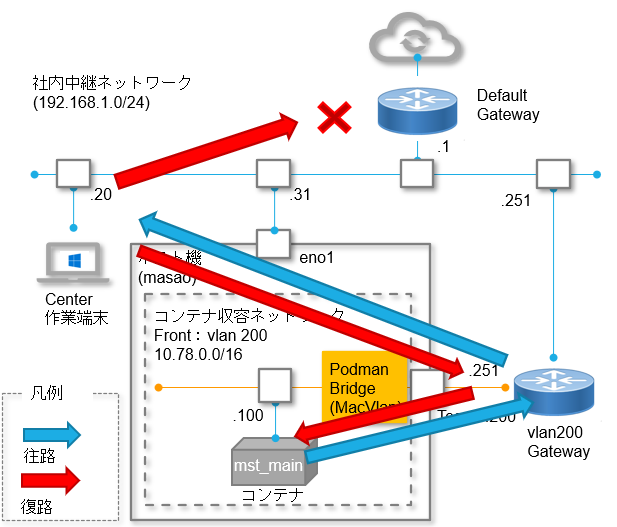
管理者権限で「コマンドプロンプト」を起動します。
スタティックルート追加
Microsoft Windows [Version 10.0.19042.1348]
(c) Microsoft Corporation. All rights reserved.

C:\WINDOWS\system32>route add -p 10.77.0.0 mask 255.255.0.0 192.168.1.251
 OK!

C:\WINDOWS\system32>route add -p 10.78.0.0 mask 255.255.0.0 192.168.1.251
 OK!

C:\WINDOWS\system32>route add -p 10.79.0.0 mask 255.255.0.0 192.168.1.251
 OK!

C:\WINDOWS\system32>route add -p 10.80.0.0 mask 255.255.0.0 192.168.1.251
 OK!

C:\WINDOWS\system32>route add -p 10.81.0.0 mask 255.255.0.0 192.168.1.252
 OK!

C:\WINDOWS\system32>route add -p 10.82.0.0 mask 255.255.0.0 192.168.1.252
 OK!

C:\WINDOWS\system32>route add -p 10.90.0.0 mask 255.255.0.0 192.168.1.252
 OK!

削除
C:\WINDOWS\system32>route delete 10.90.0.0
 OK!

再度追加
C:\WINDOWS\system32>route add -p 10.90.0.0 mask 255.255.0.0 192.168.1.252
 OK!
ホストなどのLinux機へスタティックルート追加
追加
nmcli connection modify eno1 +ipv4.routes "10.77.0.0/16 192.168.1.251"
nmcli connection modify eno1 +ipv4.routes "10.78.0.0/16 192.168.1.251"
nmcli connection modify eno1 +ipv4.routes "10.79.0.0/16 192.168.1.251"
nmcli connection modify eno1 +ipv4.routes "10.80.0.0/16 192.168.1.251"
nmcli connection modify eno1 +ipv4.routes "10.81.0.0/16 192.168.1.252"
nmcli connection modify eno1 +ipv4.routes "10.82.0.0/16 192.168.1.252"
nmcli connection modify eno1 +ipv4.routes "10.90.0.0/16 192.168.1.252"

nmcli connection reload
nmcli connection up eno1

削除
nmcli connection modify eno1 -ipv4.routes "10.77.0.0/16 192.168.1.251"
コンテナ( UBI )イメージの プル(ダウンロード)
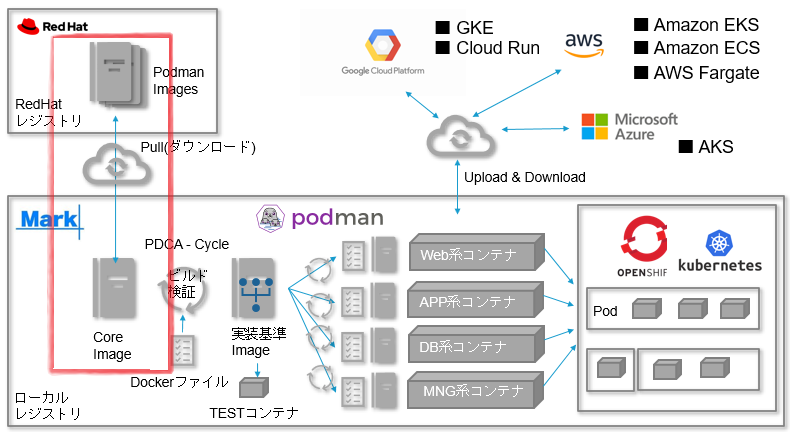
システム全体の核(core)となるUBIイメージを「Red Hat レジストリ」からダウンロードします。
「Docker Hub」などに公開されているイメージを使い、お手軽に目的のコンテナを作成できますが、セキュアなイメージであると判断するには、時間や工数がかかります。
PCI-DSS対応イメージでは、コンプライアンス準拠、および、セキュリティ対策などの膨大なチューニングを必要とします。
したがって、「車輪の再開発」(既にあるのに1から”理解しながら”作り直すこと)を率先して実施していきます。
苦労を買うつもりで、楽しみましょう♪
コンテナーレジストリーの設定
$ sudo su -
# vi /etc/containers/registries.conf

unqualified-search-registries = ["registry.fedoraproject.org", "registry.access.redhat.com", "registry.centos.org", "docker.io"]
イメージ検索
$ sudo su -
# podman search ubi

INDEX       NAME                                                  DESCRIPTION                                      STARS       OFFICIAL    AUTOMATED
redhat.com  registry.access.redhat.com/ubi7/ubi-minimal           The Universal Base Image Init is designed to...  0
redhat.com  registry.access.redhat.com/ubi7/ubi-init              The Universal Base Image Init is designed to...  0
redhat.com  registry.access.redhat.com/ubi8-minimal               The Universal Base Image Minimal is a stripp...  0
redhat.com  registry.access.redhat.com/ubi7                       The Universal Base Image is designed and eng...  0
redhat.com  registry.access.redhat.com/ubi7-minimal               The Universal Base Image Minimal is a stripp...  0
redhat.com  registry.access.redhat.com/ubi8/ubi-micro             Provides the latest release of Micro Univers...  0
redhat.com  registry.access.redhat.com/ubi9-beta/ubi              Provides the latest release of Red Hat Unive...  0
redhat.com  registry.access.redhat.com/ubi9-beta/ubi-minimal      Provides the latest release of the Minimal R...  0
redhat.com  registry.access.redhat.com/ubi7/ubi                   The Universal Base Image is designed and eng...  0
redhat.com  registry.access.redhat.com/ubi8/ubi                   Provides the latest release of the Red Hat U...  0
redhat.com  registry.access.redhat.com/ubi8/ubi-minimal           Provides the latest release of the Minimal R...  0
redhat.com  registry.access.redhat.com/ubi8/ubi-init              Provides the latest release of the Red Hat U...  0
redhat.com  registry.access.redhat.com/ubi8                       The Universal Base Image is designed and eng...  0
redhat.com  registry.access.redhat.com/ubi8-init                  The Universal Base Image Init is designed to...  0
redhat.com  registry.access.redhat.com/ubi7-init                  The Universal Base Image Init is designed to...  0
redhat.com  registry.access.redhat.com/ubi8-micro                 Provides the latest release of Micro Univers...  0
redhat.com  registry.access.redhat.com/ubi9-beta/ubi-init         Provides the latest release of the Red Hat U...  0
redhat.com  registry.access.redhat.com/ubi9-beta/ubi-micro        Provides the latest release of Micro Univers...  0
redhat.com  registry.access.redhat.com/ubi8/openjdk-8-runtime     OpenJDK 1.8 runtime-only image on Red Hat Un...  0
redhat.com  registry.access.redhat.com/ubi8/openjdk-11-runtime    OpenJDK 11 runtime-only image on Red Hat Uni...  0
redhat.com  registry.access.redhat.com/ubi8/openjdk-17-runtime    OpenJDK 17 runtime-only image on Red Hat Uni...  0
redhat.com  registry.access.redhat.com/ubi8/go-toolset            Platform for building and running Go 1.11.5 ...  0
redhat.com  registry.access.redhat.com/ubi7/s2i-core              Base image which allows using of source-to-i...  0
redhat.com  registry.access.redhat.com/ubi8/dotnet-21-runtime     Provides the latest release of Red Hat Enter...  0
redhat.com  registry.access.redhat.com/ubi8/perl-526              Platform for building and running Perl 5.26 ...  0
docker.io   docker.io/ubirch/ubirch-client                        Dockerized version of the ubirch-protocol cl...  0
docker.io   docker.io/ubirak/moco                                 Ubirak moco docker containers                    0
docker.io   docker.io/mblab/ubio                                  Creates container to run uBio app                0                       [OK]
docker.io   docker.io/ubirch/ubirch-avatar-service                                                                 1
docker.io   docker.io/ubirch/ubirch-certify-service               ubirch-certify-service                           0
docker.io   docker.io/ubirch/filter-service                       ubirch filter service                            0
docker.io   docker.io/ubidots/docker-ubifunction-python3.6action  Base Docker to execute UbiFunction python3.6...  0
docker.io   docker.io/ubidots/docker-ubifunction-python3action    Base Docker to execute UbiFunction python ac...  0
docker.io   docker.io/ubirch/ubirch-certifier-web                 ubirch-certifier-web                             0
docker.io   docker.io/ubidots/docker-ubifunction-node10action     Base container to run Ubifunctions based on ...  0
docker.io   docker.io/ubirch/ubirch-blockchain-service                                                             0
docker.io   docker.io/ubirch/ubirch-ethereum-service              Command line interface python service develo...  0
docker.io   docker.io/nodeshift/ubi8-s2i-web-app                  OpenShift S2I builder images for Modern Web ...  2
docker.io   docker.io/ubirch/ubirch-key-service                                                                    0
docker.io   docker.io/ubiviushub/ubivius-game                     Ubivius game server                              0
docker.io   docker.io/cyberark/ubi-ruby-fips                      Combines a UBI base image with ruby compiled...  0
docker.io   docker.io/ubirch/ubirch-id-service                    ubirch-id-service                                0
docker.io   docker.io/ubirch/ubirch-incident-service              Ubirch Incident Service                          0
docker.io   docker.io/ubirch/discovery-kafka-service                                                               0
docker.io   docker.io/hclcnlabs/ubi-stratos-bk-base                                                                0
docker.io   docker.io/opsmxdev/ubi8-autopilot                                                                      0
docker.io   docker.io/hclcnlabs/ubi-stratos-bk-build-base                                                          0
docker.io   docker.io/hclcnlabs/ubi-stratos-init-base                                                              0
docker.io   docker.io/hclcnlabs/ubi-stratos-db-base                                                                0
docker.io   docker.io/planesticud/ubicaciones_crud                                                                 0
イメージのプル(ダウンロード)
現在のローカルレジストリの登録状況(空です)
$ sudo su -
# podman images

REPOSITORY                           TAG         IMAGE ID      CREATED      SIZE

Red Hatレジストリからプル(ダウンロード)
# podman pull registry.access.redhat.com/ubi8/ubi

Trying to pull registry.access.redhat.com/ubi8/ubi:latest...
Getting image source signatures
Checking if image destination supports signatures
Copying blob ce3c6836540f done
Copying blob 63f9f4c31162 done
Copying config cc06568478 done
Writing manifest to image destination
Storing signatures
cc0656847854310306093b3dc1a7d9e7fc06399da46853e0c921cd5ec1906bfd

ローカルレジストリの登録状況(追加確認)
# podman images

REPOSITORY                           TAG         IMAGE ID      CREATED      SIZE
registry.access.redhat.com/ubi8/ubi  latest      cc0656847854  3 weeks ago  235 MB
実装基準イメージ作成
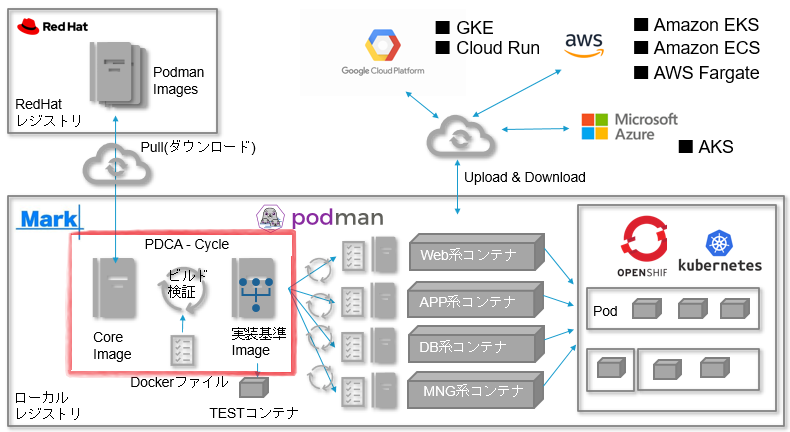
実装基準イメージのDockerファイル作成
注意点として、ファイルをホスト機からコピーする際は相対パス指定となるところです。
$ sudo su -
# vi /root/podman/mst_core/build/mst_core
========ここから========
# Base Image
FROM registry.access.redhat.com/ubi8/ubi:latest

# Add yum Repository
RUN yum install -y https://dl.fedoraproject.org/pub/epel/epel-release-latest-8.noarch.rpm
RUN yum install -y http://rpms.famillecollet.com/enterprise/remi-release-8.rpm
RUN yum install -y https://repo.zabbix.com/zabbix/5.5/rhel/8/x86_64/zabbix-release-5.5-1.el8.noarch.rpm

# Add yum Repository ( copy from local file )
#  -- COPY MariaDB Repository
COPY ./share/MariaDB.repo /etc/yum.repos.d/MariaDB.repo

# Install RPM
RUN yum update  -y --disableplugin=subscription-manager
RUN yum update  -y
RUN yum install -y NetworkManager
RUN yum install -y chrony
RUN yum install -y nfs-utils
RUN yum install -y bc
RUN yum install -y procps
RUN yum install -y rsyslog
RUN yum install -y net-tools
RUN yum install -y bind-utils
RUN yum install -y iputils
RUN yum install -y rsync
RUN yum install -y lsof
RUN yum install -y iproute
RUN yum install -y crontabs
RUN yum install -y traceroute
RUN yum install -y wget
RUN yum install -y tcpdump
RUN yum install -y python39
RUN yum install -y perl
RUN yum install -y hostname
RUN yum install -y sudo
RUN yum install -y iperf3
RUN yum install -y openssh
RUN yum install -y openssh-server
RUN yum install -y openssh-clients
RUN yum install -y firewalld
RUN yum install -y httpd
RUN yum install -y mod_ssl
RUN yum install -y mod_fcgid
RUN yum install -y mod_wsgi
RUN yum install -y MariaDB-client
RUN yum module reset -y php
RUN yum module install -y php:7.4
RUN yum install -y php-zip php-pear
RUN yum install -y php74 php74-php php74-php-mysqlnd
RUN yum install -y clamav clamd clamav-devel clamav-update clamav-data clamav-filesystem
RUN yum install -y zabbix-agent2
RUN yum clean all

#=======================
# systemctl setup
#=======================
RUN systemctl enable rsyslog.service
RUN systemctl enable firewalld.service
RUN systemctl enable sshd.service
RUN systemctl enable crond.service
RUN systemctl enable chronyd.service
RUN systemctl enable httpd.service

#=======================
# sshd setup
#=======================
COPY ./share/sshd_config /etc/ssh/sshd_config
RUN chmod 600    /etc/ssh/sshd_config

#=======================
# suders setup
#=======================
COPY ./share/sudo_users /etc/sudoers.d/sudo_users
RUN chmod 660 /etc/sudoers.d/sudo_users

#=======================
# group add
#=======================
RUN groupadd -g 10001 autopilot

#=======================
# ansible setup
#=======================
# user add
RUN useradd -u 10001 -g 10001 -d /home/autopilot -s /bin/bash autopilot

# ssh conf
RUN mkdir /home/autopilot/.ssh
COPY ./share/autopilot_keys/id_ed25519      /home/autopilot/.ssh
COPY ./share/autopilot_keys/id_ed25519.pub  /home/autopilot/.ssh
COPY ./share/autopilot_keys/authorized_keys /home/autopilot/.ssh
COPY ./share/ssh_config /home/autopilot/.ssh/config
RUN chmod 600 /home/autopilot/.ssh/*
RUN chmod 700 /home/autopilot/.ssh

# .bashrc conf
COPY ./share/bashrc /home/autopilot/.bashrc
RUN chmod 644 /home/autopilot/.bashrc
RUN chown -R autopilot /home/autopilot
RUN chgrp -R autopilot /home/autopilot
実装基準イメージのビルド( 基本編 )
ビルド前イメージ確認
$ sudo su -
# podman images
REPOSITORY                           TAG         IMAGE ID      CREATED         SIZE
registry.access.redhat.com/ubi8/ubi  latest      cc0656847854  4 weeks ago     235 MB

ビルドディレクトリへ移動
# cd /root/podman

ビルド
# podman build -f ./mst_core/build/mst_core -t mark_demo/mst_core_v1.0 .
ビルド( デバッグ モード )
# podman build --log-level=debug -f ./mst_core/build/mst_core -t mark_demo/mst_core_v1.0 .

STEP 1/42: FROM registry.access.redhat.com/ubi8/ubi:latest
STEP 2/42: RUN yum install -y https://dl.fedoraproject.org/pub/epel/epel-release-latest-8.noarch.rpm
Updating Subscription Management repositories.
Unable to read consumer identity
Subscription Manager is operating in container mode.
Red Hat Enterprise Linux 8 for x86_64 - AppStre 8.4 MB/s |  37 MB     00:04
Red Hat Enterprise Linux 8 for x86_64 - BaseOS  8.6 MB/s |  41 MB     00:04
Red Hat Universal Base Image 8 (RPMs) - BaseOS  489 kB/s | 794 kB     00:01
 :
 :
(省略)
 :
 :
DEBU[0475] parsed reference into "[overlay@/var/lib/containers/storage+/run/containers/storage:overlay.mountopt=nodev,metacopy=on]localhost/mark_demo/mst_core_v1.0:latest"
Successfully tagged localhost/mark_demo/mst_core_v1.0:latest
DEBU[0475] printing final image id "d1d2d038a7d0015838cc0115aa8298cde76959445c156d3422e5db5e8a069114"
d1d2d038a7d0015838cc0115aa8298cde76959445c156d3422e5db5e8a069114
DEBU[0475] Called build.PersistentPostRunE(podman build --squash-all --log-level=debug -f ./mst_core/build/mst_core -t mark_demo/mst_core_v1.0 .)

実装イメージの確認
# podman images

REPOSITORY                           TAG         IMAGE ID      CREATED        SIZE
localhost/mark_demo/mst_core_v1.0    latest      a6ddb8b61d53  2 minutes ago  1.71 GB
registry.access.redhat.com/ubi8/ubi  latest      cc0656847854  4 weeks ago    235 MB
ビルド処理では、イメージの再作成を高速化するため、作成段階のイメージレイヤー(途中過程) を自動記録しています。
欲が出てしまい、ビルドのステップ数が大きくなってしまうと、イメージレイヤー(途中過程)も増えていきます。そのため、ページの上限数を超過してしまい、以下のような「too large 4161 > page size 4096」が出力されます。
コンテナ起動後に「Ansible」でできることは任せることにしましょう。
どうしても、ビルドしたいという時は、次項「実装基準イメージのビルド( 確定編: podman build –squash-all )」を参照してください。
ERRO[0003] error unmounting /var/lib/containers/storage/overlay/f5ca94f7a4ddf306612de6ee918d4373f0033901a753ca1e962448eb5ab709ce/merged: invalid argument
Error: error committing container for step {Env:[PATH=/usr/local/sbin:/usr/local/bin:/usr/sbin:/usr/bin:/sbin:/bin container=oci] Command:run
Args:[useradd -u 10002 -g 10001 -d /home/scanner -s /bin/bash scanner] Flags:[] Attrs:map[] Message:RUN useradd -u 10002 -g 10001 -d /home/scanner -s /bin/bash scanner Original
:RUN useradd -u 10002 -g 10001 -d /home/scanner -s /bin/bash scanner}: error copying layers and metadata for container "9bee2e86e1196b7c2d7db47f9224046f32a806c0e5e6fc517eb39c6763449297":
initializing source containers-storage:e13ad946ae474e2b4546e80b79043fe1e282835c82ea12b70115f2a57cc0841e-working-container: error extracting layer "62113d727cdc633b89bb350193588f8df2d61324e7e5c67f564a03c1e366c778":
cannot mount layer, mount label "system_u:object_r:container_file_t:s0:c585,c602" too large 4161 > page size 4096
実装基準イメージのビルド( 確定編: podman build –squash-all )
開発環境によりビルド試験を終えたイメージでは、再作成の必要性がなくなります。
商用環境では、システム障害に備え可搬性が重要になってきますから、イメージサイズを小さくするすることを目的とします。
以下の「podman build –squash-all 」コマンドにより、複数のイメージレイヤーを一つに圧縮することで、全体のイメージサイズを小さくすることができます。
通常のビルド方法(--squash-all なし)によるレイヤーを参照してみる
$ sudo su -
# podman inspect localhost/mark_demo/mst_core_v1.0

(省略)
        "RootFS": {
            "Type": "layers",
            "Layers": [
                "sha256:0d3f22d60daf4a2421b2239fb0e1c6ec02d3787274db8b098fb648941ea2d5dc",
                "sha256:0488bd866f642b2b1b5490f5c50d628815e4e8fa1f7cae57d52c67c1e9d3e2cc",
                "sha256:edb56a2933944f7d47a8796bef5f6bbe3c459f44cfd5096de63df2555fa391da",
         :
         :
        (省略)
         :
         :
                "sha256:1f4f30b4fa708685db66e551fc6a231ef76e104f3e97261bf159a436cc4685d4",
                "sha256:ca02982c6c08e97bbc261dd52a0ad0b117f7432a86749e4a649ad8ae5ec7861f"
            ]
(省略)

確定版のビルド方法(--squash-all あり)
# podman build --squash-all --log-level=debug - -f ./mst_core/build/mst_core -t mark_demo/mst_core_v1.0 .

(省略)

確定版のビルド方法(--squash-all あり)によるレイヤーを参照してみる
# podman inspect localhost/mark_demo/mst_core_v1.0

(省略)
            "Layers": [
                "sha256:09c3110bb24fd69baa30a5bf618565b235ad18cc5126e91eac98fac21d1d3f5e"
            ]
(省略)

通常のビルド方法(--squash-all なし)のイメージサイズ
# podman images

REPOSITORY                           TAG         IMAGE ID      CREATED        SIZE
localhost/mark_demo/mst_core_v1.0    latest      a6ddb8b61d53  2 minutes ago  1.71 GB
registry.access.redhat.com/ubi8/ubi  latest      cc0656847854  4 weeks ago    235 MB

確定版のビルド方法(--squash-all あり)のイメージサイズ
1GB未満になりました(汗)
# podman images

REPOSITORY                           TAG         IMAGE ID      CREATED        SIZE
localhost/mark_demo/mst_core_v1.0    latest      d1d2d038a7d0  2 minutes ago  928 MB
registry.access.redhat.com/ubi8/ubi  latest      cc0656847854  4 weeks ago    235 MB
永続ボリュームの作成/削除
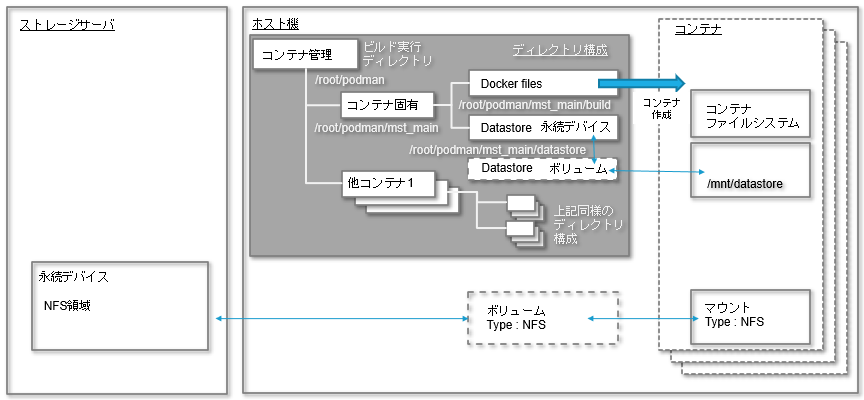
次項により、新規作成する実装基準コンテナを改編などにより再作成すると、コンテナ内のデータは初期状態へ戻ってしまします。
ログやゴミファイルの初期化の手間が不要となるなどの良いところもあります。
データベースのデータなど永続的に保持したい場合、ホスト機に永続ボリュームを定義します。
そのボリュームをコンテナからマウントすることにより、コンテナ再作成後もデータを保持することができます。
【ボリュームの利点】
● ボリュームはコンテナー間で共有できます。
● ボリュームは、他と比べるとバックアップまたは移行が簡単です。
● ボリュームを使用するとコンテナーのサイズが増えません。
ここでは、永続ボリュームの作成/削除を実施します。
次項「実装基準コンテナの作成/起動/停止」の「実装基準コンテナの作成」パラメータにより、永続ボリュームをマウントします。
作成前、ボリュームの確認
$ sudo su -
# podman volume ls

SELinuxコンテキストの追加
# chcon -R -h -t container_file_t /home/podman

ホスト側、ボリュームディレクトリ(ボリュームデバイス)の作成
# mkdir -p /root/podman/mst_main/datastore

ホスト側、ボリュームディレクトリの確認
# ls -l /root/podman/mst_main/datastore
合計 0

永続ボリュームの作成
# podman volume create -o type=none -o device=/root/podman/mst_main/datastore -o o=bind mst_main_datastore

mst_main_datastore

作成後、ボリュームの確認
# podman volume ls
DRIVER      VOLUME NAME
local       mst_main_datastore

ボリュームの定義内容
# podman volume inspect mst_main_datastore

[
    {
        "Name": "mst_main_datastore",
        "Driver": "local",
        "Mountpoint": "/var/lib/containers/storage/volumes/mst_main_datastore/_data",
        "CreatedAt": "2021-12-06T06:11:59.145116651+09:00",
        "Labels": {},
        "Scope": "local",
        "Options": {
            "device": "/root/podman/mst_main/datastore",
            "o": "bind",
            "type": "none"
        }
    }
]

ボリュームの削除
# podman volume rm mst_main_datastore

mst_main_datastore

ホスト側、ボリュームディレクトリ(ボリュームデバイス)の再作成
# /bin/rm -r /root/podman/mst_main/datastore
# mkdir -p /root/podman/mst_main/datastore

永続ボリュームの再作成
# podman volume create -o type=none -o device=/root/podman/mst_main/datastore -o o=bind mst_main_datastore
mst_main_datastore

(例) NFS領域から永続ボリュームの作成
# podman volume create --opt type=nfs4 --opt o=rw --opt device=10.0.0.35:/home/nfsshare mst_main_datastore_nfs

mst_main_datastore_nfs

(例) NFS領域から作成した永続ボリュームの定義
# podman volume inspect mst_main_datastore_nfs
[
    {
        "Name": "mst_main_datastore_nfs",
        "Driver": "local",
        "Mountpoint": "/var/lib/containers/storage/volumes/mst_main_datastore_nfs/_data",
        "CreatedAt": "2021-12-06T06:12:48.247228983+09:00",
        "Labels": {},
        "Scope": "local",
        "Options": {
            "device": "10.0.0.35:/home/nfsshare",
            "o": "rw",
            "type": "nfs4"
        }
    }
]

(例) NFS領域から作成した永続ボリュームの削除
# podman volume rm mst_main_datastore_nfs

mst_main_datastore_nfs

再作成後、ボリュームの確認
# podman volume ls

DRIVER      VOLUME NAME
local       mst_main_datastore
実装基準コンテナの作成/起動/停止
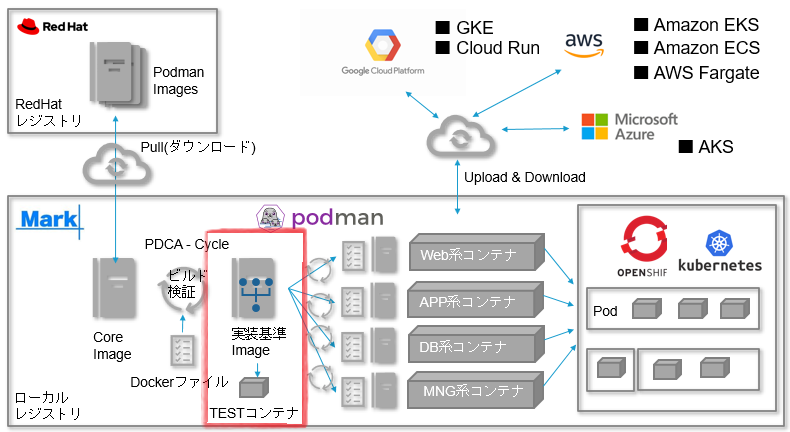
実装基準イメージから実装基準コンテナを作成、起動を一気に行う「docker run」コマンドを以下へ記載します。
コンテナの配置状況確認(空)
# podman ps -a
CONTAINER ID  IMAGE       COMMAND     CREATED     STATUS      PORTS       NAMES

コンテナ作成
# podman run -it -d --privileged --tz=Asia/Tokyo --hostname=mst_main --name=mst_main --security-opt label=disable --net=macvlan.200 --ip=10.78.0.100 -v mst_main_datastore:/mnt/datastore:Z localhost/mark_demo/mst_core_v1.0 /sbin/init
220d1f19bd62a141c0abccc5a75c8c84673f3ea66b465b1d811b022149d6370a

コンテナの配置状況確認(追加確認)
# podman ps -a
CONTAINER ID  IMAGE                                COMMAND     CREATED        STATUS            PORTS       NAMES
220d1f19bd62  localhost/mark_demo/mst_main:latest  /sbin/init  7 seconds ago  Up 7 seconds ago              mst_main

実装基準コンテナへログイン
# podman exec -it mst_main /bin/bash

実装基準コンテナのネットワークデバイス、IPアドレス付与を確認
[root@mst_main /]# ifconfig -a
eth0: flags=4163<UP,BROADCAST,RUNNING,MULTICAST>  mtu 1500
        inet 10.78.0.100  netmask 255.255.0.0  broadcast 10.78.255.255
        inet6 fe80::80bd:40ff:fe60:32c9  prefixlen 64  scopeid 0x20<link>
        ether 82:bd:40:60:32:c9  txqueuelen 0  (Ethernet)
        RX packets 0  bytes 0 (0.0 B)
        RX errors 0  dropped 0  overruns 0  frame 0
        TX packets 12  bytes 908 (908.0 B)
        TX errors 0  dropped 0 overruns 0  carrier 0  collisions 0

lo: flags=73<UP,LOOPBACK,RUNNING>  mtu 65536
        inet 127.0.0.1  netmask 255.0.0.0
        inet6 ::1  prefixlen 128  scopeid 0x10<host>
        loop  txqueuelen 1000  (Local Loopback)
        RX packets 0  bytes 0 (0.0 B)
        RX errors 0  dropped 0  overruns 0  frame 0
        TX packets 0  bytes 0 (0.0 B)
        TX errors 0  dropped 0 overruns 0  carrier 0  collisions 0

実装基準コンテナのルーティングテーブル確認
[root@mst_main /]# netstat -nr

Kernel IP routing table
Destination     Gateway         Genmask         Flags   MSS Window  irtt Iface
0.0.0.0         10.78.255.251   0.0.0.0         UG        0 0          0 eth0
10.78.0.0       0.0.0.0         255.255.0.0     U         0 0          0 eth0

実装基準コンテナからDefault GatewayへPing
[root@mst_main /]# ping -c 3 10.78.255.251

PING 10.78.255.251 (10.78.255.251) 56(84) bytes of data.
64 bytes from 10.78.255.251: icmp_seq=1 ttl=255 time=0.583 ms
64 bytes from 10.78.255.251: icmp_seq=2 ttl=255 time=0.688 ms
64 bytes from 10.78.255.251: icmp_seq=3 ttl=255 time=0.673 ms

--- 10.78.255.251 ping statistics ---
3 packets transmitted, 3 received, 0% packet loss, time 2055ms
rtt min/avg/max/mdev = 0.583/0.648/0.688/0.046 ms

実装基準コンテナからログアウト
[root@mst_main /]# exit
exit

ホスト機による実装基準コンテナのステータス確認(UPしています)
# podman ps -a
CONTAINER ID  IMAGE                                COMMAND     CREATED        STATUS            PORTS       NAMES
220d1f19bd62  localhost/mark_demo/mst_main:latest  /sbin/init  4 minutes ago  Up 4 minutes ago              mst_main

実装基準コンテナの停止
# podman stop mst_main
mst_main

ホスト機による実装基準コンテナのステータス確認(Exitedしています)
# podman ps -a
CONTAINER ID  IMAGE                                COMMAND     CREATED        STATUS                      PORTS       NAMES
220d1f19bd62  localhost/mark_demo/mst_main:latest  /sbin/init  5 minutes ago  Exited (130) 5 seconds ago              mst_main

実装基準コンテナの起動
# podman start mst_main
mst_main

ホスト機による実装基準コンテナのステータス確認(UPしています)
# podman ps -a
CONTAINER ID  IMAGE                                COMMAND     CREATED        STATUS            PORTS       NAMES
220d1f19bd62  localhost/mark_demo/mst_main:latest  /sbin/init  6 minutes ago  Up 3 seconds ago              mst_main

実装基準コンテナへ再ログイン
# podman exec -it mst_main /bin/bash

実装基準コンテナで試しにアップデートを実施
[root@mst_main /]# yum update -y

Updating Subscription Management repositories.
Unable to read consumer identity
Subscription Manager is operating in container mode.
Last metadata expiration check: 0:01:28 ago on Mon Nov 29 05:08:49 2021.
Dependencies resolved.
================================================================================
 Package           Arch    Version      Repository                         Size
================================================================================
Upgrading:
 python3-mod_wsgi  x86_64  4.6.4-4.el8  rhel-8-for-x86_64-appstream-rpms  2.5 M

Transaction Summary
================================================================================
Upgrade  1 Package

Total download size: 2.5 M
Downloading Packages:
python3-mod_wsgi-4.6.4-4.el8.x86_64.rpm         837 kB/s | 2.5 MB     00:03
--------------------------------------------------------------------------------
Total                                           837 kB/s | 2.5 MB     00:03
Running transaction check
Transaction check succeeded.
Running transaction test
Transaction test succeeded.
Running transaction
  Preparing        :                                                        1/1
  Upgrading        : python3-mod_wsgi-4.6.4-4.el8.x86_64                    1/2
  Cleanup          : python3-mod_wsgi-4.6.4-3.el8.x86_64                    2/2
  Running scriptlet: python3-mod_wsgi-4.6.4-3.el8.x86_64                    2/2
  Verifying        : python3-mod_wsgi-4.6.4-4.el8.x86_64                    1/2
  Verifying        : python3-mod_wsgi-4.6.4-3.el8.x86_64                    2/2
Installed products updated.

Upgraded:
  python3-mod_wsgi-4.6.4-4.el8.x86_64

Complete!
実装基準イメージの動作確認(テスト)
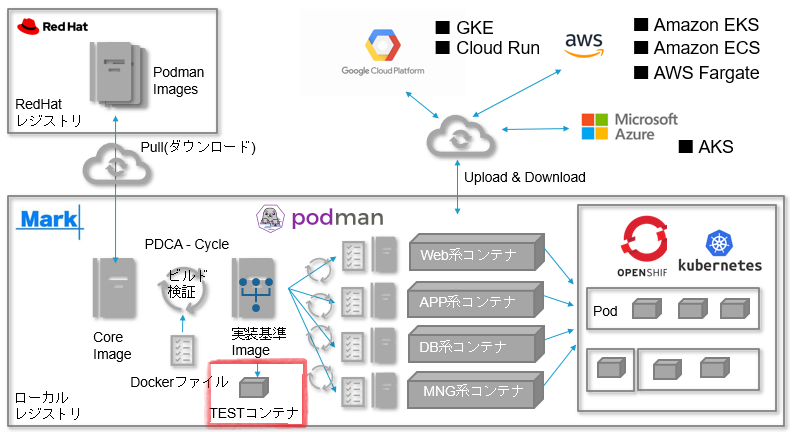
下記に確認方法、および、テストケースのサンプルを記載します。
実運用の際は、全ネットワークへコンテナを配置、正常系、異常系、および、セキュリティ確認(脆弱性スキャン)、冗長化、可搬性確認、バックアップ/リカバリ、監視といったテストを実施していきます。
項目数は1000以上を目指します。
テストのほとんどを「Ansible playbook」、「Jenkins」を用い、自動化することにより、苦労のない「CI/CD」環境を整えます。
コンテナ構成状況の確認( podman inspect )
今後の運用において重要となってくる、コンテナに関する構成管理情報となります。
出力形式はJSONですが、めんどくさいのでお得意の「grep」コマンドです。
一応、jsonから値を取得するサンプルも記載しました。
$ sudo su -
# podman inspect mst_main

(省略)

コンテナへ設定されたIPアドレスを調べる
# podman inspect mst_main | grep -i IPAddress

            "IPAddress": "",
                    "IPAddress": "10.78.0.100",

# podman inspect mst_main | grep "10.78.0.100"

                    "IPAddress": "10.78.0.100",
                "--ip=10.78.0.100",

コンテナへ設定されたネットワークを調べる

# podman inspect mst_main | grep -i NetworkID

                    "NetworkID": "macvlan.200",

# podman inspect mst_main | grep -i "macvlan.200"

                "macvlan.200": {
                    "NetworkID": "macvlan.200",
                "--net=macvlan.200",

コンテナへ自動的に付与されたMACアドレスを調べる
自動化シェル用コマンド例
オプションの「--format」は使わずに、往年の「jq」コマンドを使います。
# podman inspect mst_main | jq '.[].NetworkSettings.Networks["macvlan.200"].MacAddress'

"a6:9f:8b:f0:23:6c"

永続領域の表示
# podman inspect mst_main | jq '.[].Mounts'

[
  {
    "Type": "volume",
    "Name": "mst_main_datastore",
    "Source": "/var/lib/containers/storage/volumes/mst_main_datastore/_data",
    "Destination": "/mnt/datastore",
    "Driver": "local",
    "Mode": "Z",
    "Options": [
      "nosuid",
      "nodev",
      "rbind"
    ],
    "RW": true,
    "Propagation": "rprivate"
  }
]

ホスト側永続デバイスの表示
# podman volume inspect mst_main_datastore | jq '.[].Options.device'

"/root/podman/mst_main/datastore"
実装基準イメージの帯域測定
コンテナへログイン
$ sudo su -
# podman exec -it mst_main /bin/bash

コンテナから100MbpsのLANを使用したストレージサーバ「hana」へ接続
[root@mst_main /]# iperf3 -c 10.90.255.102

Connecting to host 10.90.255.102, port 5201
[  5] local 10.78.0.100 port 40450 connected to 10.90.255.102 port 5201
[ ID] Interval           Transfer     Bitrate         Retr  Cwnd
[  5]   0.00-1.00   sec  11.7 MBytes  98.5 Mbits/sec    7   83.4 KBytes
[  5]   1.00-2.00   sec  11.2 MBytes  93.8 Mbits/sec    4    105 KBytes
[  5]   2.00-3.00   sec  11.2 MBytes  94.4 Mbits/sec    5   91.9 KBytes
[  5]   3.00-4.00   sec  11.2 MBytes  93.8 Mbits/sec    3   76.4 KBytes
[  5]   4.00-5.00   sec  11.2 MBytes  94.3 Mbits/sec    4   97.6 KBytes
[  5]   5.00-6.00   sec  11.2 MBytes  93.8 Mbits/sec    5   83.4 KBytes
[  5]   6.00-7.00   sec  11.2 MBytes  93.8 Mbits/sec    3    105 KBytes
[  5]   7.00-8.00   sec  11.2 MBytes  93.8 Mbits/sec    3   91.9 KBytes
[  5]   8.00-9.00   sec  11.2 MBytes  93.8 Mbits/sec    4   76.4 KBytes
[  5]   9.00-10.00  sec  11.2 MBytes  93.8 Mbits/sec    3   99.0 KBytes
- - - - - - - - - - - - - - - - - - - - - - - - -
[ ID] Interval           Transfer     Bitrate         Retr
[  5]   0.00-10.00  sec   113 MBytes  94.4 Mbits/sec   41             sender
[  5]   0.00-10.05  sec   112 MBytes  93.5 Mbits/sec                  receiver

iperf Done.

コンテナから1G(1000M)bpsのLANを使用したストレージサーバ「hana」へ接続
[root@mst_main /]# iperf3 -c 10.77.255.102

Connecting to host 10.77.255.102, port 5201
[  5] local 10.78.0.100 port 45842 connected to 10.77.255.102 port 5201
[ ID] Interval           Transfer     Bitrate         Retr  Cwnd
[  5]   0.00-1.00   sec   114 MBytes   958 Mbits/sec    0    653 KBytes
[  5]   1.00-2.00   sec   112 MBytes   944 Mbits/sec    0    687 KBytes
[  5]   2.00-3.00   sec   112 MBytes   944 Mbits/sec    0    724 KBytes
[  5]   3.00-4.00   sec   111 MBytes   933 Mbits/sec    0    724 KBytes
[  5]   4.00-5.00   sec   112 MBytes   944 Mbits/sec    0    724 KBytes
[  5]   5.00-6.00   sec   111 MBytes   933 Mbits/sec    0    724 KBytes
[  5]   6.00-7.00   sec   112 MBytes   944 Mbits/sec    0    724 KBytes
[  5]   7.00-8.00   sec   111 MBytes   933 Mbits/sec    0    724 KBytes
[  5]   8.00-9.00   sec   112 MBytes   944 Mbits/sec    0    724 KBytes
[  5]   9.00-10.00  sec   111 MBytes   933 Mbits/sec    0    724 KBytes
- - - - - - - - - - - - - - - - - - - - - - - - -
[ ID] Interval           Transfer     Bitrate         Retr
[  5]   0.00-10.00  sec  1.10 GBytes   941 Mbits/sec    0             sender
[  5]   0.00-10.04  sec  1.09 GBytes   935 Mbits/sec                  receiver

iperf Done.
実装基準イメージのhttpd疎通確認( apache )
テストの自動化としては「curl」コマンドで充分ですが、ここではブラウザでも表示してみます。
コンテナへログイン
$ sudo su -
# podman exec -it mst_main /bin/bash

ポート開閉状況の確認
[root@mst_main /]# firewall-cmd --list-all
public
  target: default
  icmp-block-inversion: no
  interfaces:
  sources:
  services: cockpit dhcpv6-client ssh
  ports:
  protocols:
  forward: no
  masquerade: no
  forward-ports:
  source-ports:
  icmp-blocks:
  rich rules:

tcp 80(http)ポート閉塞
[root@mst_main /]# firewall-cmd --zone=public --add-port=80/tcp --permanent
success

変更の反映
[root@mst_main /]# firewall-cmd --reload
success

ポート開閉状況の確認
[root@mst_main /]# firewall-cmd --list-all
public
  target: default
  icmp-block-inversion: no
  interfaces:
  sources:
  services: cockpit dhcpv6-client ssh
  ports: 80/tcp
  protocols:
  forward: no
  masquerade: no
  forward-ports:
  source-ports:
  icmp-blocks:
  rich rules:

【重要】テスト後、ポート閉塞
[root@mst_main /]# firewall-cmd --zone=public --remove-port=80/tcp --permanent
success

[root@mst_main /]# firewall-cmd --reload
success

[root@mst_main /]# firewall-cmd --list-all
public
  target: default
  icmp-block-inversion: no
  interfaces:
  sources:
  services: cockpit dhcpv6-client ssh
  ports:
  protocols:
  forward: no
  masquerade: no
  forward-ports:
  source-ports:
  icmp-blocks:
  rich rules:
以下の結果画像は、作業用PCからFirefoxブラウザを用い、「http://10.78.0.100」とアクセスしたものです。
各種コンテナについて(ブログ形式)
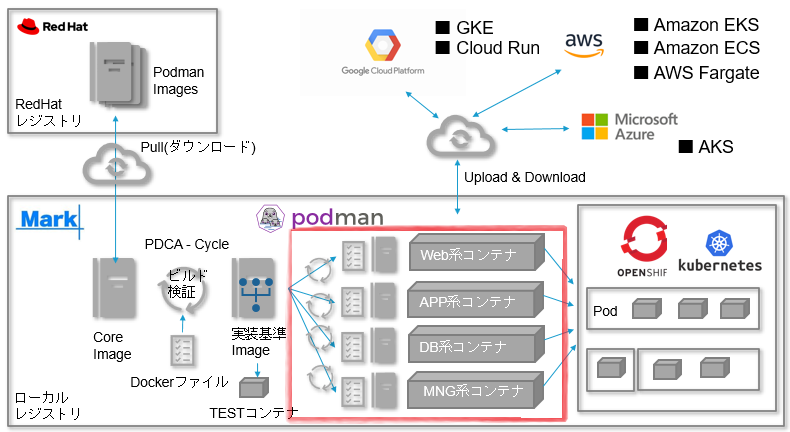
各種(Web、APP、DB、運用)機能を持ったコンテナの設計、構築、テスト、運用についてブログ形式を用いて記載していきます。
最強最速のコンテナ環境を目指します(Tuned + NUMA)
評価&執筆中
広告
Cisco Catalyst 備忘録
初回の儀( ローカル認証 + SSH 接続 )
consoleポートにシリアルケーブル接続して初期セットアップを行います。
最初からvlanインターフェース(vlan 700)を用い、ssh接続を設定します。
Switch> enable
Switch# terminal length 0
Switch# show license
Switch# show version
Switch# show sdm prefer
Switch# show run

Switch# configure terminal
Enter configuration commands, one per line.  End with CNTL/Z.

Switch(config)# no enable password
Switch(config)# enable secret XXXXXXXX

Switch(config)# hostname C2960-01

C2960-01(config)# service password-encryption
C2960-01(config)# ip domain-name mark-system.com
C2960-01(config)# ip name-server 192.168.1.1
C2960-01(config)# username XXXXX secret XXXXXXXX
C2960-01(config)# crypto key generate rsa
How many bits in the modulus [512]: 2048
% Generating 2048 bit RSA keys, keys will be non-exportable...
*Mar  2 02:20:40.427: %SSH-5-ENABLED: SSH 1.99 has been enabled


C2960-01(config)# ip ssh version 2

C2960-01(config)# line con 0
C2960-01(config-line)#
C2960-01(config-line)# line vty 0 4
C2960-01(config-line)# exec-timeout 240 0
C2960-01(config-line)# no password
C2960-01(config-line)# login local
C2960-01(config-line)# transport input ssh
C2960-01(config-line)# line vty 5 15
C2960-01(config-line)# exec-timeout 240 0
C2960-01(config-line)# no password
C2960-01(config-line)# login
C2960-01(config-line)# exit
C2960-01(config)# no aaa new-model
C2960-01(config)# exit


C2960-01# show ip ssh
SSH Enabled - version 2.0
Authentication timeout: 120 secs; Authentication retries: 3

C2960-01# show ssh
%No SSHv1 server connections running.
%No SSHv2 server connections running.


C2960-01# show vlan brief

VLAN Name                             Status    Ports
---- -------------------------------- --------- -------------------------------
1    default                          active    Gi0/1, Gi0/2, Gi0/3, Gi0/4                                                Gi0/5, Gi0/6, Gi0/7, Gi0/8
                                                Gi0/9, Gi0/10
1002 fddi-default                     act/unsup
1003 token-ring-default               act/unsup
1004 fddinet-default                  act/unsup
1005 trnet-default                    act/unsup

C2960-01# configure terminal
C2960-01(config)# ip access-list extended out-all-permit
C2960-01(config-ext-nacl)# permit ip any any
C2960-01(config-ext-nacl)# exit
C2960-01(config)# ip access-list extended in-all-permit
C2960-01(config-ext-nacl)# permit ip any any
C2960-01(config-ext-nacl)# exit
C2960-01(config)# ip access-list standard ntp-acl
C2960-01(config-ext-nacl)# permit any
C2960-01(config-ext-nacl)# exit

C2960-01(config)# interface Vlan1
C2960-01(config-if)# no ip address
C2960-01(config-if)# no ip route-cache
C2960-01(config-if)# shutdown
C2960-01(config-if)# exit

C2960-01(config)# vlan 700
C2960-01(config-vlan)# name MARK
C2960-01(config-vlan)# exit

C2960-01(config)# interface vlan 700
C2960-01(config-if)# ip address 192.168.1.254 255.255.255.0
C2960-01(config-if)# ip access-group in-all-permit in
C2960-01(config-if)# ip access-group out-all-permit out
C2960-01(config-if)# no ip address
C2960-01(config-if)# no ip route-cache
C2960-01(config-if)# no shutdown
C2960-01(config-if)# exit

C2960-01(config)# interface GigabitEthernet0/10
C2960-01(config-if)# switchport access vlan 700
C2960-01(config-if)# switchport mode access
C2960-01(config-if)# logging event link-status
C2960-01(config-if)# spanning-tree bpduguard enable
C2960-01(config-if)# spanning-tree guard root
C2960-01(config-if)# exit

C2960-01(config)# clock timezone JST 9
C2960-01(config)# ntp server 133.243.238.163 source Vlan 700
C2960-01(config)# ntp server 133.243.238.164 prefer source Vlan 700
C2960-01(config)# ntp access-group peer ntp-acl

C2960-01(config)# service timestamps debug datetime msec localtime show-timezone
C2960-01(config)# service timestamps log datetime msec localtime show-timezone
C2960-01(config)# logging buffered 512000 debugging
C2960-01(config)# logging console debugging
C2960-01(config)# logging trap debugging
C2960-01(config)# no logging console

C2960-01(config)# ip default-gateway 192.168.1.1
C2960-01(config)# ip route 0.0.0.0 0.0.0.0 192.168.1.1

C2960-01(config)#exit

C2960-01# terminal length 0
C2960-01# show run
C2960-01# show version

C2960-01# clock set 11:23:00 21 Nov 2021
C2960-01# show ntp associations

  address         ref clock       st   when   poll reach  delay  offset   disp
+~133.243.238.163 .NICT.           1     45     64   377  9.121  66.594  4.155
*~133.243.238.164 .NICT.           1     41     64   377  9.036  65.111  3.133
 * sys.peer, # selected, + candidate, - outlyer, x falseticker, ~ configured

C2960-01# copy running-config startup-config
C2960-01# show archive config differences
!
!Contextual Config Diffs:
!No changes were found

C2960-01# exit
「WS-C3560-8PC」などのL3SWの場合、以下も追記することでデフォルトゲートウェイ(default gateway)が有効になります。
また、「WS-C2960CG-8TC-L」などのL2SWの場合は、「IOSのバージョンアップ」、「SDMテンプレートの変更(lanbase-routing)」により、以下の実行が必要になります。
C3560-01(config)# ip routing
C3560-01(config)# ip route 0.0.0.0 0.0.0.0 192.168.1.1
IOSアップデート
ciscoのページからIOSイメージが入った「tarファイル」をダウンロードします。
下記の例で使ったアップデートファイル:c2960c405ex-universalk9-tar.152-2a.E1.tartftpサーバ「tftpd64」をPC(例: 192.168.1.14)にインストールします。
以下のコマンドを実行します。
C2960-01# archive download-sw /leave-old-sw tftp://192.168.1.14/c2960c405ex-universalk9-tar.152-2a.E1.tar

Loading c2960c405ex-universalk9-tar.152-2a.E1.tar from 192.168.1.14 (via Vlan700): !!!!!!!!!!!!!!!!!!!!!!!!!!!!!!!!!!!!!!!!!!!!!!!!!!!!!!!!!!!!!!!!!!!!!!!!!!!!!!!!!!!!!
[OK - 21514240 bytes]

Loading c2960c405ex-universalk9-tar.152-2a.E1.tar from 192.168.1.14 (via Vlan700): !!!!!!!!!!!!!!!!!!!!!!!!!!!!!!!!!!!!!!!!!!!!!!!!!!!!!!!!!!!!!!!!!!!!!!!!!!!!!!!!!!!!!
examining image...
extracting info (115 bytes)
extracting c2960c405ex-universalk9-mz.152-2a.E1/info (370 bytes)
extracting info (115 bytes)

System Type:             0x00020000
  Ios Image File Size:   0x00FCD200
  Total Image File Size: 0x01482200
  Minimum Dram required: 0x08000000
  Image Suffix:          universalk9-152-2a.E1
  Image Directory:       c2960c405ex-universalk9-mz.152-2a.E1
  Image Name:            c2960c405ex-universalk9-mz.152-2a.E1.bin
  Image Feature:         IP|LAYER_2|SSH|3DES|MIN_DRAM_MEG=128

Old image for switch 1: unknown

Extracting images from archive into flash...
c2960c405ex-universalk9-mz.152-2a.E1/ (directory)
extracting c2960c405ex-universalk9-mz.152-2a.E1/info (370 bytes)
extracting c2960c405ex-universalk9-mz.152-2a.E1/dc_default_profiles.txt (171988 bytes)
c2960c405ex-universalk9-mz.152-2a.E1/html/ (directory)
extracting c2960c405ex-universalk9-mz.152-2a.E1/html/ip.js (3500 bytes)
 :
 :
(省略)
 :
 :
extracting c2960c405ex-universalk9-mz.152-2a.E1/html/empty.htm (313 bytes)
extracting c2960c405ex-universalk9-mz.152-2a.E1/c2960c405ex-universalk9-mz.152-2a.E1.bin (16563200 bytes)
extracting info (115 bytes)

Installing (renaming): `flash:update/c2960c405ex-universalk9-mz.152-2a.E1' ->
                                       `flash:/c2960c405ex-universalk9-mz.152-2a.E1'
New software image installed in flash:/c2960c405ex-universalk9-mz.152-2a.E1


All software images installed.

C2960-01# show flash
Directory of flash:/

    2  -rwx         616   Mar 2 1993 11:33:49 +09:00  vlan.dat
  599  -rwx        2072   Mar 2 1993 12:04:42 +09:00  multiple-fs
  600  -rwx        1206   Mar 2 1993 12:04:06 +09:00  config.text
  601  -rwx        3566   Mar 2 1993 12:04:06 +09:00  private-config.text
  603  drwx         512   Mar 3 1993 14:40:35 +09:00  c2960c405ex-universalk9-mz.152-2a.E1
    3  drwx         512   Mar 3 1993 14:40:36 +09:00  c2960c405ex-universalk9-mz.122-55.EX2

57931776 bytes total (20858368 bytes free)
C2960-01# reload

System configuration has been modified. Save? [yes/no]:
Building configuration...
[OK]
Proceed with reload? [confirm]
フラッシュメモリが枯渇している場合、上書きモード(/overwrite)を使用します。
archive download-sw /overwrite tftp://192.168.1.15/c3560-ipbasek9-tar.150-2.SE11.tarreload後はIOSのバージョンを確認します。
WS-C2960CG-8TC-L
C2960-01# show version
Cisco IOS Software, C2960C Software (C2960c405ex-UNIVERSALK9-M), Version 15.2(2a)E1, RELEASE SOFTWARE (fc1)
Technical Support: http://www.cisco.com/techsupport
Copyright (c) 1986-2014 by Cisco Systems, Inc.
Compiled Wed 10-Dec-14 11:02 by prod_rel_team

ROM: Bootstrap program is C2960C boot loader
BOOTLDR: C2960C Boot Loader (C2960C-HBOOT-M) Version 12.2(55r)EX11, RELEASE SOFTWARE (fc1)

C2960-01 uptime is 2 minutes
System returned to ROM by power-on
System restarted at 10:27:15 JST Wed Mar 30 2011
System image file is "flash:/c2960c405ex-universalk9-mz.152-2a.E1/c2960c405ex-universalk9-mz.152-2a.E1.bin"
Last reload reason: Unknown reason


This product contains cryptographic features and is subject to United
States and local country laws governing import, export, transfer and
use. Delivery of Cisco cryptographic products does not imply
third-party authority to import, export, distribute or use encryption.

C2960-01#
WS-C3560-8PC
C3560-01#show version
Cisco IOS Software, C3560 Software (C3560-IPBASEK9-M), Version 15.0(2)SE11, RELEASE SOFTWARE (fc3)
Technical Support: http://www.cisco.com/techsupport
Copyright (c) 1986-2017 by Cisco Systems, Inc.
Compiled Sat 19-Aug-17 09:21 by prod_rel_team

ROM: Bootstrap program is C3560 boot loader
BOOTLDR: C3560 Boot Loader (C3560-HBOOT-M) Version 12.2(35r)SE2, RELEASE SOFTWARE (fc1)

C3560-01 uptime is 3 minutes
System returned to ROM by power-on
System image file is "flash:c3560-ipbasek9-mz.150-2.SE11/c3560-ipbasek9-mz.150-2.SE11.bin"


This product contains cryptographic features and is subject to United
States and local country laws governing import, export, transfer and
use. Delivery of Cisco cryptographic products does not imply
third-party authority to import, export, distribute or use encryption.
Importers, exporters, distributors and users are responsible for
compliance with U.S. and local country laws. By using this product you
agree to comply with applicable laws and regulations. If you are unable
to comply with U.S. and local laws, return this product immediately.

A summary of U.S. laws governing Cisco cryptographic products may be found at:
http://www.cisco.com/wwl/export/crypto/tool/stqrg.html

If you require further assistance please contact us by sending email to
export@cisco.com.

cisco WS-C3560-8PC (PowerPC405) processor (revision F0) with 131072K bytes of memory.
Processor board ID FOC1427W3JW
Last reset from power-on
9 Virtual Ethernet interfaces
8 FastEthernet interfaces
1 Gigabit Ethernet interface
The password-recovery mechanism is enabled.

512K bytes of flash-simulated non-volatile configuration memory.
Base ethernet MAC Address       : D0:57:4C:C0:AA:00
Motherboard assembly number     : 73-10612-09
Power supply part number        : 341-0207-01
Motherboard serial number       : FOC1427057W
Power supply serial number      : LIT14130LHM
Model revision number           : F0
Motherboard revision number     : A0
Model number                    : WS-C3560-8PC-S
System serial number            : FOC1427W3JW
Top Assembly Part Number        : 800-28131-04
Top Assembly Revision Number    : A0
Version ID                      : V04
CLEI Code Number                : COML900ARA
Hardware Board Revision Number  : 0x01


Switch Ports Model              SW Version            SW Image
------ ----- -----              ----------            ----------
*    1 9     WS-C3560-8PC       15.0(2)SE11           C3560-IPBASEK9-M


Configuration register is 0xF
SDMテンプレートの変更
テンプレートを「default」から「lanbase-routing」に変更し、L2SWに「ルーティング(routing)」機能を持たせます。
WS-C2960CG-8TC-L
C2960-01#show sdm prefer
 The current template is "default" template.
 The selected template optimizes the resources in
 the switch to support this level of features for
 0 routed interfaces and 255 VLANs.

  number of unicast mac addresses:                  8K
  number of IPv4 IGMP groups + multicast routes:    0.25K
  number of IPv4 unicast routes:                    0.375k
    number of directly-connected IPv4 hosts:        0.375k
    number of indirect IPv4 routes:                 0
  number of IPv6 multicast groups:                  0.25K
  number of IPv6 unicast routes:                    0.25K
    number of directly-connected IPv6 addresses:    0.25K
    number of indirect IPv6 unicast routes:         0
  number of IPv4 policy based routing aces:         0
  number of IPv4/MAC qos aces:                      0.375k
  number of IPv4/MAC security aces:                 0.375k
  number of IPv6 policy based routing aces:         0
  number of IPv6 qos aces:                          60
  number of IPv6 security aces:                     0.125k

C2960-01# conf t

C2960-01(config)#sdm prefer ?
  default          Default bias
  lanbase-routing  Supports both IPv4 and IPv6 Static Routing

C2960-01(config)# sdm prefer lanbase-routing

Changes to the running SDM preferences have been stored, but cannot take effect
until the next reload.
Use 'show sdm prefer' to see what SDM preference is currently active.
C2960-01(config)# reload

System configuration has been modified. Save? [yes/no]: yes
Building configuration...
[OK]
Proceed with reload? [confirm]
WS-C3560-8PC
C3560-01(config)#sdm prefer ?
  access              Access bias
  default             Default bias
  dual-ipv4-and-ipv6  Support both IPv4 and IPv6
  routing             Unicast bias
  vlan                VLAN bias
変更確認 WS-C2960CG-8TC-L
reload後に変更を確認します。
C2960-01# show sdm prefer
 The current template is "lanbase-routing" template.
 The selected template optimizes the resources in
 the switch to support this level of features for
 0 routed interfaces and 255 VLANs.

  number of unicast mac addresses:                  4K
  number of IPv4 IGMP groups + multicast routes:    0.25K
  number of IPv4 unicast routes:                    0.875k
    number of directly-connected IPv4 hosts:        0.875k
    number of indirect IPv4 routes:                 16
  number of IPv6 multicast groups:                  0.25K
  number of IPv6 unicast routes:                    0.75K
    number of directly-connected IPv6 addresses:    0.75K
    number of indirect IPv6 unicast routes:         16
  number of IPv4 policy based routing aces:         0
  number of IPv4/MAC qos aces:                      0.375k
  number of IPv4/MAC security aces:                 0.375k
  number of IPv6 policy based routing aces:         0
  number of IPv6 qos aces:                          0.125k
  number of IPv6 security aces:                     0.25K

C2960-01#conf t
Enter configuration commands, one per line.  End with CNTL/Z.
C2960-01(config)#ip routing
C2960-01(config)#ip route 0.0.0.0 0.0.0.0 192.168.1.1
C2960-01(config)#exit
C2960-01#show ip route
Codes: L - local, C - connected, S - static, R - RIP, M - mobile, B - BGP
       D - EIGRP, EX - EIGRP external, O - OSPF, IA - OSPF inter area
       N1 - OSPF NSSA external type 1, N2 - OSPF NSSA external type 2
       E1 - OSPF external type 1, E2 - OSPF external type 2
       i - IS-IS, su - IS-IS summary, L1 - IS-IS level-1, L2 - IS-IS level-2
       ia - IS-IS inter area, * - candidate default, U - per-user static route
       o - ODR, P - periodic downloaded static route, H - NHRP, l - LISP
       + - replicated route, % - next hop override

Gateway of last resort is 192.168.1.1 to network 0.0.0.0

S*    0.0.0.0/0 [1/0] via 192.168.1.1
      192.168.1.0/24 is variably subnetted, 2 subnets, 2 masks
C        192.168.1.0/24 is directly connected, Vlan700
L        192.168.1.254/32 is directly connected, Vlan700
変更確認 WS-C3560-8PC
reload後に変更を確認します。
C3560-01#show sdm prefer
 The current template is "desktop routing" template.
 The selected template optimizes the resources in
 the switch to support this level of features for
 8 routed interfaces and 1024 VLANs.

  number of unicast mac addresses:                  3K
  number of IPv4 IGMP groups + multicast routes:    1K
  number of IPv4 unicast routes:                    11K
    number of directly-connected IPv4 hosts:        3K
    number of indirect IPv4 routes:                 8K
  number of IPv6 multicast groups:                  0
  number of IPv6 unicast routes:                    0
    number of directly-connected IPv6 addresses:    0
    number of indirect IPv6 unicast routes:         0
  number of IPv4 policy based routing aces:         0.5K
  number of IPv4/MAC qos aces:                      0.5K
  number of IPv4/MAC security aces:                 1K
  number of IPv6 policy based routing aces:         0
  number of IPv6 qos aces:                          20
  number of IPv6 security aces:                     25
ログイン後の決まり文句
C3560-01> enable
Password:
C3560-01# terminal length 0
C3560-01# show version
C3560-01# show archive config differences
C3560-01# show run
C3560-01# configure terminal
Enter configuration commands, one per line.  End with CNTL/Z.
  :
  :
  設定
  :
  :
C3560-01(config)# exit
C3560-01# show archive config differences
C3560-01# copy running-config startup-config
Destination filename [startup-config]?
Building configuration...
[OK]
C3560-01# show archive config differences
C3560-01# exit
vlan
VTP 透過モード(VTP がディセーブル)の場合、拡張範囲 VLAN(1006 ~ 4094)を使用できるが、変更せず。
vlan id 100~900を作成しました。
一覧表示
C3560-01# show vlan brief

追加・変更
C3560-01(config)# vlan 100
C3560-01(config-vlan)# name DMZ
C3560-01(config-vlan)# exit

削除
C3560-01(config)# no vlan 1000

変更確認
C3560-01# show vlan brief


VLAN Name                             Status    Ports
---- -------------------------------- --------- -------------------------------
1    default                          active    Fa0/1, Fa0/2, Fa0/3, Fa0/4
                                                Fa0/5, Fa0/6, Fa0/7, Fa0/8
100  DMZ                              active
200  FRONT                            active
300  APP                              active
400  DATA                             active
500  MNG                              active
600  BASTION                          active
700  MARK                             active
900  INTERNAL                         active
1002 fddi-default                     act/unsup
1003 token-ring-default               act/unsup
1004 fddinet-default                  act/unsup
1005 trnet-default                    act/unsup

C3560-01# show vlan id 100

VLAN Name                             Status    Ports
---- -------------------------------- --------- -------------------------------
100  DMZ                              active

VLAN Type  SAID       MTU   Parent RingNo BridgeNo Stp  BrdgMode Trans1 Trans2
---- ----- ---------- ----- ------ ------ -------- ---- -------- ------ ------
100  enet  100100     1500  -      -      -        -    -        0      0

Remote SPAN VLAN
----------------
Disabled

Primary Secondary Type              Ports
------- --------- ----------------- ------------------------------------------
vlan interface
VTP 透過モード(VTP がディセーブル)の場合、拡張範囲 VLAN(1006 ~ 4094)を使用できるが、変更せず。
C3560-01# conf t
Enter configuration commands, one per line.  End with CNTL/Z.
C3560-01(config)# ip routing
C3560-01(config)# interface vlan 100
C3560-01(config-if)# ip address 10.77.255.253 255.255.0.0
C3560-01(config-if)# no ip route-cache
C3560-01(config-if)# no ip redirects
C3560-01(config-if)# no shutdown
C3560-01(config-if)# exit
C3560-01(config)# no spanning-tree vlan 1,100,200,300,400,500,600,700,900
C3560-01(config)# exit

C3560-01# show interfaces status

Port      Name               Status       Vlan       Duplex  Speed Type
Fa0/1     ### Server:sumiko  connected    trunk      a-full  a-100 10/100BaseTX
Fa0/2     ### Server:sumiko  connected    trunk      a-full  a-100 10/100BaseTX
Fa0/3     ### Server:masao e connected    trunk      a-full  a-100 10/100BaseTX
Fa0/4     ### Server:masao e connected    trunk      a-full  a-100 10/100BaseTX
Fa0/5     ### Server:hana en connected    trunk      a-full  a-100 10/100BaseTX
Fa0/6     ### Server:hana en connected    trunk      a-full  a-100 10/100BaseTX
Fa0/7                        disabled     1            auto   auto 10/100BaseTX
Fa0/8                        disabled     1            auto   auto 10/100BaseTX
Gi0/1                        connected    700        a-full a-1000 10/100/1000BaseTX
Po11                         notconnect   unassigned   auto   auto
Po12                         connected    trunk      a-full  a-100
Po13                         notconnect   unassigned   auto   auto

C3560-01#show ip interface brief

Interface              IP-Address      OK? Method Status                Protocol
Vlan1                  unassigned      YES NVRAM  administratively down down
Vlan100                10.77.255.253   YES manual up                    up
Vlan200                10.78.255.253   YES manual up                    up
Vlan300                10.79.255.253   YES manual up                    up
Vlan400                10.80.255.253   YES manual up                    up
Vlan500                10.81.255.253   YES manual up                    up
Vlan600                10.82.255.253   YES manual up                    up
Vlan700                192.168.1.253   YES NVRAM  up                    up
Vlan900                10.90.255.253   YES manual up                    up
FastEthernet0/1        unassigned      YES unset  up                    up
FastEthernet0/2        unassigned      YES unset  up                    up
FastEthernet0/3        unassigned      YES unset  up                    up
FastEthernet0/4        unassigned      YES unset  up                    up
FastEthernet0/5        unassigned      YES unset  up                    up
FastEthernet0/6        unassigned      YES unset  up                    up
FastEthernet0/7        unassigned      YES unset  administratively down down
FastEthernet0/8        unassigned      YES unset  administratively down down
GigabitEthernet0/1     unassigned      YES unset  up                    up
Port-channel11         unassigned      YES unset  down                  down
Port-channel12         unassigned      YES unset  up                    up
Port-channel13         unassigned      YES unset  down                  down


C3560-01#show ip route
Codes: C - connected, S - static, R - RIP, M - mobile, B - BGP
       D - EIGRP, EX - EIGRP external, O - OSPF, IA - OSPF inter area
       N1 - OSPF NSSA external type 1, N2 - OSPF NSSA external type 2
       E1 - OSPF external type 1, E2 - OSPF external type 2
       i - IS-IS, su - IS-IS summary, L1 - IS-IS level-1, L2 - IS-IS level-2
       ia - IS-IS inter area, * - candidate default, U - per-user static route
       o - ODR, P - periodic downloaded static route

Gateway of last resort is not set

C    192.168.1.0/24 is directly connected, GigabitEthernet0/1
C3560-01#
Port Channel/Channel Group
対向機器は2台のRHELサーバです。
各サーバから2本のLANケーブルでチーミング(LACP)接続をしています。
C3560-01#conf t
Enter configuration commands, one per line.  End with CNTL/Z.

C3560-01(config-if)# interface FastEthernet0/1
C3560-01(config-if)# description ### Server:sumiko enp1s0f2 ###
C3560-01(config-if)# switchport trunk encapsulation dot1q
C3560-01(config-if)# switchport trunk allowed vlan 500,600,900
C3560-01(config-if)# switchport mode trunk
C3560-01(config-if)# spanning-tree bpduguard enable
C3560-01(config-if)# spanning-tree guard root
C3560-01(config-if)# no shutdown
C3560-01(config-if)# channel-group 11 mode active
Creating a port-channel interface Port-channel 11

C3560-01(config-if)# interface FastEthernet0/2
C3560-01(config-if)# description ### Server:sumiko enp1s0f3 ###
C3560-01(config-if)# switchport trunk encapsulation dot1q
C3560-01(config-if)# switchport trunk allowed vlan 500,600,900
C3560-01(config-if)# switchport mode trunk
C3560-01(config-if)# spanning-tree bpduguard enable
C3560-01(config-if)# spanning-tree guard root
C3560-01(config-if)# no shutdown
C3560-01(config-if)# channel-group 11 mode active

C3560-01(config-if)# interface FastEthernet0/3
C3560-01(config-if)# description ### Server:masao enp1s0f2 ###
C3560-01(config-if)# switchport trunk encapsulation dot1q
C3560-01(config-if)# switchport trunk allowed vlan 500,600,900
C3560-01(config-if)# switchport mode trunk
C3560-01(config-if)# spanning-tree bpduguard enable
C3560-01(config-if)# spanning-tree guard root
C3560-01(config-if)# no shutdown
C3560-01(config-if)# channel-group 12 mode active
Creating a port-channel interface Port-channel 12

C3560-01(config-if)# interface FastEthernet0/4
C3560-01(config-if)# description ### Server:masao enp1s0f3 ###
C3560-01(config-if)# switchport trunk encapsulation dot1q
C3560-01(config-if)# switchport trunk allowed vlan 500,600,900
C3560-01(config-if)# switchport mode trunk
C3560-01(config-if)# spanning-tree bpduguard enable
C3560-01(config-if)# spanning-tree guard root
C3560-01(config-if)# no shutdown
C3560-01(config-if)# channel-group 12 mode active
C3560-01(config-if)# exit
C3560-01(config)# exit

C3560-01# show interfaces status

Port      Name               Status       Vlan       Duplex  Speed Type
Fa0/1     ### Server:sumiko  connected    trunk      a-full  a-100 10/100BaseTX
Fa0/2     ### Server:sumiko  connected    trunk      a-full  a-100 10/100BaseTX
Fa0/3     ### Server:masao e connected    trunk      a-full  a-100 10/100BaseTX
Fa0/4     ### Server:masao e connected    trunk      a-full  a-100 10/100BaseTX
Fa0/5     ### Server:hana en connected    trunk      a-full  a-100 10/100BaseTX
Fa0/6     ### Server:hana en connected    trunk      a-full  a-100 10/100BaseTX
Fa0/7                        disabled     1            auto   auto 10/100BaseTX
Fa0/8                        disabled     1            auto   auto 10/100BaseTX
Gi0/1     ### Switch: C2960- connected    trunk      a-full a-1000 10/100/1000BaseTX
Po11      ### Server:sumiko  connected    trunk      a-full  a-100
Po12      ### Server:masao t connected    trunk      a-full  a-100
Po13      ### Server:hana te connected    trunk      a-full  a-100

C3560-01# show etherchannel summary

Flags:  D - down        P - bundled in port-channel
        I - stand-alone s - suspended
        H - Hot-standby (LACP only)
        R - Layer3      S - Layer2
        U - in use      f - failed to allocate aggregator

        M - not in use, minimum links not met
        u - unsuitable for bundling
        w - waiting to be aggregated
        d - default port


Number of channel-groups in use: 2
Number of aggregators:           2

Group  Port-channel  Protocol    Ports
------+-------------+-----------+-----------------------------------------------
11     Po11(SU)        LACP      Fa0/1(P)    Fa0/2(P)
12     Po12(SU)        LACP      Fa0/3(P)    Fa0/4(P)
13     Po13(SU)        LACP      Fa0/5(P)    Fa0/6(P)

C3560-01# show etherchannel 12 detail


Group state = L2
Ports: 2   Maxports = 16
Port-channels: 1 Max Port-channels = 16
Protocol:   LACP
Minimum Links: 0


                Ports in the group:
                -------------------
Port: Gi0/3
------------

Port state    = Up Mstr Assoc In-Bndl
Channel group = 12          Mode = Active          Gcchange = -
Port-channel  = Po12        GC   =   -             Pseudo port-channel = Po12
Port index    = 0           Load = 0x00            Protocol =   LACP

Flags:  S - Device is sending Slow LACPDUs   F - Device is sending fast LACPDUs.
        A - Device is in active mode.        P - Device is in passive mode.

Local information:
                            LACP port     Admin     Oper    Port        Port
Port      Flags   State     Priority      Key       Key     Number      State
Gi0/3     SA      bndl      32768         0xC       0xC     0x104       0x3D

Partner's information:

                  LACP port                        Admin  Oper   Port    Port
Port      Flags   Priority  Dev ID          Age    key    Key    Number  State
Gi0/3     SA      255       58c2.320d.7db0   3s    0x0    0x0    0x2     0x3D

Age of the port in the current state: 0d:00h:04m:59s

Port: Gi0/4
------------

Port state    = Up Cnt-bndl Suspend Not-in-Bndl
Channel group = 12          Mode = Active          Gcchange = -
Port-channel  = null        GC   =   -             Pseudo port-channel = Po12
Port index    = 0           Load = 0x00            Protocol =   LACP

Flags:  S - Device is sending Slow LACPDUs   F - Device is sending fast LACPDUs.
        A - Device is in active mode.        P - Device is in passive mode.

Local information:
                            LACP port     Admin     Oper    Port        Port
Port      Flags   State     Priority      Key       Key     Number      State
Gi0/4     SA      susp      32768         0xC       0x0     0x105       0x45

Age of the port in the current state: 0d:00h:04m:49s

Probable reason: speed of Gi0/4 is 100M, Gi0/3 is 1000M
                Port-channels in the group:
                ---------------------------

Port-channel: Po12    (Primary Aggregator)

------------

Age of the Port-channel   = 1d:01h:19m:44s
Logical slot/port   = 9/12          Number of ports = 1
HotStandBy port = null
Port state          = Port-channel Ag-Inuse
Protocol            =   LACP
Port security       = Disabled

Ports in the Port-channel:

Index   Load   Port     EC state        No of bits
------+------+------+------------------+-----------
  0     00     Gi0/3    Active             0

Time since last port bundled:    0d:00h:04m:59s    Gi0/3
Time since last port Un-bundled: 0d:00h:05m:10s    Gi0/3
PBR(ポリシーベース ルーティング)
IPBASEイメージでは、インターフェースに対する「ip policy route-map」コマンドを受け付けないという結果。雰囲気は以下の通りです。
時間があれば、IPSERVICEイメージを実装します。
EOLを迎えた機器で可能なのかな?
C3560-01# conf t
Enter configuration commands, one per line.  End with CNTL/Z.
C3560-01(config)# ip access-list extended v200-pbr
C3560-01(config-ext-nacl)# permit ip 10.78.0.0 0.0.255.255 192.168.1.0 0.0.0.255
C3560-01(config-ext-nacl)# exit
C3560-01(config)# exit

C3560-01# show access-lists

Standard IP access list ntp-acl
    10 permit any (310 matches)
Extended IP access list CMP-NAT-ACL
    10 Dynamic Cluster-HSRP deny   ip any any
    20 Dynamic Cluster-NAT permit ip any any
Extended IP access list in-all-permit
    10 permit ip any any (24486 matches)
Extended IP access list out-all-permit
    10 permit ip any any (6 matches)
Extended IP access list v200-pbr
    10 permit ip 10.78.0.0 0.0.255.255 192.168.1.0 0.0.0.255

C3560-01# conf t
Enter configuration commands, one per line.  End with CNTL/Z.
C3560-01(config)# route-map pbr-map1 permit
C3560-01(config-route-map)# match ip address v200-pbr
C3560-01(config-route-map)# set ip next-hop 192.168.1.1
C3560-01(config-route-map)# exit
C3560-01(config)# exit

C3560-01# show ip policy
Interface      Route map
local          pbr-map1

C3560-01# show route-map
route-map pbr-map1, permit, sequence 10
  Match clauses:
    ip address (access-lists): v200-pbr
  Set clauses:
    ip next-hop 192.168.1.1
  Policy routing matches: 20 packets, 2294 bytes

C3560-01# conf t
C3560-01(config)# ip local policy route-map pbr-map1
C3560-01(config)# interface vlan200
C3560-01(config-if)# ip policy route-map pbr-map1
                        ^
% Invalid input detected at '^' marker.

C3560-01(config-if)#
snmp、snmptrap
設定は以下の通りです。
C3560-01(config) snmp-server community mark01 RO
C3560-01(config) snmp-server host 10.81.0.103 version 2c mark01
C3560-01(config) snmp-server enable traps
syslog転送(logging)
設定は以下の通りです。
C3560-01(config) logging facility local5
C3560-01(config) logging host 10.81.0.103 transport tcp port 10514
show run-config
変更が発生した時点で書き換えます。
WS-C2960CG-8TC-L
C2960-01#show run
Building configuration...

Current configuration : 8459 bytes
!
! Last configuration change at 21:54:46 JST Tue Dec 28 2021 by (省略)
! NVRAM config last updated at 06:52:32 JST Tue Dec 28 2021 by (省略)
!
version 15.2
no service pad
service timestamps debug datetime msec localtime show-timezone
service timestamps log datetime msec localtime show-timezone
service password-encryption
!
hostname C2960-01
!
boot-start-marker
boot-end-marker
!
logging buffered 512000
no logging console
enable secret 5 (省略)
!
username (省略) secret 5 (省略)
no aaa new-model
clock timezone JST 9 0
ip routing
!
!
ip domain-name mark-system.com
ip name-server 192.168.1.1
!
!
!
!
!
!
!
crypto pki trustpoint TP-self-signed-2808284800
 enrollment selfsigned
 subject-name cn=IOS-Self-Signed-Certificate-2808284800
 revocation-check none
 rsakeypair TP-self-signed-2808284800
!
!
crypto pki certificate chain TP-self-signed-2808284800
 certificate self-signed 01
        (省略)
        quit
spanning-tree mode pvst
spanning-tree extend system-id
port-channel load-balance src-dst-ip
!
!
!
!
vlan internal allocation policy ascending
!
ip ssh version 2
ip scp server enable
!
!
!
!
!
!
!
!
!
!
interface Port-channel11
 description ### Server:sumiko team0 ###
 switchport trunk allowed vlan 100,200,300,400
 switchport mode trunk
!
interface Port-channel12
 description ### Server:masao team0 ###
 switchport trunk allowed vlan 100,200,300,400
 switchport mode trunk
!
interface Port-channel13
 description ### Server:hana team0 ###
 switchport trunk allowed vlan 100,200,300,400
 switchport mode trunk
!
interface GigabitEthernet0/1
 description ### Server:sumiko enp1s0f0 ###
 switchport trunk allowed vlan 100,200,300,400
 switchport mode trunk
 spanning-tree bpduguard enable
 spanning-tree guard root
 channel-group 11 mode active
!
interface GigabitEthernet0/2
 description ### Server:sumiko enp1s0f1 ###
 switchport trunk allowed vlan 100,200,300,400
 switchport mode trunk
 spanning-tree bpduguard enable
 spanning-tree guard root
 channel-group 11 mode active
!
interface GigabitEthernet0/3
 description ### Server:masao enp1s0f0 ###
 switchport trunk allowed vlan 100,200,300,400
 switchport mode trunk
 spanning-tree bpduguard enable
 spanning-tree guard root
 channel-group 12 mode active
!
interface GigabitEthernet0/4
 description ### Server:masao enp1s0f1 ###
 switchport trunk allowed vlan 100,200,300,400
 switchport mode trunk
 spanning-tree bpduguard enable
 spanning-tree guard root
 channel-group 12 mode active
!
interface GigabitEthernet0/5
 description ### Server:hana enp3s0f0 ###
 switchport trunk allowed vlan 100,200,300,400
 switchport mode trunk
 spanning-tree bpduguard enable
 spanning-tree guard root
 channel-group 13 mode active
!
interface GigabitEthernet0/6
 description ### Server:hana enp3s0f1 ###
 switchport trunk allowed vlan 100,200,300,400
 switchport mode trunk
 spanning-tree bpduguard enable
 spanning-tree guard root
 channel-group 13 mode active
!
interface GigabitEthernet0/7
 shutdown
!
interface GigabitEthernet0/8
 shutdown
!
interface GigabitEthernet0/9
 description ### Switch: 9400-02 G0/7 ###
 switchport access vlan 700
 switchport mode access
!
interface GigabitEthernet0/10
 description ### Switch: C2960-02 G0/10 ###
 switchport trunk allowed vlan 100,200,300,400,500,600,900
 switchport mode trunk
!
interface Vlan1
 no ip address
 no ip redirects
 no ip route-cache
 shutdown
!
interface Vlan100
 description ### DMZ ###
 ip address 10.77.255.251 255.255.0.0
 no ip redirects
 no ip route-cache
!
interface Vlan200
 description ### FRONT ###
 ip address 10.78.255.251 255.255.0.0
 no ip redirects
 no ip route-cache
!
interface Vlan300
 description ### APP ###
 ip address 10.79.255.251 255.255.0.0
 no ip redirects
 no ip route-cache
!
interface Vlan400
 description ### DATA ###
 ip address 10.80.255.251 255.255.0.0
 no ip redirects
 no ip route-cache
!
interface Vlan500
 description ### MNG ###
 ip address 10.81.255.251 255.255.0.0
 no ip redirects
 no ip route-cache
!
interface Vlan600
 description ### BASTION ###
 ip address 10.82.255.251 255.255.0.0
 no ip redirects
 no ip route-cache
!
interface Vlan700
 description ### MARK ###
 ip address 192.168.1.251 255.255.255.0
 ip access-group in-all-permit in
 ip access-group out-all-permit out
 no ip redirects
 no ip route-cache
!
interface Vlan900
 description ### INTERNAL ###
 ip address 10.90.255.251 255.255.0.0
 no ip redirects
 no ip route-cache
!
ip default-gateway 192.168.1.1
no ip http server
no ip http secure-server
!
ip route 0.0.0.0 0.0.0.0 192.168.1.1
!
ip access-list standard ntp-acl
 permit any
!
ip access-list extended in-all-permit
 permit ip any any
ip access-list extended out-all-permit
 permit ip any any
logging facility local5
logging host 10.81.0.103 transport tcp port 10514
!
snmp-server community mark01 RO
snmp-server enable traps snmp authentication linkdown linkup coldstart warmstart
snmp-server enable traps transceiver all
snmp-server enable traps call-home message-send-fail server-fail
snmp-server enable traps tty
snmp-server enable traps license
snmp-server enable traps auth-framework sec-violation
snmp-server enable traps cluster
snmp-server enable traps config-copy
snmp-server enable traps config
snmp-server enable traps config-ctid
snmp-server enable traps trustsec-sxp conn-srcaddr-err msg-parse-err conn-config-err binding-err conn-up conn-down binding-expn-fail oper-nodeid-change binding-conflict
snmp-server enable traps energywise
snmp-server enable traps fru-ctrl
snmp-server enable traps entity
snmp-server enable traps event-manager
snmp-server enable traps ike policy add
snmp-server enable traps ike policy delete
snmp-server enable traps ike tunnel start
snmp-server enable traps ike tunnel stop
snmp-server enable traps ipsec cryptomap add
snmp-server enable traps ipsec cryptomap delete
snmp-server enable traps ipsec cryptomap attach
snmp-server enable traps ipsec cryptomap detach
snmp-server enable traps ipsec tunnel start
snmp-server enable traps ipsec tunnel stop
snmp-server enable traps ipsec too-many-sas
snmp-server enable traps power-ethernet police
snmp-server enable traps cpu threshold
snmp-server enable traps rep
snmp-server enable traps vstack
snmp-server enable traps bridge newroot topologychange
snmp-server enable traps stpx inconsistency root-inconsistency loop-inconsistency
snmp-server enable traps syslog
snmp-server enable traps vtp
snmp-server enable traps vlancreate
snmp-server enable traps vlandelete
snmp-server enable traps flash insertion removal
snmp-server enable traps port-security
snmp-server enable traps envmon fan shutdown supply temperature status
snmp-server enable traps stackwise
snmp-server enable traps bulkstat collection transfer
snmp-server enable traps errdisable
snmp-server enable traps mac-notification change move threshold
snmp-server enable traps vlan-membership
snmp-server host 10.81.0.103 version 2c mark01
!
!
line con 0
line vty 0 4
 exec-timeout 240 0
 login local
 transport input ssh
line vty 5 15
 exec-timeout 240 0
 login
!
ntp access-group peer ntp-acl
ntp server 133.243.238.163 source Vlan700
ntp server 133.243.238.164 prefer source Vlan700
end
C2960-02#show run
Building configuration...
Current configuration : 8480 bytes
!
! Last configuration change at 21:53:58 JST Tue Dec 28 2021 by (省略)
! NVRAM config last updated at 06:57:56 JST Tue Dec 28 2021 by (省略)
!
version 15.2
no service pad
service timestamps debug datetime msec localtime show-timezone
service timestamps log datetime msec localtime show-timezone
service password-encryption
!
hostname C2960-02
!
boot-start-marker
boot-end-marker
!
logging buffered 512000
no logging console
enable secret 5 (省略)
!
username (省略) secret 5 (省略)
no aaa new-model
clock timezone JST 9 0
ip routing
!
!
ip domain-name mark-system.com
ip name-server 192.168.1.1
!
!
!
!
!
!
!
crypto pki trustpoint TP-self-signed-808983168
enrollment selfsigned
subject-name cn=IOS-Self-Signed-Certificate-808983168
revocation-check none
rsakeypair TP-self-signed-808983168
!
!
crypto pki certificate chain TP-self-signed-808983168
certificate self-signed 01
(省略)
quit
spanning-tree mode pvst
spanning-tree extend system-id
port-channel load-balance src-dst-ip
!
!
!
!
vlan internal allocation policy ascending
!
ip ssh version 2
!
!
!
!
!
!
!
!
!
!
interface Port-channel11
description ### Server:sumiko team1 ###
switchport trunk allowed vlan 500,600,900
switchport mode trunk
!
interface Port-channel12
description ### Server:masao team1 ###
switchport trunk allowed vlan 500,600,900
switchport mode trunk
!
interface Port-channel13
description ### Server:hana team1 ###
switchport trunk allowed vlan 500,600,900
switchport mode trunk
!
interface GigabitEthernet0/1
description ### Server:sumiko enp1s0f2 ###
switchport trunk allowed vlan 500,600,900
switchport mode trunk
spanning-tree bpduguard enable
spanning-tree guard root
channel-group 11 mode active
!
interface GigabitEthernet0/2
description ### Server:sumiko enp1s0f3 ###
switchport trunk allowed vlan 500,600,900
switchport mode trunk
spanning-tree bpduguard enable
spanning-tree guard root
channel-group 11 mode active
!
interface GigabitEthernet0/3
description ### Server:masao enp1s0f2 ###
switchport trunk allowed vlan 500,600,900
switchport mode trunk
spanning-tree bpduguard enable
spanning-tree guard root
channel-group 12 mode active
!
interface GigabitEthernet0/4
description ### Server:masao enp1s0f3 ###
switchport trunk allowed vlan 500,600,900
switchport mode trunk
spanning-tree bpduguard enable
spanning-tree guard root
channel-group 12 mode active
!
interface GigabitEthernet0/5
description ### Server:hana enp4s0f0 ###
switchport trunk allowed vlan 500,600,900
switchport mode trunk
spanning-tree bpduguard enable
spanning-tree guard root
channel-group 13 mode active
!
interface GigabitEthernet0/6
description ### Server:hana enp4s0f1 ###
switchport trunk allowed vlan 500,600,900
switchport mode trunk
spanning-tree bpduguard enable
spanning-tree guard root
channel-group 13 mode active
!
interface GigabitEthernet0/7
shutdown
!
interface GigabitEthernet0/8
shutdown
!
interface GigabitEthernet0/9
description ### Switch: 9400-02 G0/6 ###
switchport access vlan 700
switchport mode access
!
interface GigabitEthernet0/10
description ### Switch: C2960-01 G0/10 ###
switchport trunk allowed vlan 100,200,300,400,500,600,900
switchport mode trunk
!
interface Vlan1
no ip address
no ip redirects
no ip route-cache
shutdown
!
interface Vlan100
description ### DMZ ###
ip address 10.77.255.252 255.255.0.0
no ip redirects
no ip route-cache
!
interface Vlan200
description ### FRONT ###
ip address 10.78.255.252 255.255.0.0
no ip redirects
no ip route-cache
!
interface Vlan300
description ### APP ###
ip address 10.79.255.252 255.255.0.0
no ip redirects
no ip route-cache
!
interface Vlan400
description ### DATA ###
ip address 10.80.255.252 255.255.0.0
no ip redirects
no ip route-cache
!
interface Vlan500
description ### MNG ###
ip address 10.81.255.252 255.255.0.0
no ip redirects
no ip route-cache
!
interface Vlan600
description ### BASTION ###
ip address 10.82.255.252 255.255.0.0
no ip redirects
no ip route-cache
!
interface Vlan700
description ### MARK ###
ip address 192.168.1.252 255.255.255.0
ip access-group in-all-permit in
ip access-group out-all-permit out
no ip redirects
no ip route-cache
!
interface Vlan900
description ### INTERNAL ###
ip address 10.90.255.252 255.255.0.0
no ip redirects
no ip route-cache
!
ip default-gateway 192.168.1.1
no ip http server
no ip http secure-server
!
ip route 0.0.0.0 0.0.0.0 192.168.1.1
!
ip access-list standard ntp-acl
permit any
!
ip access-list extended in-all-permit
permit ip any any
ip access-list extended out-all-permit
permit ip any any
logging facility local5
logging host 10.81.0.103 transport tcp port 10514
!
snmp-server community mark01 RO
snmp-server enable traps snmp authentication linkdown linkup coldstart warmstart
snmp-server enable traps transceiver all
snmp-server enable traps call-home message-send-fail server-fail
snmp-server enable traps tty
snmp-server enable traps license
snmp-server enable traps auth-framework sec-violation
snmp-server enable traps cluster
snmp-server enable traps config-copy
snmp-server enable traps config
snmp-server enable traps config-ctid
snmp-server enable traps trustsec-sxp conn-srcaddr-err msg-parse-err conn-config-err binding-err conn-up conn-down binding-expn-fail oper-nodeid-change binding-conflict
snmp-server enable traps energywise
snmp-server enable traps fru-ctrl
snmp-server enable traps entity
snmp-server enable traps event-manager
snmp-server enable traps ike policy add
snmp-server enable traps ike policy delete
snmp-server enable traps ike tunnel start
snmp-server enable traps ike tunnel stop
snmp-server enable traps ipsec cryptomap add
snmp-server enable traps ipsec cryptomap delete
snmp-server enable traps ipsec cryptomap attach
snmp-server enable traps ipsec cryptomap detach
snmp-server enable traps ipsec tunnel start
snmp-server enable traps ipsec tunnel stop
snmp-server enable traps ipsec too-many-sas
snmp-server enable traps power-ethernet police
snmp-server enable traps cpu threshold
snmp-server enable traps rep
snmp-server enable traps vstack
snmp-server enable traps bridge newroot topologychange
snmp-server enable traps stpx inconsistency root-inconsistency loop-inconsistency
snmp-server enable traps syslog
snmp-server enable traps vtp
snmp-server enable traps vlancreate
snmp-server enable traps vlandelete
snmp-server enable traps flash insertion removal
snmp-server enable traps port-security
snmp-server enable traps envmon fan shutdown supply temperature status
snmp-server enable traps stackwise
snmp-server enable traps bulkstat collection transfer
snmp-server enable traps errdisable
snmp-server enable traps mac-notification change move threshold
snmp-server enable traps vlan-membership
snmp-server host 10.81.0.103 version 2c mark01
!
!
line con 0
line vty 0 4
exec-timeout 240 0
login local
transport input ssh
line vty 5 15
exec-timeout 240 0
login
!
ntp access-group peer ntp-acl
ntp server 133.243.238.163 source Vlan700
ntp server 133.243.238.164 prefer source Vlan700
endWS-C3560-8PC
C3560-01#show run
Building configuration...

Current configuration : 8998 bytes
!
! Last configuration change at 00:22:37 JST Sun Dec 26 2021 by (省略)
! NVRAM config last updated at 00:22:48 JST Sun Dec 26 2021 by (省略)
!
version 15.0
no service pad
service timestamps debug datetime msec localtime show-timezone
service timestamps log datetime msec localtime show-timezone
service password-encryption
!
hostname C3560-01
!
boot-start-marker
boot-end-marker
!
logging buffered 512000
no logging console
enable secret 5 (省略)
!
username (省略)secret 5 (省略)
no aaa new-model
clock timezone JST 9 0
system mtu routing 1500
ip routing
ip domain-name mark-system.com
ip name-server 192.168.1.1
!
!
cluster enable C3560-CL 0
!
!
crypto pki trustpoint TP-self-signed-1287694848
 enrollment selfsigned
 subject-name cn=IOS-Self-Signed-Certificate-1287694848
 revocation-check none
 rsakeypair TP-self-signed-1287694848
!
!
crypto pki certificate chain TP-self-signed-1287694848
 certificate self-signed 01
(省略)
        quit
!
!
!
!
!
port-channel load-balance src-dst-ip
!
spanning-tree mode pvst
spanning-tree extend system-id
no spanning-tree vlan 1,100,200,300,400,500,600,700,900
!
vlan internal allocation policy ascending
!
ip ssh version 2
!
!
!
!
!
!
!
!
!
!
!
!
!
interface FastEthernet0/1
 switchport access vlan 700
 switchport mode access
 spanning-tree bpduguard enable
 spanning-tree guard root
!
interface FastEthernet0/2
 switchport access vlan 700
 switchport mode access
 spanning-tree bpduguard enable
 spanning-tree guard root
!
interface FastEthernet0/3
 switchport access vlan 700
 switchport mode access
 spanning-tree bpduguard enable
 spanning-tree guard root
!
interface FastEthernet0/4
 switchport access vlan 700
 switchport mode access
 spanning-tree bpduguard enable
 spanning-tree guard root
!
interface FastEthernet0/5
 switchport access vlan 700
 switchport mode access
 spanning-tree bpduguard enable
 spanning-tree guard root
!
interface FastEthernet0/6
 switchport access vlan 700
 switchport mode access
 spanning-tree bpduguard enable
 spanning-tree guard root
!
interface FastEthernet0/7
 switchport access vlan 700
 switchport mode access
 spanning-tree bpduguard enable
 spanning-tree guard root
!
interface FastEthernet0/8
 switchport access vlan 700
 switchport mode access
 spanning-tree bpduguard enable
 spanning-tree guard root
!
interface GigabitEthernet0/1
 description ### Switch: 9400-02 G0/8 ###
 switchport access vlan 700
 switchport mode access
 spanning-tree bpduguard enable
 spanning-tree guard root
!
interface Vlan1
 no ip address
 no ip route-cache
 shutdown
!
interface Vlan100
 description ### DMZ ###
 ip address 10.77.255.254 255.255.0.0
 no ip redirects
 no ip route-cache
!
interface Vlan200
 description ### FRONT ###
 ip address 10.78.255.254 255.255.0.0
 no ip redirects
 no ip route-cache
!
interface Vlan300
 description ### APP ###
 ip address 10.79.255.254 255.255.0.0
 no ip redirects
 no ip route-cache
!
interface Vlan400
 description ### DATA ###
 ip address 10.80.255.254 255.255.0.0
 no ip redirects
 no ip route-cache
!
interface Vlan500
 description ### MNG ###
 ip address 10.81.255.254 255.255.0.0
 no ip redirects
 no ip route-cache
!
interface Vlan600
 description ### BASTION ###
 ip address 10.82.255.254 255.255.0.0
 no ip redirects
 no ip route-cache
!
interface Vlan700
 description ### MARK ###
 ip address 192.168.1.254 255.255.255.0
 ip access-group in-all-permit in
 ip access-group out-all-permit out
 no ip redirects
 no ip route-cache
!
interface Vlan900
 description ### INTERNAL ###
 ip address 10.90.255.254 255.255.0.0
 no ip redirects
 no ip route-cache
!
ip local policy route-map pbr-map1
ip default-gateway 192.168.1.1
no ip http server
no ip http secure-server
!
ip route 0.0.0.0 0.0.0.0 192.168.1.1
ip route 10.77.0.0 255.255.0.0 192.168.1.251
ip route 10.78.0.0 255.255.0.0 192.168.1.251
ip route 10.79.0.0 255.255.0.0 192.168.1.251
ip route 10.80.0.0 255.255.0.0 192.168.1.251
ip route 10.81.0.0 255.255.0.0 192.168.1.252
ip route 10.82.0.0 255.255.0.0 192.168.1.252
ip route 10.90.0.0 255.255.0.0 192.168.1.252
!
ip access-list standard ntp-acl
 permit any
!
ip access-list extended in-all-permit
 permit ip any any
ip access-list extended out-all-permit
 permit ip any any
ip access-list extended v200-pbr
 permit ip 10.78.0.0 0.0.255.255 192.168.1.0 0.0.0.255
!
logging facility local5
logging host 10.81.0.103 transport tcp port 10514
route-map pbr-map1 permit 10
 match ip address v200-pbr
 set ip next-hop 192.168.1.1
!
snmp-server community mark01 RO
snmp-server enable traps snmp authentication linkdown linkup coldstart warmstart
snmp-server enable traps flowmon
snmp-server enable traps transceiver all
snmp-server enable traps call-home message-send-fail server-fail
snmp-server enable traps tty
snmp-server enable traps eigrp
snmp-server enable traps ospf state-change
snmp-server enable traps ospf errors
snmp-server enable traps ospf retransmit
snmp-server enable traps ospf lsa
snmp-server enable traps ospf cisco-specific state-change nssa-trans-change
snmp-server enable traps ospf cisco-specific state-change shamlink interface
snmp-server enable traps ospf cisco-specific state-change shamlink neighbor
snmp-server enable traps ospf cisco-specific errors
snmp-server enable traps ospf cisco-specific retransmit
snmp-server enable traps ospf cisco-specific lsa
snmp-server enable traps cluster
snmp-server enable traps fru-ctrl
snmp-server enable traps entity
snmp-server enable traps cpu threshold
snmp-server enable traps power-ethernet police
snmp-server enable traps rep
snmp-server enable traps vtp
snmp-server enable traps vlancreate
snmp-server enable traps vlandelete
snmp-server enable traps flash insertion removal
snmp-server enable traps port-security
snmp-server enable traps auth-framework sec-violation
snmp-server enable traps dot1x auth-fail-vlan guest-vlan no-auth-fail-vlan no-guest-vlan
snmp-server enable traps envmon fan shutdown supply temperature status
snmp-server enable traps event-manager
snmp-server enable traps cef resource-failure peer-state-change peer-fib-state-change inconsistency
snmp-server enable traps config-copy
snmp-server enable traps config
snmp-server enable traps config-ctid
snmp-server enable traps hsrp
snmp-server enable traps ipmulticast
snmp-server enable traps pim neighbor-change rp-mapping-change invalid-pim-message
snmp-server enable traps energywise
snmp-server enable traps vstack
snmp-server enable traps bridge newroot topologychange
snmp-server enable traps stpx inconsistency root-inconsistency loop-inconsistency
snmp-server enable traps syslog
snmp-server enable traps ipsla
snmp-server enable traps ike policy add
snmp-server enable traps ike policy delete
snmp-server enable traps ike tunnel start
snmp-server enable traps ike tunnel stop
snmp-server enable traps ipsec cryptomap add
snmp-server enable traps ipsec cryptomap delete
snmp-server enable traps ipsec cryptomap attach
snmp-server enable traps ipsec cryptomap detach
snmp-server enable traps ipsec tunnel start
snmp-server enable traps ipsec tunnel stop
snmp-server enable traps ipsec too-many-sas
snmp-server enable traps mac-notification change move threshold
snmp-server enable traps vlan-membership
snmp-server enable traps errdisable
snmp-server enable traps vrfmib vrf-up vrf-down vnet-trunk-up vnet-trunk-down
snmp-server host 10.81.0.103 version 2c mark01
!
vstack
!
line con 0
line vty 0 4
 exec-timeout 240 0
 login local
 transport input ssh
line vty 5 15
 exec-timeout 240 0
 login
!
ntp access-group peer ntp-acl
ntp server 133.243.238.163
ntp server 133.243.238.164 prefer
end